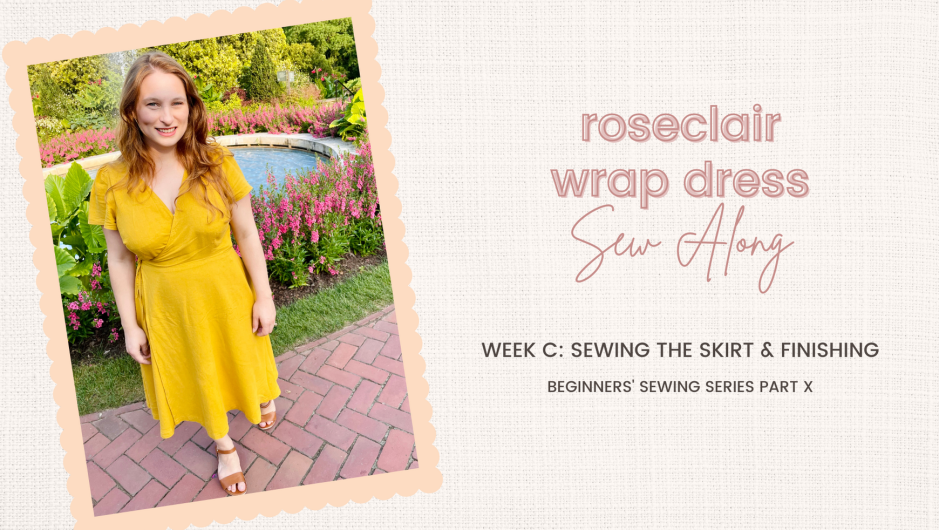
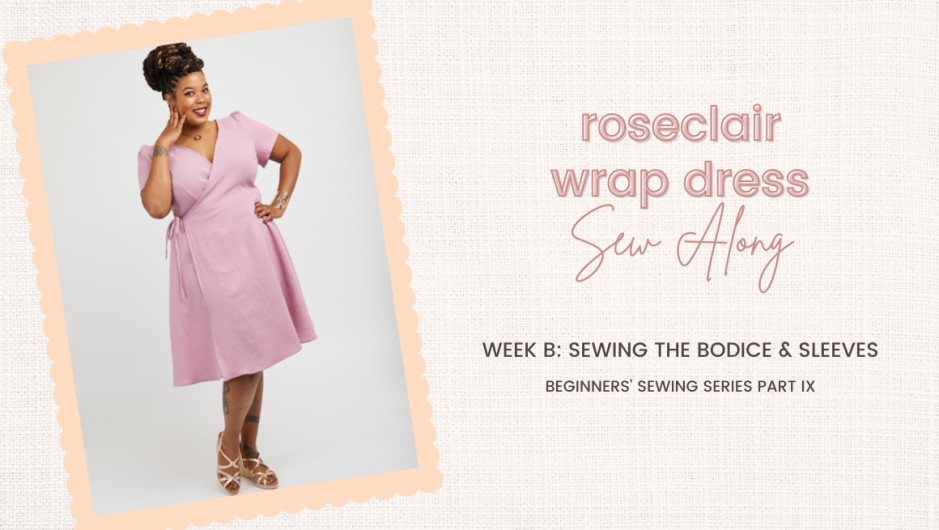
Roseclair Sew Along Week C: Sewing the Bodice & Sleeves (Beginners’ Sewing Series Part 10)

Brand new to sewing? Start here, with posts on gathering your toolstaking your measurements, and figuring out your garment sewing cup size. The Sew Busty Beginners’ Sewing Series will be your step-by-step guide to learning garment sewing. Each installment will build upon the last, getting progressively more advanced in skills and techniques. Catch up with the whole series here.

As part of the Beginners’ Sewing Series, we’re doing a sew along of the Cashmerette Roseclair Wrap Dress. Check out the full sew along here.

Per last week’s post, over the past week, you should have:

  • Marked and sewn your darts
  • Sewn and finished your shoulder seams
  • Sewn and finished your sleeve seam
  • Sewn your waist ties
  • Sewn and finished your side seams

Today, we’re going to sew up the skirt, attach it to the bodice, and do all the finishing touches!

Lindsie wears her yellow Roseclair wrap dress in the woods. Lindsie is a white woman with large boobs, and she has paired her mustard yellow wrap dress with a pair of brown sandals. She stands on a bark trail with trees in the background.

Sewing the Skirt

Your first step today is going to be to sew the skirt! To start off, you need to sew up your center back seam. Matching your two center back pieces, right sides together at the notches along the center back seam, pin.

I actually cut my center back along the fold. If I had done this correctly, by cutting it so it was 1/2″ (12 mm) inward at the center back, I wouldn’t have had to sew at all! But I forgot to trim the seam allowance when I cut on the fold, so I still needed to shave off that extra 1/2″ (12 mm) by sewing, or my skirt would have been a full inch too big!

Sew this seam at a 1/2″ (12 mm) seam allowance. Then, finish your seam by either pinking, serging, or zigzagging, as we discussed last week.

A skirt is pinned along the center back seam, right sides together

You’re going to do the exact same thing to attach the side skirt pieces to the back skirt: Pin the back skirt to the side skirts, right sides together, matching the notches. Sew at a 1/2″ (12 mm) seam allowance, then finish your seam:

Lindsie holds two notched pieces of fabric together so that their notches align
Lindsie shows a seam with a zigzag finish

Attaching Your Skirt to Your Bodice

You should now have a finished skirt! The next step is to attach it to the bodice.

With right sides of the bodice and skirt facing each other and matching the skirt’s center back seam with the bodice’s center back (which is a fold), pin. Then, pin at each of the notches. Fill in the rest of the seam with pins.

Now, you’re going to sew this seam at a 1/2″ (12 mm) seam allowance. When you do so, have your bodice on bottom. This is for similar reasons we discussed last week – your bodice is more curvy and will curve around the bottom of your sewing machine, while the skirt would try to bunch up if it were on bottom.

You now should have something that very nearly looks like a finished dress!

But you aren’t done 🙂

Finishing the Vertical Edge

You now need to finish all those pesky raw edges. We’ll tackle the vertical edge first.

First, fold that vertical edge in by 1/4″ (6 mm) and press. Now, fold it in by another 1/4″ (6 mm) and press. Do this on both sides.

Next, you need to sew this folded edge. I’m going to set my machine on a straight stitch, but with my needle 2 mm to the left. Then, I’m going to align my fabric so the folded edge is 1/4″ (6 mm) to the right of center, meaning that my stitching will be 8 mm inward from the folded edge:

You’ll end up with an edge that looks like this:

Creating Bias Tape

I thought a lot about whether to have y’all buy bias tape (a shortcut I often take) or, per the pattern instructions, make bias tape. Ultimately, I decided making bias tape isn’t all that hard, and it’s an important skill. Sometimes, you just can’t find pre-made bias tape that perfectly matches your fabric!

So, using the neckline tape pattern piece, you first need to place your two pieces perpendicular to each other, with right sides together and matching at a corner, like this:

Stick a pin through that, then sew from corner to corner, as shown here:

You’re now going to trim off that extra corner:

Now, at your ironing board, open this fold and press the little bit of seam allowance you left flat. You’ll be left with a long strip of fabric, all of which is on the bias!

Fold this long strip of fabric in half, with wrong sides together, and press.

Next, unfold your strip of fabric. Then, fold each raw end inwards, with wrong sides together, so it meets the center fold line and press. I like to do this one at a time, as I find it difficult to wrangle both raw edges at once:

If your bias tape is anything like mine, your center fold line has disappeared from the pressing of the other folds 😦 So we need to fold this in half and press again. You’ll then unfold the whole thing, revealing three fold lines:

You’ve made bias tape! We now need to finish each end of our bias tape. At each end, fold it back up, but fold the center line backward so that right sides are together:

Sew this at the very end to secure, trim the seam allowance, then flip this in on itself, so the short raw edge is inside all the folds:

Finishing the Neckline

We’re now going to use your me-made bias tape to finish the neckline!

With your bias tape unfolded, match the seam where you brought together your two pieces of neckline binding fabric with your center back fold at the neckline. Pin these two points together with right sides together. Working from this center point out, continue to pin your bias tape to your neckline, matching raw edges, until the entire neckline is covered. You will have extra bias tape on both sides.

Now, bring this to your sewing machine. Position your fabric so that your bias tape is on top. You should center your foot and your needle over the fold line closest to the edge of the fabric:

You do not need to finish this seam. Instead, you’re going trim the seam allowance a bit:

Then, double fold the bias tape up and press so that the seam allowance is on the same side of the seam as the bias tape. Head back to your sewing machine, and stitch about 2.5 mm inward from the fold along the entire bias tape – including the free-floating parts at the end of your neckline:

Your neckline and floating bias tape should now look like this – no raw edges to be seen:

You’re now going to flip that sewn edge under once more, and again sew at about 2.5 mm inward:

Finishing the Sleeves

Now, to finish the sleeves, which we left raw last week! You can either finish these sleeves in the way I describe here, or check out the pattern instructions to learn how to make them puffed!

At your ironing board, fold the edge of the sleeves inward, to the wrong side, 1/4″ (6 mm) and press. Fold inward another 1/4″ (6 mm) and press again.

Now, sew this. Again, I like to set my machine so my needle is 2.5 mm to the left, then align the fold with the center of my presser foot.

Almost Finished … Now, the Waiting Period

Okay, your dress is so close to being done. All you need to do is the hem. But here’s the thing: You need to hang that baby up and wait 24 hours (or at least overnight).

Why? Because you need to wait for the hem to drop. With woven fabric, gravity will pull different parts of the hem down unevenly. If you hem it now, before letting gravity do its work, you’re going to end up with an uneven hem. But if you wait 24 hours, or at least overnight, for gravity to do its thing before you hem, you can account for any unevenness in your hem by trimming it while it’s hanging (or better yet, having a friend or spouse trim it while you’re wearing it) so it will be even with wear.

Hemming Your Dress

Now, to hem! This is really subjective, as it sort of depends on the look you’re going for. Sometimes, I love to do really wide hems. Other times, I like something more narrow. This time, I went for in between.

The basic steps are the same regardless of how wide a hem you’re after: You need to fold your fabric to the inside twice, and you need to stitch it so both folds get captured in the seam.

I opted to fold my hem up 1/4″ (6 mm) for my first fold, then 1″ (about 2.5 cm) for my second:

Then, I stitched this with a 5/8″ (1.5 cm) seam allowance, so that my stitching would catch both layers of fabric.

All Done!

Now, try it on, snap a pic, and post with #sewbusty so I can see! I can’t wait to see your gorgeous Roseclairs!

Your Homework:

  • Sew your skirt together by sewing and finishing the center back seam and side seams
  • Attach your skirt to your bodice and finish that seam
  • Finish the vertical edges of your skirt
  • Make and attach bias tape to your neckline
  • Finish your sleeve edges
  • Hem your skirt
  • Take a picture and share with the community on instagram using #sewbustycommunity, or share on the Sew Busty Facebook group or subreddit!

Questions about this week’s steps for the Roseclair dress? Drop a comment below, or ask on the Sew Busty Facebook group or subreddit.

Roseclair Sew Along Week B: Sewing the Bodice & Sleeves (Beginners’ Sewing Series Part 9)

Brand new to sewing? Start here, with posts on gathering your toolstaking your measurements, and figuring out your garment sewing cup size. The Sew Busty Beginners’ Sewing Series will be your step-by-step guide to learning garment sewing. Each installment will build upon the last, getting progressively more advanced in skills and techniques. Catch up with the whole series here.

As part of the Beginners’ Sewing Series, we’re doing a sew along of the Cashmerette Roseclair Wrap Dress. Check out the full sew along here.

Per last week’s post, over the past week, you should have:

Today, we’re going to sew up the bodice, which means you’ll end up with something that looks sort of like a shirt at the end of the day! I’m really excited to introduce you to darts and to seam finishing for woven fabric today!

This month, I won’t be going over things like threading your machine, marking notches, or keeping yourself organized. But if you need a refresher on those topics, hop back to May’s Lago/Saybrook sew along, where I share all the deets on those points!

Getting Ready to Sew: Marking Notches & Darts

BEFORE YOU UNPIN YOUR PATTERN PIECES, we have a couple steps.

First, always start by marking your notches. On all your pattern pieces. Yes, even that one.

Trust me. I didn’t do this, and there were a couple pieces that I unpinned from the pattern, only to realize I hadn’t marked my notches 🤦‍♀️ Learn from my mistakes. Mark all your notches!!!

Second, we need to mark our darts. There are a lot of techniques to marking darts! Some people like to use tailor’s tacks, some like to use a tracing wheel. Well, this is how my mama taught me, so this is how I do it.

I first pierce the dart point using a pin, piercing through both layers of fabric:

Then, I flip my fabric over and use my fabric marking pen (water soluble side, not air soluble side, because I don’t want this marking to disappear before I’ve sewn my darts!) to make a dot where the pin is sticking out.

Then, I carefully flip my fabric back over, keeping the pin where it is. Now, I’m going to mark the ends of the dart legs:

Once I’ve done that, I’ll unpin the pattern from the fabric along the edge of the dart, leaving the dart point at the apex where it is! Then, I lift my pattern, revealing the pin at the dart point sticking into my top layer of fabric. I mark this point on this side:

Now I can remove this pin. I’ll repeat this process on all the other darts so that the front waist darts, front bust darts, and back waist darts are all marked. Only then do I completely remove my pattern pieces from my fabric.

My next step is to draw in the dart legs. Now, I don’t always draw in my dart legs, and if you are an intermediate-to-advanced sewist, you probably don’t need to do this step. But, for my beginner friends, I’d recommend doing this until you’re really confident you can sew a straight line without much guide. (Honestly, my spatial reasoning skills are so bad that even after 20+ years of sewing, I still often draw in my legs. It takes 2 seconds and ensures my darts will be straight.)

To draw in your dart legs, just use a ruler to connect your dart point to your leg ends – all of which you’ve marked at this point.

Do this on all of your darts. Your pattern pieces will now look like this:

Let’s talk a bit about what darts are: For your Lago or Saybrook tank, you didn’t have darts, because the stretch of the fabric will mold over your mounds. But, for woven fabrics, because they don’t stretch, we must add shaping to them. Enter darts. In this Advanced Fit Series post, Ann from Designer Stitch talks more about how darts shape around your boobies.

Staystitching

Okay, I’ll be honest with you. I always forget to stay stitch first. I dunno why, but my first inclination is always to get my darts sewn, and then I look at the directions only to realize OMG I WAS SUPPOSED TO STAYSTITCH.

But staystitching is super important on this particular pattern. Why? Because the wrap front is cut on the bias.

Staystitch. Bias. … Lindsie, you’re talking gibberish!

I know. It’s a lot of vocab all at once! Let’s break it down:

Bias: Remember when we talked about the grain and the cross-grain very briefly with the Lago/Saybrook sew along? As seen in the diagram below, the grain is parallel to the selvedge and the cross-grain is perpendicular to the selvedge.

The bias is the 45-degree angle between the grain and the cross-grain. As you’ll have seen when you cut your pattern, the neckline binding is cut at this angle.

Not only is the neckline binding cut on the bias, but so is the neckline, since the side seam is on the grain, and the neckline is at an angle from that.

Why does this matter? Because, on the grain and cross-grain, woven fabric doesn’t stretch. But, on the bias, you’ll notice that woven fabric has a tad bit of stretch. Unlike stretch/knit fabric, though, woven fabric, once stretched on the bias, doesn’t easily return to its unstretched state. (This is what we call recovery – many knit fabrics have excellent recovery.)

What we don’t want is for the neckline to stretch while we sew the other parts of the garment, leaving the neckline too long. So we staystitch. Which brings me to …

Staystitch: Staystitching is when we sew along the edge of fabric in order to prevent stretching. There’s nothing really special to it. I like to stitch 1/4″ from the edge of the fabric, because this then gets caught in the seam allowance and saves me the step of having to remove the staystitching later.

You want to stitch from the shoulder down to the end of the neckline. Here, you can see that I’ve staystitched the front neckline:

Once again, PLEASE pretend that my darts aren’t already sewn in this picture. Do as I say, not as I do! Staystitch first!

You also need to staystitch the back. Stitch from the shoulder to the center back, then again from the other shoulder to the center back.

Sewing the Darts

Our next step is to sew our darts. To do this, we must first fold and pin them. Here’s my process for that:

Pinning the darts

First, I put a pin through the dart point – going in, then back out of the fabric so my pin sticks out on the wrong side of the fabric.

Then, I pick the fabric up by holding that pin, and match the ends of the dart legs, like this:

Then, I start pinning my dart. As I pin, I flip the fabric over to ensure that my pin is aligning straight with my drawn dart legs on both sides:

At this point, I don’t worry too much about which direction my pins are facing. I find it easier to just get everything pinned and aligned, then worry about pin orientation later.

Once it’s all pinned, I’ll carefully re-pin, removing only one pin at a time, in order to get my pins such that they’ll be on the top, head toward me, when I sew from dart leg end to dart point with the bulk of my fabric to the left. You can see that I’ve adjusted my pin orientation in this picture:

stitching the darts

So the thing about darts, especially on busty bodies, is you don’t want to introduce a lot of bulk to the dart ends. Normally, when we sew a seam, we either lockstitch or backstitch at the beginning and end of the seam in order to secure that stitching. But, with darts, you don’t want to do this, because both lockstitching and backstitching cause bulk.

So what do we do instead? Reduce our stitch length, dramatically. I start my darts from the edge of the fabric, and I start with a 1 mm stitch length:

I align the center of my foot with the dart leg, as you can see in this picture, then I begin stitching.

Once I’ve stitched about, I dunno, 3/4″ to 1″ of the dart, I switch back to my standard straight stitch – 2.5 mm stitch length.

Then, once I’m about 3/4″ from the end of the dart, I switch back to the 1 mm stitch length.

Then, and this is very important, stitch right off the folded edge of your dart. Don’t stop sewing until your needle is no longer on fabric, as seen here:

At this point, you can cut your thread. Some people tie their thread ends here before snipping them, for extra security. I find that the 1 mm stitch length is enough security to keep everything in place.

Repeat these steps for all of your darts – the two bust darts, the two front waist darts, and the two back waist darts.

Pressing your darts

Set your iron temperature according to your fabric. I’m using linen, so I have mine on a pretty high heat. But, if you’re using any synthetic fabrics (polyester, rayon, etc.) or more delicate fabric (like silk), you’ll want to choose your heat setting accordingly.

So, in an ideal world, you’d have a boob ham and a tailor’s ham for pressing your darts. I’m almost ashamed to admit this, but I don’t have either. 🙃 But, y’know, you’re a beginner, so I’m guessing you don’t either. That’s okay! We’re going to channel our inner Tim Gunn and MAKE IT WORK.

My alternative to a ham is this balled up old t-shirt. Yeahhhh, it’s the same color as my Roseclair fabric. It’s my favorite color, what can I say?!

So you’re going to grab an old t-shirt and ball it up like a softball, just like this:

Then, you’re going to place those bust darts over this balled-up t-shirt, and press. Now, most tutorials will instruct you to press bust darts downward, so the extra fabric is toward the waist. Cashmerette, though, recommends the same thing I do: That you press your bust darts upward, so the extra fabric is toward the armscye (armhole). Why? Because it looks better on a large bust. Seriously.

Here’s my bust dart before pressing. See that dimple in the fabric?

And here it is after pressing. Dimple is gone! Pressing does wonders!

For the waist darts on the front and back of the bodice, we’ll press those toward the center of the dress. These darts are less curvy, so they can generally be done on the flat surface of your ironing board.

Tacking the bust darts

Now, this is a step I do that not everyone does, but I find it helps me a lot. My bust darts are HUGE, so I don’t want that extra fabric flapping around or threatening to go downward when I just pressed it up. So I tack the darts.

To do this, I first put my fabric back over my balled up t-shirt. Then, I pin the edge of the dart, as seen below. The reason I put the fabric over the t-shirt before pinning is that I want to ensure I’m allowing the dart fabric to curve around something, as it will lay differently that way than if it’s laid out flat. If I pin while it’s laid flat, I can end up with not enough fabric there, making it lay weird when on.

Now, I’m going to use a 5 mm long basting stitch to just tack the dart to the main fabric. I do this at 1/4″ from the edge, as this will be within my seam allowance. Once I have it tacked, I also trim the extra dart fabric, so that the dart is even with the edge of the main fabric:

Sewing the Shoulder Seams

We’re going to start sewing the pieces together! First, align your back bodice piece with your front bodice pieces along the shoulder seams, right sides of the fabric together, like this:

Then, we’re just going to pin those shoulder seams:

Now, to the sewing machine you go! Just use your standard 2.5 mm straight stitch, and sew at a 1/2″ seam allowance – that’s 1/2″ from the edge of the fabric. Lockstitch or backstitch at the beginning of your seam, and again at the end of your seam.

Seam Finishing Options

Now, here’s where things get interesting! On stretch knit fabrics, we don’t need to finish the edges of the fabric because knit fabrics don’t fray. Why? Remember how we talked about the difference between wovens and knits last week? Remember how knits are knitted, while wovens are woven? Well, this means that wovens will absolutely fray.

So we have to do something to prevent this. There are a few options. Some people LOVE to serge their fabric edges. Personally, I HATE my serger (and all sergers). It just feels like the machine is controlling things instead of me controlling things, and I don’t like it. Serging also requires an entirely separate machine, and for those beginners reading this as part of our Beginners’ Sewing Series, I’m assuming you probably don’t have a serger.

So here are some options for those who don’t have or don’t want to use a serger:

Pinked edges

I like to think of pinked edges as the old school way of doing things. Pinking is what my grandma and my mom used to finish seams. It’s also often the option I go for.

Pinking is simple. Using pinking shears (the kind meant for fabric; please don’t use the zigzag scissors meant for paper!), simply cut down the length of your seam allowance, leaving about 1/4″ seam allowance. Be very careful not to cut too close to your stitching, and be extra extra careful not to accidentally catch some of your main fabric in the shears. (I’ve done this enough times that I’ve now mostly switched to the next method I’m going to show you!)

Pinking your seams will prevent most fraying, but it won’t stop it entirely. It’ll just limit how much fraying you’ll see.

Zigzagging the edges

My current favorite method of seam finishing is zigzagging the edges, and this is what I’m going to do for the Roseclair.

For this option, simply switch your machine to its zigzag stitch, 4 mm wide by 3 mm long or so. (This is what my machine defaults to on zigzag.) Align your fabric edge so that the edge of your fabric is just shy of where the needle will go down at the outermost point in the zigzag. In other words, you’re going to be zigzagging off the edge. Sew down the entire length of the seam.

You’ll end up with something like this:

And that’s all there is to it! Finish both shoulder seams this way. Once they’re finished, press the seam allowance toward the back of the bodice.

Sewing the Sleeve

Time to move onto the sleeve! The first step on the sleeve is to sew two gathering stitches.

At the curve of the sleeve, you’ll see three notches. The center one marks the top of the sleeve. The two notches on either side of the center notch are to mark where to sew your gathering stitches.

To sew the gathering stitches, set your sewing machine on a long stitch length. I like 5 mm stitches, just like I’d use with basting, and I stitch at 1/4″ from the edge for my first pass, and then 3/8″ from the edge for the second pass. When you do this, make sure you keep your thread ends long on both sides.

I know it’s hard to see, but the sleeve ends up like this:

Now, you’re going to lay your sleeve on top of your bodice with right sides together, making sure that the double notch on the sleeve is on the same side of the center as the double notch on the bodice. The sleeve should be laid on top of the bulk of the fabric. I didn’t get a good picture, so let me give you this image from the Roseclair instructions.

You want to pin the sleeve to the bodice, matching the center notch to the shoulder seam. Then, you need to pull on one of the gathering stitch threads to gather up the fabric so that you can match the sleeve notches on either side of the center notch with the corresponding notches on the bodice.

I start by doing this on one side, then pinning the sleeve and bodice notches together:

Then, repeat this on the other side of the center notch. Add more pins to secure the gathered sleeve to the bodice:

Now, on the rest of the sleeve, match the notches with the bodice and pin. Then, continue matching the edge of the sleeve with the bodice fabric edge, pinning throughout the seam, ending up with this:

Now, we need to stitch this into place. Use a 1/2″ seam allowance and your standard straight stitch, lockstitching or backstitching at the beginning and end of the seam. Important: Sew this seam with the bodice fabric up, and the sleeve down. Why? Your sleeve will wrap around the end of your sewing machines and is less susceptible to getting bunched up under your needle. The bodice, on the other hand, is keen on bunching if it’s the lower fabric.

Repeat this process on the second sleeve. Finish the seam allowance as described above, by pinking, by zigzagging, or by using a serger. Then, press, the seam allowance toward the sleeve, being careful not to crush the gathers at the top of the sleeve.

And, from the outside, your sleeve will look like this:

Creating the Waist Ties

Now, don’t be like me and get super excited and jump right into sewing your side seams. Instead, you need to make your waist ties first!

Editor’s note: This is a great lesson in marking your pattern pieces when you cut your fabric! If you’re thinking that my waist ties look super wide, you’re right! I accidentally used the cuff piece (which I didn’t even need to cut, as it’s only for the long sleeve option) as my waist ties! The bonus? It’s a lot easier to see what I’m doing because the fabric is larger. But your waist ties should be longer and skinnier than mine!

pressing the waist ties

At your ironing board, press your first waist tie in half:

Now, unfold the waist tie, and press in the short edges by about 1/4″:

Now, fold each long end inward, just to the center fold line and press:

Re-fold on the center line and press once more:

Repeat the above process for the second waist tie.

sewing the waist ties

At your sewing machine, set your needle in the furthest right position and set your waist tie so its edge is just peeking out from under the edge of your foot:

The reason I do this is so I can get the stitching on my waist tie very close to the edge, but without my machine trying to eat my fabric. If I have the tie further left, not peeking out from under my foot at all, sometimes the needle will push it down into the machine, clogging things up.

Now, stitch along the open ends of the waist tie, resulting in this:

Repeat these steps on your second waist tie.

Stitching the first waist tie onto the bodice

Mark 1/2″ upward from the bottom of your bodice, along the right side seam. (The right side seam being the side seam that will be on the right side of your body when worn.)

Remember, when you do this, you will not have sewn the side seam yet. I had sewn my side seam, then realized I shouldn’t have, and then seam ripped.

Align the edge of your first waist tie with the edge of your side seam on the right side of your fabric. Baste this into place, using a straight stitch at 5 mm stitch length, at 1/4″ from the edge of your fabric.

Sewing the Side Seams

Now, with right sides together and the waist tie on the inside of the sandwiched bodice pieces on the right side of your bodice (the left waist tie will be sewn in the next step), lay the side seams together and pin:

Sew this seam with a standard straight stitch at a 1/2″ seam allowance, making sure to either lockstitch or backstitch at the beginning and end of each seam. Your finished seam will look like this:

Finish this seam in the same way you’ve finished the other seams – by serging, pinking, or zigzagging.

Stitching the second waist tie to the bodice

Now, on the left side of the bodice (as in the left side when it’s on your body!), pin the second waist tie onto the seam allowance, 1/2″ up from the bottom of the bodice:

Stitch this two times, with the second pass being a backstitch. The resulting stitch will look like this:

Assessing Fit

Wooohoo, that’s it for this week! Now is a good time to try on your bodice and asses the fit. Are the darts in the right place? Does it seem like the shoulders fall correctly? If something seems awry, please hop over to the Sew  Sew Busty Facebook group or subreddit to ask questions!

Here’s my fit, and you can see more details on my instagram stories:

Your Homework:

  • Prepare your pattern pieces by staystitching the neckline and sewing the darts
  • Sew your bodice together at the shoulders
  • Sew your sleeves onto your bodice
  • Prepare your waist ties and stitch them to your bodice
  • Sew your bodice side seams
  • Finish all seams by serging, pinking, or zigzagging.

Questions about this week’s steps for the Roseclair dress? Drop a comment below, or ask on the Sew Busty Facebook group or subreddit.


Some of the links in this post are affiliate links. Using the affiliate links in Sew Busty posts is a great way to support the costs of running Sew Busty, as when you click on the link and purchase the item, I will receive an affiliate commission at no extra cost to you. This helps me pay for the hosting, domain, design, and other costs associated with administering this site. All opinions remain my own.

Roseclair Sew Along Week A: Choosing Your Size & Materials (Beginners’ Sewing Series Part 8)

Brand new to sewing? Start here, with posts on gathering your toolstaking your measurements, and figuring out your garment sewing cup size. The Sew Busty Beginners’ Sewing Series will be your step-by-step guide to learning garment sewing. Each installment will build upon the last, getting progressively more advanced in skills and techniques. Catch up with the whole series here.

As part of the Beginners’ Sewing Series, we’re doing a sew along of the Cashmerette Roseclair Wrap Dress. Check out the full sew along here.

For our first Beginners’ Series sew along, we started with a tank top made from stretchy knit material. Knits are fantastic for beginners because they’re easier to fit and don’t include more complicated things like darts or facings.

But, if I’m being honest, I really really prefer woven garments. I prefer wearing woven; I prefer sewing woven.

So, for our second sew along, we’re going to make a garment using woven material! And, of course, we’re going to make a dress (with an alternate top option!) for July’s #sewbustychallenge meets #sewmonthlywithhom!

The Cashmerette Rosclair!

This pattern has three options: View A is a long wrap dress with tiers of material, View B is knee-length and has short sleeves, and View C is knee-length with puff sleeves. I’m going to be making View B … I think. I might end up deciding to do View C. You’ll be able to easily follow along by choosing View B or C, but for View A, you’ll be on your own for the tiered skirt.

Not a dress person? The Roseclair can also be made as a peplum top! Feel free to follow along and make a shirt 🙂

what is woven material?

In the most basic sense, woven materials aren’t stretchy, but knits generally are. Now, there are exceptions, like the sheer cup lining we use for bra making, which is both knit and not stretchy. Buuuuut, you can generally think woven = stable and knit = stretchy to keep things simple.

The real difference is that wovens are made out of a bunch of threads woven together. Think of a loom.

Knits, on the other hand, are made of a single thread that’s looped and braided around itself. Think of knitting.

With knits, we don’t always have to use darts or other shaping elements, because the fabric will stretch over our bodies. With wovens, we must use stitching to mold the fabric.

Woven materials come in many different types! Poplin, crepe, silk, satin, linen, polyester, rayon, chiffon, even quilting cotton! So many types.

Choosing Material for the Roseclair

For this particular project, we’re going to choose a lightweight woven fabric, such as cotton poplin, linen, rayon, or double gauze. Honestly, basically any of those fabrics are pretty beginner-friendly. I’m personally going to use this mustard linen from Joann’s, but you should feel free to choose another of the materials I just listed.

If you’d like to use the same material I’m using, check out this link for other linens and linen-look fabrics available from Joann’s!

Choosing a Size for the Roseclair

Normally, at this point in the post, I’d go over very detailed instructions on how to measure yourself and choose your size.

But Cashmerette has made it so much easier than that.

Specifically, they have a magnificent size calculator. Literally just pop in your measurements, click “calculate my size,” and voila! It will tell you which size to make, including places where you might need to blend between sizes.

For me, I’m going to make a 10 G/H for the bust, then blend to an 8 at the waist. The size calculator also tells me to blend to a size 4 at the hip. However, since the Roseclair has an open hip (versus a fitted hip), I’m not going to continue to blend down from the waist, but am instead going to make an 8 from the waist down.

Similarly, if your hip measurement falls into a smaller size than your waist, don’t worry about blending down in sizes. But if your hip measurement falls into a larger size than your waist, you will want to blend up. To blend between sizes, follow this tutorial on Cashmerette’s site!

A note on cashmerette’s cup sizes

Remember back when I told you how to determine your garment cup size, and how I said it wasn’t the same as your bra size? Well, this doesn’t exactly hold true for Cashmerette. So, before you freak out about the cup size suggested by the Cashmerette calculator, let me explain:

You see, Cashmerette labels their cup sizes such that your size in their patterns will likely be closer to your size in bras. However, this does not mean that your cup size in Cashmerette will definitely be equivalent to your bra size. For me, for example, I wear a J bra, and the calculator gives me a G/H as my suggested Cashmerette size.

It really comes down to labeling. What most designers call a garment DD cup, Cashmerette calls a G/H. What most designers call a garment D, Cashmerette calls E/F. And what most designers call a C, Cashmerette calls a C/D.

All of this said, you shouldn’t need to worry much about this, because the size calculator will tell you what you need to know.

What if I need a full bust adjustment?

If you need a full bust adjustment on the Roseclair, hang tight! Later this week, we will have a tutorial on doing a full bust adjustment on a wrap dress.

Your Homework

This week, you should:

  • Purchase the Roseclair pattern (sizes 0-16; sizes 12-32) and print and assemble it (or have it printed it at a copy shop!) by following these instructions.
  • Make sure you have all the tools you’ll need for sewing. For this project, in addition to the basics listed on the Tools of the Trade post, you’ll need:
    • a set of 80/12 universal needles (US/UK) (linked needles will work with most machines, but double check that your machine doesn’t use proprietary needles)
  • Purchase materials:
    • Yardage of a lightweight woven, such as linen – between 2-3/4 and 5-1/2 yards, depending on your size and the width of the fabric
    • Polyester thread to match your fabric (US/UK)
  • Get your fabric ready:
    • Make any necessary pattern adjustments, such as blending between sizes and doing a full bust adjustment.
    • Cut out your fabric and be ready to sew!

The next installment of the Roseclair Dress sew along will take place July 19! We’ll be sewing up the bodice.


Some of the links in this post are affiliate links. This means if you click on the link and purchase the item, I will receive an affiliate commission at no extra cost to you. All opinions remain my own.

Beginners’ Sewing Series Part 7 | Lago/Saybrook Tank Part D: Sewing the Hem & Finishing Touches

Brand new to sewing? Start here. The Sew Busty Beginners’ Sewing Series will be your step-by-step guide to learning garment sewing. Each installment will build upon the last, getting progressively more advanced in skills and techniques. Catch up with the whole series here.

As part of the Beginners’ Sewing Series, we’re starting with a sew along of the Itch to Stitch Lago Tank and the Cashmerette Saybrook tank (with an exclusive 20% off through May 31, 2021 using code SEWBUSTY20). Check out the full sew along here.

YOU’RE ALMOST DONE WITH YOUR TANK!!!

Over the past week, you should have sewn your side seams, shoulder seams, neck band, and armscye bands, per last week’s post.

This week, we’re going to hem this baby up and do some topstitching, and VOILA! You will have a super cute tank!

Sewing the Hem

We’re going to start with the hem. You probably know what the hem is based on buying ready-to-wear clothing, but in case this is a new term for you, a hem is the bottom of a garment. So, on this tank, it’s the part that goes around your hips.

Note: If you’re making the Saybrook and have chosen View A (the knotted front), please skip the hem section in this post and instead head over to Cashmerette’s blog for how to finish that view. For Views B and C, you can keep following here!

The hem determines the length of the shirt. So, the first thing I want you to do is try on your tank. Fold it up to different lengths. Think about your favorite tank tops – where do they hit your body? Then use a disappearing ink fabric pen (for lighter fabric) or fabric chalk (for darker fabric) to mark where you want the bottom of your tank to be. I like to mark my top in the front and on each side.

For me, I decided I liked something close to the full length of the tank. Specifically, I thought it would look great by shaving 5/8″ off the bottom. So that meant I needed to do a 5/8″ hem.

If you want to shave more or less off your tank, you can totally choose! I wouldn’t go less than 3/8″, though. But, as far as shortening goes, the sky (or maybe your boobs?) is the limit! (Unless you want your boobs to peek out, in which case, ROCK THOSE TITTIES!)

Once you decide how high you want the bottom of your tank, you’ll fold the bottom of the shirt inward, to the inside of the tank, overlapping by the amount you decided. So, for me, I folded the bottom 5/8″ up inside the shirt, like you can see I’ve started doing here:

Now, we’re going to start pinning. Pin that fold in place all the way around the bottom of the tank. Then iron!

Now, we get to sew! But we’re not going to use that zigzag we’ve been using! Well, to be clear, you can use the same zigzag we’ve been using. But, since this is a stitch that is going to be seen on the finished shirt, you can also choose a different stitch. But stick with a stitch that has stretch to it.

Personally, I chose this stitch (which on my machine is #11, but may be a different number on your machine):

If you don’t have this stitch, feel free to choose any stitch that’s marked for stretch in your manual, or stick with the trusty zigzag.

My only word of caution is I would avoid the triple stitch/stretch straight stitch. Personally, I find that this stitch doesn’t stretch enough for things like hems and bands, which go around the body. It’s best suited, in my opinion, for vertical seams that don’t need quite as much stretch to be retained.

Now, I recommend feeding your fabric into the sewing machine with the right side of your tank facing up. This will result in a cleaner look, and the pins should keep the folded edge folded under nicely.

For hems, I also like to use the edge of my foot to line up against the folded edge, as seen in the photo below. On my preferred foot, this makes my stitch 3/8″ from the edge of the fold. This is perfect for my 5/8″ hem, as it will mean there will be 1/4″ of the raw edge above the stitch.

If you have chosen a smaller hem, say 3/8″, make sure your stitch is a bit closer to your folded edge. For a 3/8″ hem, I would probably put my stitch at 1/4″ from the folded edge.

If you have chosen a larger hem, I’d keep your stitch in the range of 3/8″ to 3/4″ from the folded edge. We will trim off the excess raw edge once your hem is done.

Starting at side seam, stitch all the way around the tank, pulling the pins as you come to them. Overlap your stitching for about 1/2″ at the end to secure. You may also want to use a lockstitch at the end, if you machine has that option, to make sure your hem is nicely held in place.

If you chose a hem that was greater than 5/8″, use your snips to very carefully trim the raw edge of the fabric to about 1/4″ from the stitching. VERY CAREFULLY. If it feels like you’re cutting through too many layers of fabric, you probably are. Ask me how I know.

Let’s Topstitch!

OMG we’re on the final step!

The last thing we are going to do is topstitch. What is topstitching? Well, it’s the pretty stitching that holds down all those raw ends and can be seen from the outside of the garment.

A word about your topstitching versus topstitching on ready-to-wear/store bought garments: Factories use a special machine called a coverstitch to topstitch. This is what gives your RTW garments that nice double straight line on the front, like this:

I’m going to assume you only have a regular old sewing machine, not a coverstitch. So your topstitching is going to look different.

You could get fancy and break out a double needle, and get a look very similar to a coverstitch. But sewing with a double needle makes me want to drop the f bomb more times than almost any other sewing technique, and since this is a beginners’ sewing series, we’re going to use a different method. Again, it’ll look different, but it’s going to look fab.

So I’m going to use that same stitch #11 that I used for the hem earlier. If you don’t have this stitch, go ahead and lean on that zigzag or another stretch stitch. Again, I wouldn’t use the triple stitch for the reasons I outlined earlier.

At your neckband, fold the raw fabric down toward the body of the tank. You can pin this all the way around, but I actually think you might be okay going commando on this one. Just let the presser foot on your machine hold the fabric down.

Working with the outside of your tank facing up, you’re going to sew that raw edge down, stitching just to the side of the seam line. Here, I’m using that red little mark on my presser foot to follow the seam line so I can ensure my seam stays even with the seam.

Be careful not to pull your fabric as you sew this, as it’s easy to pull at this point. Pulling will distort your neckline.

Every inch or so, lift your fabric and take a peek to make sure the raw edge is still facing inward and being caught by the underside of the topstitching. If you’ve missed the raw edge, stop, seam rip to where the raw edge stops being caught, and start over just before that point. If you find yourself struggling to keep that raw edge in place, turned inward, go ahead and break out those to help!

Stitch all the way around the neckline, either overlapping about 1/2″ at the end or using a lockstitch to finish.

The finished product will look a bit like this. Notice how, on the left, things look a bit wavy? Sometimes, even if we try not to stretch the fabric, this just happens. Don’t stress if it’s minor. Just give it a press and a steam and the waviness will likely dissipate, as seen here on the right!

Now, repeat these exact same topstitching steps on each arm hole, pressing the raw edge of the fabric inward and stitching just next to the seam line. Give it a press and steam with your iron!

CONGRATULATIONS!!! YOU HAVE FINISHED YOUR TANK TOP!

Please post your finished project on social media and tag @sewbusty (or, on insta, #sewbusty or #sewbustycommunity). I can’t wait to see how you’ve gotten on!

Here’s mine in action at the putt-putt course:

Lindsie wears her lago tank while standing on the green at a putt-putt mini golf course. She is holding a putter in her left hand and is wearing mustard shorts and sunglasses.

Your Homework

This week, you should:

  • Sew the hem on your tank
  • Topstitch your bands
  • Post your finished tank on social and make sure I see it!

Ready for the next sew along? In June, Sew Busty will be hosting Bra Month, and I’ll be doing a sew along of the Firebrand Jet Set Natural bra. This project is appropriate for an adventurous beginner, so I hope you join! If you’re a total newbie to sewing and don’t feel ready to make a bra, we’ll be jumping back into an easier project in July, so be sure to follow Sew Busty on social media and subscribe to this blog in order to be notified when that sew along launches!

Questions about these last steps on the Lago/Saybrook tank? Drop a comment below, or ask on the Sew Busty Facebook group or subreddit.

Some of the links in this post are affiliate links. This means if you click on the link and purchase the item, I will receive an affiliate commission at no extra cost to you. All opinions remain my own.

Beginners’ Sewing Series Part 6 | Lago/Saybrook Tank Part C: Sewing Seams & Bands

Brand new to sewing? Start here. The Sew Busty Beginners’ Sewing Series will be your step-by-step guide to learning garment sewing. Each installment will build upon the last, getting progressively more advanced in skills and techniques. Catch up with the whole series here.

As part of the Beginners’ Sewing Series, we’re starting with a sew along of the Itch to Stitch Lago Tank and the Cashmerette Saybrook tank (with an exclusive 20% off using code SEWBUSTY20). Check out the full sew along here.

Over the past week, you should have created your cheater FBA, graded your pattern, and cut your material per last week’s post.

This week, we’re going to work on sewing the side seams and bands for your tank! By the end of this week, you’ll have something that looks and feels like a tank. (But it won’t quite be done!)

Getting Your Machine Ready

First thing’s first: You gotta get your machine ready to sew! Pull out your handy-dandy machine manual! (Don’t have your manual? Google it; trust me.) Per your need to:

  • Install your 70/10 jersey/ballpoint needle
  • Thread your main thread and your bobbin

In the below video, I’ll show you how I thread my machine, but, the truth is, it really depends on your machine. I can’t possibly explain how to do these things on every machine.

Sewing Your Side Seams

Unpin your fabric from the pattern. I like to use little sticky notes to keep track of which fabric piece is which – I just pin the sticky note to the corresponding piece.

Now, we’re going to lay the back of the tank right side up on the table, right side of the fabric facing up. Then, we’re going to lay the front of the tank on top of the back, right side of the fabric facing down. In other words, the right sides of the fabric should face each other.

Start pinning your side seams. Start by pinning the bottom corner, then the top corner, then where the notches align. I like to pin perpendicular to the edge of my fabric and my eventual seam. This way, if I accidentally miss pulling a pin out as I sew, I’m less likely to break my needle.

From the bottom corner to the notch, the side seams should match up very closely. Once you get to the notch, though, you’ll have to do some wiggling of fabric to get the side seams to match up.

I like to start by finding the center between the notch and the armpit on each piece, and matching those. Then I find the center between those pins and once again match those. This will involve stretching the back piece to match the length of the front piece. This is because your front side seam is longer than the back, due to the boobs. I repeat this process until the seam is pinned together, as shown:

Check your pinned seam to make sure no spots are bubbling by continuing to stretch the back piece slightly to meet the front and pin.

You’ll do this on both sides of the tank. Now, it’s time to sew!

I like to set my machine to a zigzag stitch with a width of 3 and a length of 2. I find this does a good job of retaining stretch, but is also easy to seam rip if something goes awry. If you’re more advanced, you can choose a lightning stitch or other stretch stitch.

Another way I get my machine ready is by using washi tape to mark my seam allowance. On the Lago and Saybrook tanks, the seam allowance is 3/8″. (Please ignore the fact that I’ve marked and sewn a 5/8″ seam allowance. Don’t repeat my mistake! Do as I say, not as I do!)

What is a seam allowance? It’s just the distance between the edge of your fabric and where your needle will go down. So, if you measured 3/8″ from the edge of your fabric, that’s where the seam should be. On the machine, I place washi tape 3/8″ from the needle’s center point. During a zigzag, the needle will go back and forth to each side of this center point, but I generally measure from the center of the stitch.

Washi tape is great for this purpose, because it peels right off when you’re done and doesn’t leave a residue.

My next tip is to use tissue paper under your jersey! This will prevent the machine from eating your fabric, and will also help prevent the fabric from stretching too much as you sew.

I don’t always use tissue, because I have a built-in walking foot that does a lot of the same work, but I recommend that beginners use tissue throughout the process of sewing this tank. Once you’ve sewn the seam, you simply rip off the tissue.

As you sew, you’ll stop when your foot – that’s the little piece that attaches to your sewing machine and presses down on the fabric – approaches each pin. Pull the pin out, then proceed to the next pin. Eventually, you might become a fancy pants and be able to sew and pull pins simultaneously. I’ve been sewing for 20+ years and still am not coordinated enough to do this, but many people are!

How do I sew straight?

My best advice is to keep an eye on two places. I know, I know. That sounds like a lot. But it’s going to be okay. It’s a bit like driving: When you drive, you keep an eye on the road, but also on your speedometer. When sewing, you keep an eye on the spot next to your needle, but also on the fabric that’s coming up.

The important thing to keep in mind is that your needle is the spot. Nothing else matters that much. If you maintain the same distance between your needle and the side of your fabric as you sew your seam, your seam will be straight.

The best way to learn is by doing, so set your machine to a slow speed, and let’s go! Sew the entire side seam on each side.

Oops! Get a little off track?! Me too. Just seam rip the awry stitches and keep going!

The last step for the side seams is to iron them open. Now, onto the shoulder seams!

Somehow, I missed taking pictures of the shoulder seams. But the method is exactly the same as the side seams:

  1. Pin the fabric, right sides together, matching corners
  2. Use tissue and a zigzag stitch to sew, sticking to the 3/8″ seam allowance
  3. Iron your seam allowance open

At this point, you can try your tank on for a rough idea of fit! The bands will change the way it hangs a bit, so don’t get too excited and start changing a bunch of things! But, you should be able to see if it’s way too big or small, and you can make small changes based on that.

For example, if you find that you’re getting a pucker in your side seam where it’s a bit big on you, you can go back under the sewing machine and sew a bit further from the fabric edge in that spot to make the shirt smaller there. If it feels tight anywhere, you can try to sew a bit closer to the edge of the fabric (seam ripping your original stitches) to make it a bit bigger.

Sewing the Bands

Time to sew the bands! Let’s start with the neck band.

Start by folding the band in half along the short side. Pin the short ends together and sew (again, using tissue and that sweet zigzag).

Now, fold the band down the long side and pin all the way around. Iron!

Now, for this next step, we’re going to diverge from the instructions provided for the Saybrook and go a slightly easier route. If you’d like to follow the original instructions for a slightly different look, check out Cashmerette’s sew along here.

We’re going to pin the neck band to the neck opening on the tank to the outside of the tank, matching the raw ends together. Match the seam on the band to the center back line and match the notches.

Here, I’m holding the band to the neck opening, behind the tank, which is right side out.

Once you’ve matched the center back to the band seam and have matched the notches, you’re going to want to find the center points on the band and the tank, pin that point. Then find a center point again, pin that, etc. You’ll end up needing to stretch the band slightly to match the length of the neck opening. By doing this, eventually you should make it all the way around your neckline.

If there’s any bubbling, that’s a sign you need to add more pins. Here’s an example:

See how, in the first picture, the tank fabric is bubbling away from the pinned neck band fabric a bit? In the second picture, I’ve added more pins, and the bubbling is gone.

Now, we’re going to sew again! In the same way that you did the side seam, sew at a 3/8″ seam allowance using the zigzag stitch with tissue underneath.

Sewing the Armhole Bands

You’re going to repeat the exact same process from the neck band to apply the armhole bands:

  • Sew the short ends together with the right side of the fabric facing in
  • Fold the long way, pin, and iron
  • With the band against the right side of the tank, match the seam on the band to the underarm side seam, with the raw ends of the fabric matching; pin
  • Match the notches to their corresponding notches (single or double notch) and pin
  • Using tissue, a 3/8″ seam allowance, and the same zigzag stitch we’ve been using, sew the armhole bands onto the main tank

Wooohoooo! You now have a mostly-done tank top!

Your Homework

This week, you should:

  • Sew your side seams and shoulder seams
  • Try your tank on for general fit before sewing on the bands
  • Sew the neck and arm bands onto your tank

The next installment of the Lago/Saybrook Tank sew along will take place May 29! We’ll be talking about hemming and topstitching!

Have a question? Feel free to drop a comment below, or ask on the Sew Busty Facebook group or subreddit.

Some of the links in this post are affiliate links. This means if you click on the link and purchase the item, I will receive an affiliate commission at no extra cost to you. All opinions remain my own.

Beginners’ Sewing Series Part 5 | Lago/Saybrook Tank Part B: Grading, Cheater Bust Adjustment + Cutting

Brand new to sewing? Start here. The Sew Busty Beginners’ Sewing Series will be your step-by-step guide to learning garment sewing. Each installment will build upon the last, getting progressively more advanced in skills and techniques. Catch up with the whole series here.

As part of the Beginners’ Sewing Series, we’re starting with a sew along of the Itch to Stitch Lago Tank and the Cashmerette Saybrook tank. Check out the full sew along here.

Over the past week, you should have:

  • Chosen your size based on last week’s post
  • Downloaded, printed, and taped together your pattern. (Haven’t done this yet? If you’re going with the Saybrook tank, make sure to use our coupon code: SEWBUSTY20 for 20% off.)
  • Gathered your tools, including fabric, thread, needles, a sewing machine, and tissue paper

This week, we’re going to work on making room in the pattern for the boobies, talking about the anatomy of fabric and patterns, and cutting out your fabric.

Quick note: Throughout this post, I’m using a pink pen to make my adjustments. I’m doing this so you can clearly see where I’m marking. Please, for the love of all things good, use pencil.

Before You Start

Before you get started today, go ahead and wash your fabric. You’ll want to wash and dry it as you normally would for clothing. This will keep it from shrinking once it’s in tank form! Throw it in the washer now so it’s ready for ya when we’re done getting our patterns prepped!

Now, the “cheater” FBA that we’re going to use is appropriate for up to about a 5-6″ high bust to full bust difference. If your full bust measures more than 5-6″ larger than your high/upper bust, I’d encourage you to try following this tutorial over at Cashmerette to complete a full bust adjustment. It’s a little tougher than what we’re doing, but will result in a more accurate fit for a larger bust.

Cheater Full Bust Adjustment & Grading

Remember how I had you print two sizes last week – the size that matched your upper bust measurement, and one size bigger? Well, here’s where those two sizes come in.

Before you cut out your pattern pieces, we need to do some grading and create our “cheater” full bust adjustment, otherwise known as a boob bubble. If you have chosen the Saybrook tank, congratulations! You can skip this part of the sew-along, since the Saybrook already includes cup options. Just choose your cup size according to Cashmerette’s calculator and meet us at the section on grading the Saybrook, below.

Lago boob bubble fba step 1:

Starting on the front of the pattern, identify the armpit point of the smaller size – the size that matches your pre-FBA bust measure (upper bust + 2″, as discussed last week). On mine, I’m marking the point where the strap meets the bust at the armpit on the size 6.

Then, identify the largest part of the bust on the larger size. Here, you can see that I made a pink line on the largest part of the bust on the size 8.

Lago boob bubble fba step 2:

Then, identify the top of the waist. This is not the smallest part of the waist, but a bit above the smallest part – where it starts really coming inward.

Remember, I went ahead with the size 6 – the same as my pre-FBA bust measure – for the waist, even though my waist measurement actually corresponds with a size 2-4. This is because I will have a more relaxed fit, as I discussed in last week’s post.

If you have a waist measurement that is the same as or smaller than the waist measurement on the size that corresponds with your upper bust measurement, I recommend you also stick with the size that corresponds with your pre-FBA bust measure for this first project.

Now, if your waist is larger than the waist measurement of the size that corresponds with your upper bust size, you will need to do one of two things:

  1. If your waist corresponds with the waist measurement of the size larger than your upper bust size, then identify the top of the waist on that size.
  2. If your waist is larger than the waist measurement of the size larger than your upper bust, you’ll need to identify the top of the waist on the size that corresponds with your waist measurement. In this case, you’ll have printed three sizes: the size that corresponds with your upper bust + 2 (your pre-FBA bust measure), and the size that corresponds with your waist. At this point, identify the waist point on the size that corresponds with your waist measure, as shown in the video, below.

Lago boob bubble fba step 3:

Now, create a curved line between the three points you have identified, as shown in this video. If you have a French curve, that will make things easier. But, if not, just wing it and make the most smooth curve you can (using pencil!!!):

Lago boob bubble fba step 4:

Yay! You’ve done the front! Now we need to match the back. If you have a smaller bust (say a 3-4″ full bust to high bust difference), you likely do not need to complete this step. But for those with a 5-6″ full bust to high bust difference, we need a bit more room.

On the back pattern piece, identify the armpit point on the size that corresponds with your pre-FBA bust measure, the full bust point that corresponds with the one size larger, and the top of the waist that corresponds with the size you’ve chosen for your waist.

When identifying your top of waist point, make sure this is about the same distance from the little dotted line (we call this a notch … more on this later) as your top of waist point was on your front pattern piece, as seen in the below picture.

Just as you did on the front piece, draw a smooth curve between these three points.

Congratulations! You’ve completed the cheater FBA boob bubble. Feels good, yeah?

grading on the saybrook and lago:

If you find yourself needing to grade between sizes on the Saybrook tank, check out the above video for a quick and dirty on how to grade between the full bust and a larger waist. Whatever size you use for the waist, continue that size all the way down to the hem. For example, if I had stayed with the size 8 for the waist, I would continue the size 8 all the way down, not grading back in at all.

For more information on grading for a dartless top, Cashmerette has a great tutorial with a lot of detail here.

Cutting Out the Pattern Pieces

Once you have done the necessary boob bubble and FBA, cut out your pattern pieces using paper scissors. Do not use your fabric scissors for this. Fabric scissors should be for fabric, my friend.

For this, you will be cutting the smaller size – the one that corresponds with your pre-FBA bust measure – except wherever you have marked during your grading or boob bubble process. In those places, cut where you’ve drawn your curves.

For tricky parts where the sizes cross over each other, like at the straps, I like to trace the size I plan to cut using a highlighter to prevent myself from getting off track:

Alright, get cutting your paper pattern!

Let’s Talk About Fabric.

Before we cut into our fabric, let’s talk about the fabric itself. In this video, I talk you through the anatomy of the fabric. (My fabric is a lyocell spandex. Ignore my brain fart, please.)

Here’s a diagram to review:

Now, We Should Talk Patterns

In this video, I talk you through the pattern symbols. This blog gives a great run down of different pattern symbols, if you need a static visual.

Okay, Now We Talk About Cutting Fabric

Why did I talk you through the anatomy of fabric and the anatomy of a pattern before jumping into cutting?! Well, because these things are important for deciding how to cut your pattern. Let’s grab your cutting mat (no, really, grab your mat; if you don’t have a mat, choose a surface you don’t mind getting scratched) and get cutting!

Laying out your pattern

You see, you can’t just lay your pattern any which way on the fabric and cut it out. No, that won’t do. Because stretch and grainlines matter.

So you need to lay your pattern out in such a way that the pattern’s fold lines match the folds of your fabric. As you can see in this picture, I’ve changed the way my fabric was folded. Instead of being folded in half, I’ve folded it so that each selvage edge meets the center fold line. Then, I’ve used the resulting folds as the lines against which to place my pattern’s fold lines. As you can see, I’ve held back pattern piece 4 – the arm bands – to cut later.

This may or may not be the best way to lay out your pattern. Both the Lago and Saybrook include suggested cut layouts. My advice is to consider the layout I’ve chosen, but also check out the layouts suggested in the patterns to decide how to lay out your pattern.

A couple tips: No matter how you choose to lay out your fabric, make sure you have it folded straight – your selvage edges should match, not necessarily your cut edges (since you don’t know for sure that the fabric was cut straight). Also ensure that you smooth the fabric out. You don’t want any wrinkles under your pattern pieces.

Pin, pin, pin

Now that you’ve chosen the best layout, you’re going to pin your pattern to your fabric. I use this motion to pin:

Pin all the way around your pattern pieces, about every inch and a half, with the pins closer together around curves.

time to cut

Now, you have two choices here: You can use your fabric scissors, or you can use a rotary cutter.

I suck at rotary cutters, so I’m not qualified at all to show you how to use them. I’m going to show you the scissor route. If you do choose to use a rotary cutter, you must have a cutting mat.

Now, let’s get out those fabric scissors.

Cut all the way around your pattern pieces, keeping the pattern pieces to the left of your scissors if you are using right-handed scissors, and to the right of your scissors if you are using left-handed scissors. Positioning the scissors in this way will help you to keep your cutting line close to the edge of the pattern pieces.

Because of my cut layout, I did this with the front, back, and neck band pattern pieces. Then I re-folded my fabric, pinned my armhole band pattern pieces, and cut around them.

Cutting the notches

The last thing to do today is to cut your notches. Notches help us to line up our pattern pieces when we start sewing.

The notches on this pattern are marked with dotted lines, as seen in the picture below. At each notch, you’ll see two (or three) – one for the size that corresponds to your pre-FBA bust measure and one for the next largest size (the size we’re using for the bust). (If you graded for your waist, you may also have a third mark for the size that corresponds to your waist).

If you used the smaller size everywhere except your waist, use the notches that correspond with this size.

If you graded for your waist, use the pre-FBA measure size notches for any notches above the waist and on the armhole and neck bands, but the waist size notches for the notches near the waist.

When you cut your notches, do not cut them as deep as the pattern recommends. This gets very close to cutting into what we call your seam allowance: the line where you will sew. Instead, make them only about 1/4″ deep, as seen in the image below:

That’s it! You should now have all your pattern pieces cut! When you unpin and unfold your fabric, you will have one front, one back, one neck band, and two armhole bands.

Your Homework

This week, you should:

  • If using the Lago, create your “cheater FBA” and do any necessary grading
  • If using the Saybrook, do any necessary grading
  • Cut out your pattern pieces, pin them to your fabric in the correct orientation, and cut out your fabric. Make sure you cut notches at 1/4″.

The next installment of the Lago/Saybrook Tank sew along will take place May 22! We’ll be talking about sewing your seams and bands.

Have a question? Feel free to drop a comment below, or ask on the Sew Busty Facebook group or subreddit.

Some of the links in this post are affiliate links. This means if you click on the link and purchase the item, I will receive an affiliate commission at no extra cost to you. All opinions remain my own.

Beginners’ Sewing Series Part 4 | Lago/Saybrook Tank Sew Along Part A: Choosing Size + Material

Brand new to sewing? Start here. The Sew Busty Beginners’ Sewing Series will be your step-by-step guide to learning garment sewing. Each installment will build upon the last, getting progressively more advanced in skills and techniques. Catch up with the whole series here.

Now that you’ve gathered your tools, taken your measurements, and figured out your sewing cup size, let’s start working with a pattern, shall we?!

For this series, I wanted to start with an easy pattern – one that’s forgiving in fit, that doesn’t include darts or other shaping elements, and one that wouldn’t make you do a full-fledged full bust adjustment.

The patterns we’ll be starting with are Itch to Stitch’s Lago Tank and Cashmerette’s Saybrook Tank. If you’re between a 31-45″ high bust, you can choose the FREE Lago Tank. If you have a high bust of 37-57″, you can choose the Saybrook using the 20% off discount code at the bottom of this post.

(Are you a lucky duck who could choose either? Choose the Lago to learn how to do a “cheater FBA,” or choose the Saybrook for an even simpler experience using Cashmerette’s built-in cup options!)

Now, you may notice that this is one of Itch to Stitch’s few patterns that doesn’t include a full bust piece. (Most of their patterns have cup options!) That’s okay. For the Lago, we’re going to do what I call a “cheater FBA.”

The Saybrook includes cup options, so those using the Saybrook should check out Cashmerette’s size guide to help you choose your size. Then skip to the “Choosing Material” section of this post.

Let’s get planning! Now is the time to get that FREE Sew Busty Project Planner printable out and start taking notes!

Choosing a Size (Lago Only)

But first, we have to figure out your size. Pull out those measurement sheets you printed before!

If you’re using the Saybrook, hop on over to Cashmerette’s size guide to choose your size. Keep reading if you’re making the Lago.

Using Your High Bust

Now, most resources will tell you to choose your pattern based on your full bust. DO NOT DO IT.

This instruction – choosing based on full bust – is for all the B cup babes out there. You, my friend, are likely not a B cup babe, given that you’re reading this blog. So you have to do things a little differently.

For my boobalicious friends, we are going to use your high bust measurement + 2″. (Don’t know what that means? Be sure to read our guide to measurements.)

I’m going to use myself as an example. Here are my measurements:

High Bust35″
Full Bust40.5″
Waist29″
Hip37″

Why do we add 2″? Well, because most patterns are drafted for a garment sewing B cup, that is, a 2″ difference between high and full bust. So I’m taking a bet that, for example, where the pattern shows a 35″ full bust, that size will probably have a 33″ high bust, since it’s already accounting for a person who has a 2″ difference there.

So, again: High bust + 2″ = the size you’re going to start with. We’ll call this your pre-FBA bust measure.

For me, this will be 37″ as my pre-FBA bust measure.

My 37″ pre-FBA measure is between a size 6 and a size 8. I generally recommend sizing down when you’re between sizes. On this pattern, if you’re between sizes, you can probably choose between sizing down for a more fitted fit and sizing up for a more relaxed fit.

A look at the rest of the measurements

Looking at the body measurement chart, you might notice that my waist and hip measurements would normally put me at a size 2 in the waist and a size 4 in the hip. That would be a lot of what we call grading: blending between sizes.

However, I want to point your attention toward the finished measurement chart:

You’ll see here that the inches on this finished measurement chart don’t match up with the inches on the body measurement chart. A size 6, for example, is designed for a body with a 36.5″ bust measurement, but the finished garment has a 36″ bust. And that same size is designed for a body with a 30.875″ waist, but has a finished waist of 36.875″.

Why is that? Ease!

Ease is the extra inches that allow a garment to fit correctly and be comfortable. After all, you’re not trying to make a second skin for your body; you’re trying to make a garment to fit on top of it.

Here, we have both negative ease (at the bust) and positive ease (at the waist and hip). Negative ease is when there are fewer inches in the finished garment than the body it’s intended to fit. Positive ease is when there are more inches in the finished garment than the body it’s intended to fit.

At a size 6, the Lago Tank is designed with 1/2″ of negative ease at the bust, 6″ of positive ease at the waist, and 1.625″ of positive ease at the hip.

So what does this mean for what size to choose?

This means, for me, I’m not going to worry about grading down to a size 2 or 4 at the waist and hip. Instead, I’m going to rock that extra positive ease and have a slightly more relaxed fit in the waist and hips than the designer intended.

In other words, I’m going to choose a straight size 6 as my pre-FBA size.

If you are larger at the waist than the measurement given for your pre-FBA size, you will need to grade for the waist. More on that in the TLDR, below.

what about the bewbs?

Okay, you’re here because you have big boobs or a large projected chest. So what about that bust?

Like I mentioned, we’re going to do a “cheater full bust adjustment.” A cheater FBA, or a “boob bubble,” works by giving you a little extra room at the bust, while also taking advantage of negative ease.

Note: I wouldn’t recommend this method for someone who is larger than an F garment cup size – that is, 6″ bigger at the full bust than the high bust. If you have a larger FB/HB difference, in the next post, I’ll include a link to a different – but more difficult – FBA method that you can try.

Negative ease, unlike positive ease, only occurs when you use a stretchy material. By definition, a woven or stable (non-stretchy) knit cannot work with negative ease because it simply will not stretch over the body.

But here, we’re going to use stretchy fabric.

For your cheater FBA, you’re going to choose one size bigger for the bust. So, for me, that means choosing an 8 at the full bust. Looking at the finished measurements again:

As you can see, circled in pink, using an 8 at the full bust will give me a finished measurement of 37.375″. That’s about 3″ smaller than my 40.5″ full bust measurement. Given the stretchy fabric I’m going to recommend we use, I’m comfortable with having 3″ of negative ease at the full bust.

Now, will this method result in a perfect fit? Probably not. But you haven’t been wearing perfectly fitting clothes from the store anyway. And this method will result in a better fit than anything you could buy.

Young padawan, we’ll get to a perfect fit later. Once you can sew a straight line.

Can you give me the TLDR?

Sure thing! You’re going to print two (or three) layers of this pattern, at once, directly on top of each other. One size will be the size that corresponds with your high bust measurement. The other size will be one size larger. If your waist measurement falls on the chart more than one size larger than your pre-FBA size, you will also need to print a third size, which will be the size that corresponds with your waist measurement.

I’m not going to offer instructions on printing the layers or assembling the pattern, because Itch to Stitch already has a fantastic guide. Please take a look!

Choosing material

I’m going to recommend you choose a soft fabric with 4-way stretch for your first project. Cotton lycra, cotton spandex, or lyocell spandex are all good options. I would look for something with a 5-7% spandex, lycra or elastane. (Tip: Did you know that lycra, elastane and spandex are the same thing? Well, now you do! Lycra is just a brand name, like Kleenex is a brand name for specific tissues. And elastane is what our British friends call it. Many experienced sewists don’t know that!)

If you’re in the United States, Joann’s carries a bunch of lyocell spandex that I think is okay quality for your first foray into sewing. If you’re in the UK, check out Sew Anonymous’s selection of jersey fabrics.

For the Lago tank, you’ll need about 1 yard/meter of fabric, regardless of which size you choose. If you’re going to follow along with the Saybrook Tank from Cashmerette (for larger sizes), you’ll need between 1-5/8 and 2-1/8 yards, depending on your size. (You can check the fabric requirements for the Saybrook here.)

Your Homework

This week, you should:

  • Get the FREE Lago Tank pattern and download it from Itch to Stitch or, for larger sizes, buy and download the Saybrook Tank from Cashmerette, using code SEWBUSTY20 for 20% off through the end of May 2021!
  • Make sure you have all the tools you’ll need for sewing. For this project, in addition to the basics listed on the Tools of the Trade post, you’ll need:
    • a sewing machine with a zigzag stitch
    • a set of 70/10 jersey/ballpoint needles (US/UK) (linked needles will work with most machines, but double check that your machine doesn’t use proprietary needles)
    • some tissue paper (like the kind used for wrapping gifts)
  • Purchase 1 yard/meter (or 1-5/8 to 2-1/8 yards for the Cashmerette Saybrook Tank, depending on chosen size)
  • Polyester thread to match your fabric (US/UK)
  • Print and assemble your pattern (or have it printed it at a copy shop!) by following these instructions on Itch to Stitch’s website.

The next installment of the Lago/Saybrook Tank sew along will take place May 15! We’ll be talking about grading and cutting your fabric!

Some of the links in this post are affiliate links. This means if you click on the link and purchase the item, I will receive an affiliate commission at no extra cost to you. All opinions remain my own.

Beginners’ Sewing Series Part 3 | Determining Your Garment Sewing Cup Size

Brand new to sewing? Start here. The Sew Busty Beginners’ Sewing Series will be your step-by-step guide to learning garment sewing. Each installment will build upon the last, getting progressively more advanced in skills and techniques. Catch up with the whole series here.

Ever seen A, B, C, D, etc. on a garment (top, dress, etc.) pattern and been confused as to what that means? Here’s a hint: It’s not referring to your bra size.

I know, I know. That sounds batty. These are the same letters we use for bras, and, after all, pattern designers call these “cup sizes.”

JUST TRUST ME.

I’m a size 30J in bras. I wear a garment cup size of DD/E or F.

Why is this? Well, because they’re just different measurements. Bra sizes, when done correctly, are based on your underbust and full bust measurements, because a bra gets its support from your ribcage. Garments – dresses, tops, jumpsuits – don’t generally hug in at the underbust, and instead hang from your shoulders and high bust. Thus, for garments, we use your high bust and full bust measurements to determine your garment sewing cup size.

(Not sure how to measure yourself? Check here.)

Once you have these measurements, you’ll subtract your high bust from your full bust. This difference will tell you your garment pattern cup size, per this chart:

Full Bust – High Bust =Pattern Cup Size
1″A
2″B
3″C
4″D
5″DD/E
6″DDD/F
7″G
8″H

For example, my full bust is 40.5″. My high bust is 35.5″. That gives me a 5″ difference between high and full bust, putting me at a DD/E garment pattern cup size.

Now, some designers use a slightly different system to determine your garment cup size. Charm Patterns and Cashmerette, for example, both use a slightly different system, in which their cup size G is more like a DD in most designers’ patterns. All of this is to say always check the size chart of the pattern you’re making.

Beginners’ Sewing Series Part 2 | Measurements & FREE Measurement Printable

Brand new to sewing? Start here. The Sew Busty Beginners’ Sewing Series will be your step-by-step guide to learning garment sewing. Each installment will build upon the last, getting progressively more advanced in skills and techniques. Catch up with the whole series here.

Once you’ve gathered the tools you’ll need to start your sewing journey, the next step is to figure out your basic measurements. These will be your guide as you choose patterns, and as you follow the Lago Tank sew along!

(Need pattern inspiration? Check out our Busty Pattern Database and our Pinterest boards!)

Basic measurements

The most basic measurements needed for most clothing patterns are:

  • high bust
  • full bust
  • waist
  • hips

Some patterns may require additional measurements. For example, a bra pattern might call for your horizontal hemisphere or your bottom cup depth. A trousers pattern might call for your inseam. But for 75% of patterns, your high bust, full bust, waist, and hips will get you on your way.

Taking the measurements

So how do you take these measurements?! Let me show you!

Here’s a free printable measurements worksheet to keep track as you take these measurements.

High Bust

This, combined with your full bust measurement (below), will determine your sewing cup size. More on sewing cup sizes here.

For the high bust measurement, hold the measuring tape at the bust, above the breasts. This measurement should be done without a bra on for best results.

As you can see from the profile view, the tape will not be parallel with the floor, but will instead angle down as it goes toward your back.

For this measurement, don’t hold the tape too tightly, but it should be firm. Try to relax as you take this measurement.

Full Bust

For the full bust, measure with your best fitting bra on. Measure by positioning the measuring tape parallel to the floor around the fullest part of the breast/chest.

On most people, the fullest part of the bust is the nipple, but this isn’t always the case. The measuring tape should go around the part of the bust that protrudes the most, like the peak of a mountain.

Again, hold the tape firmly but not too tightly. You should be able to slip just the tip of a finger under the measuring tape.

Waist

The natural waist is where, when you bend to the side, your body folds. I like to bend side to side and mark where my body folds with my hand, then wrap the measuring tape around at that point, parallel to the floor.

The natural waist is not always the smallest part of one’s body. Some people have a smaller underbust than waist, for example. However, for most patterns, it’s important to measure this point at your natural waist rather than your smallest part.

Hip

Ohhhh the “hip” measurement. Let’s be real, shall we?

The hip measurement should really be called the BOOTY MEASUREMENT.

So many people see hip and think “oh, okay, here’s my hip bone.” Sorry, buster. You’re being too logical. Whatever sewing deity of olde who decided what to call the measurements decided to call the butt the hip.

Okay, now that we’re clear, you should take your hip measurement around the fullest part of your butt. Generally, this is about 8.5″ below your waist, though on short people (hello!), it’s usually around 8″ below the waist.

Okay, now what?

Be sure to write down these measurements!

If you have a pattern in mind already, check the pattern envelope or sizing information to make sure you don’t need more measurements, such as bicep or inseam.

Still looking for a pattern? Check out our Busty Pattern Database!

Beginners’ Sewing Series Part 1 | Tools of the Trade

Brand new to sewing? Start here. The Sew Busty Beginners’ Sewing Series will be your step-by-step guide to learning garment sewing. Each installment will build upon the last, getting progressively more advanced in skills and techniques. Catch up with the whole series here.

Let’s talk about step one: making sure you have all the tools you’ll need to start sewing.

A sewing machine

A brother CS 8060 sewing machine sits on a white surface

Let me be perfectly clear: You absolutely can sew with only a thread and needle. But it’s about a million times faster and easier on a sewing machine.

I tend to advise beginners steer clear of cheap machines, like mini machines or anything called “lightweight” or “essential.” These machines just tend not to be very well designed on the inside, and that can show in the stitches.

But that doesn’t mean you need to spend a lot to get a quality machine. My last sewing machine, pictured above, was purchased off Craigslist for $20. I used it for 4 years and never had any issues.

Cutting tools

A purple rotary cutter, purple and pink pinking shears, oil slick rainbow duck bill scissors, oil slick thread snips, and oil slick fabric shears sit on a white backdrop
Left to right: rotary cutter, pinking shears, duckbill scissors, embroidery scissors, fabric shears

You’ll see that I have quite a few cutting tools, but you only need one: Fabric scissors.

A lot of people like to cut their pattern pieces with a rotary cutter. If you think you might be one of those people, a rotary cutter is a good idea too. Personally, I hate using a rotary blade, so I generally just stick to scissors.

Pins and a pin holder

A succulent-shaped green pin cushion with a cream-colored flower and white pins throughout sits on a white background.

I personally like to use Clover brand silk pins for just about everything, but less delicate fabrics can use different pins. Some people also prefer to use clips instead of pins.

There are many options for where to keep your pins: pin cushions and magnetic pin holders are popular choices.

Seam ripper

A hot large pink seam ripper sits next to a small white seam ripper on a white surface

If I had to name the most important sewing tool, I’d unfortunately probably have to say the seam ripper. Think of it like an eraser for sewing mistakes. Didn’t get your seam quite straight? Rip that baby. Sewed with the wrong sides facing together? Rip it up.

I personally like having a longer, pencil-like seam ripper (like the pink one pictured), though most machines come with a small seam ripper (like the white one).

I’ve been sewing for decades and I still use the seam ripper on basically every project. #noshame

Measuring tools

A quilter's ruler sits next to a retractable measuring tape on a white surface

The most important measuring tool when you’re starting out is certainly a measuring tape. Most sewists will want a measuring tape that goes up to at least 60″, and some plus-size sewists may want a longer measuring tape.

I like to have both metric and imperial so that I can follow along with tutorials and patterns that use either system.

Needles and thread

A spool of light pink Coats & Clark Dual Duty thread sits next to a package of various machine sewing needles

People have different favorites when it comes to thread. Gutterman, for example, has a faithful following. Personally, I tend to be a Coats & Clark gal.

For most clothing projects, you want to use either a polyester or nylon thread. Both have a little stretch to them, which allows your seams to move with your body.

Marking tools

A double-sided Dritz Mark-be-Gone disappearing ink pen sits next to a Crayola white colored pencil on a white surface.

A marking tool will be helpful for marking darts, tricky seam allowances, and even pattern pieces.

My mom always used a double-sided Dritz marking pen, so that’s what I use too. The purple side disappears over time. The blue side washes out with water.

The other marking tool I keep around is a white colored pencil, for marking dark fabrics.

Other people like to use tailor’s chalk or heat erasable pens, which disappear when you iron them.

Bobbins

Five clear bobbins, one wound with black thread, sit on a white surface.

The most important thing I can say about bobbins is to make sure you get bobbins that are compatible with your machine. Bobbins come in different classes – usually class 15 and class 16. They also come in either metal or plastic.

My machine takes a plastic class 15 bobbin. That’s it. No metal. No class 16. Just plastic class 15.

Your machine will be different. Some machines take only proprietary bobbins made by the same brand as makes your machine.

It’s important to use the right bobbin for your machine, because using a different bobbin can harm the inner workings of your machine. You don’t want a broken machine on day one!

Iron and ironing board

A blue and white iron sits on an ironing board with a black and white geometric design.

I hate ironing. But I reluctantly do it while sewing because it really does make your garment look better.

I’ll be honest with you and say what many sewing bloggers won’t tell you: With some fabrics, you can 100% get away with not ironing and with what we call finger pressing instead. For example, the duoplex fabric that bras are often made from is easily finger pressed. But with other materials, an iron is necessary.

Get yourself a cheap iron. I got this one for $5 off Facebook marketplace years ago. It still works beautifully.

Other helpful tools

A pencil, sticky notes, fabric glue stick, fabric tape, and eraser sit on a green cutting mat

Here are some of my other must-haves:

  • A pencil: For tracing patterns and making alterations.
  • Tracing paper: Also for tracing patterns and making alterations. I use a roll of medical paper, which you can purchase on Amazon.
  • A good eraser
  • Scotch tape: For sticking patterns together and for making pattern alterations.

And here are some of my favorite tools that aren’t absolutely necessary:

  • A printer: I didn’t have a printer for a long time, and the guys at Staples KNEW ME. It’s so much easier to just have a printer in my house so I can print my own patterns. I bought mine on Facebook marketplace for $30.
  • Fabric glue stick: This will keep you from ripping your hair out when you do a hem on a shifty fabric.
  • Hem tape: Marketed for lazy hems, this product is good for lazy hems (ha!), as well as sticking ornamentation onto garments (like bows onto bras)
  • Sticky notes: I use these to keep track of what fabric piece is for what part of the pattern.
  • A cutting mat: This will help you avoid scratching your cutting surface with your scissors. If you want to use a rotary cutter, a self-healing cutting mat is 100% necessary.

Experienced sewists, any other tools of the trade that you think beginners should know about? Let us know in the comments!