
Advanced Fitting Series with Designer Stitch | Darts: Essential Fitting Tools
The Advanced Fitting Series aims to answer all your intermediate-to-advanced fit questions. It is a collaboration between Sew Busty and pattern designer Ann Grose of Designer Stitch. Have a question about fit? Email it to fitquestions@sewbusty.com and you might see it featured!
Greetings my lovelies – Ann here from Designer Stitch. And welcome to my first blog post as part of the Sew Busty Advanced Fitting Series – answering your questions about any fitting dilemmas or problems that you may encounter when sewing all of your fabulous me-made clothing.
Over in my Facebook group I call this – My Teachers Hat 👩🎓 – so welcome everyone.
As this is my first post about fitting I am going to talk to you about my FAVOURITE subject – DARTS!!
You may have seen a few previous posts over on my blog discussing darts so you will know that I truly adore them.
Darts are an essential fitting tool that is needed in a sewing pattern. They are key in getting the correct fit of your sewing pattern as they enable the fabric to shape and sculpt itself around your body.
Darts give a fabulous silhouette to the garment to enable you to get the best fit possible.
What do darts do?
Darts are a contouring tool – where a flat length of fabric is shaped to contour around your body.
Darts are essentially a wedge of fabric – shaped liked an extended triangle – that is stitched in your fabric to convert that length of fabric – a 2D shape into a 3D shape.
Where are darts found?
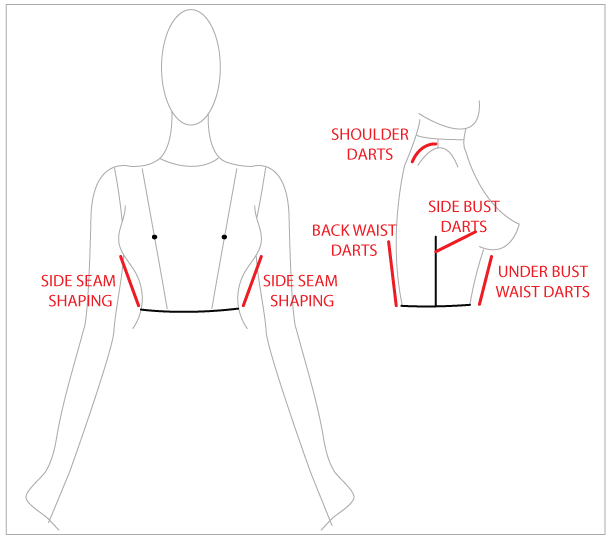
Dart areas can be found throughout the body. Bust darts, waist darts, back shoulder darts, front neckline darts.
Even the shaped side seams of a pattern are essentially darts – except they are split apart to create individual front and back side seams.
Darts don’t always have to remain as darts. Darts can be converted in flare, gather, pleats and tucks.
What happens when there are no darts in play?
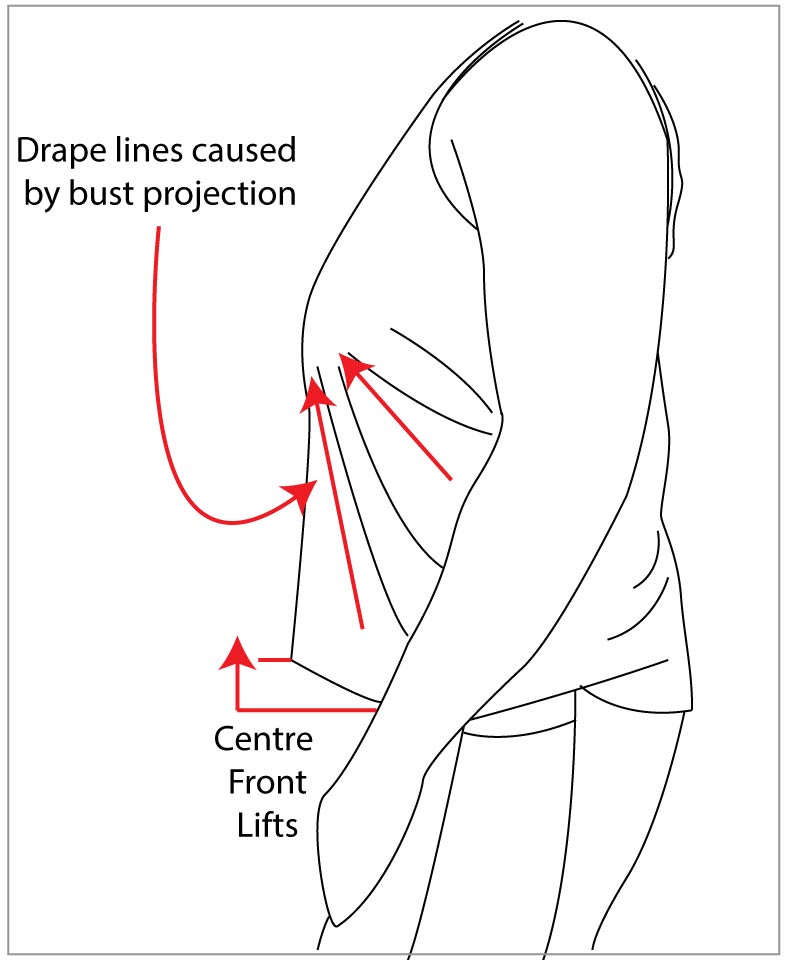
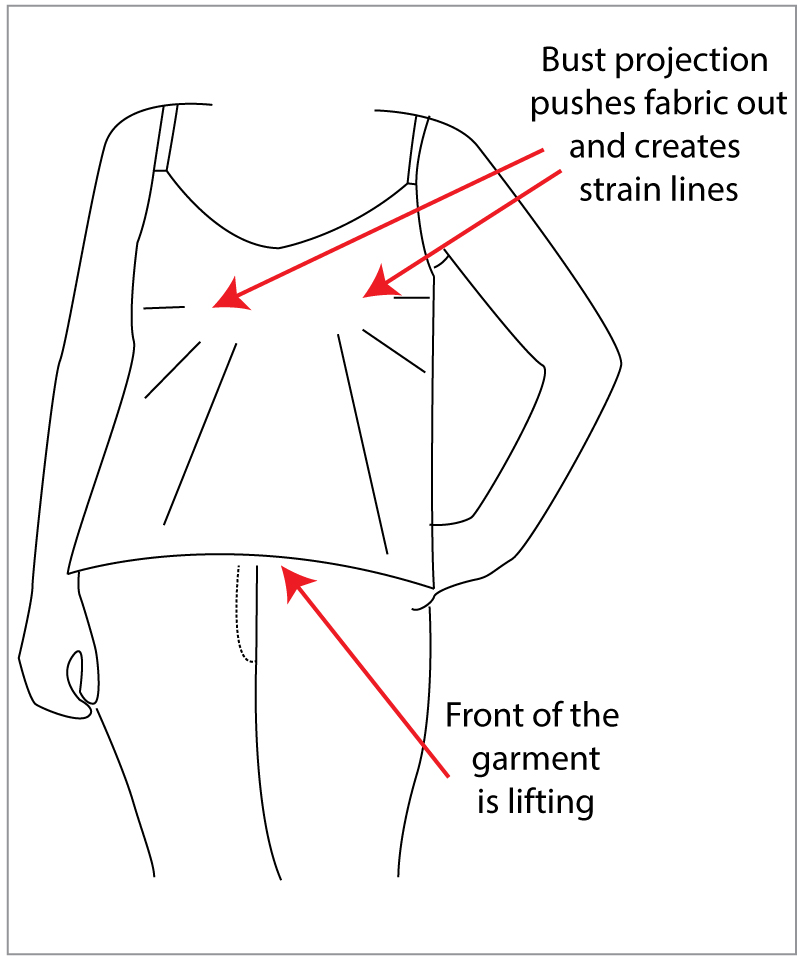
The above images are my render of two photographs that were submitted to Sew Busty where the submitter was asking about choosing the appropriate size of the pattern.
Her measures were High Bust = 36″, Full Bust = 38″. And she stated the pattern was drafted for a C Cup. (The body measures as detailed warrant a B Cup). She wondered if she needed a full bust adjustment, due to the wrinkling under the bust.
Regardless of this sizing – if you are trying to drape a flat 2D length of fabric over the body you need some type of contouring device – hence DARTS!!
And you may be saying – Why Darts? The images above indicate that the center front (CF) is lifting and there are drape lines radiating from the side seams to the bust point.
What is happening is that the bust is projecting – dragging the fabric – and then lifting the front hem line to accommodate the projection of the bust mound. (Note: the garment fitted the wearer except the drape lines were very visible. They were drape lines – not drag lines which indicate a garment that is too small).
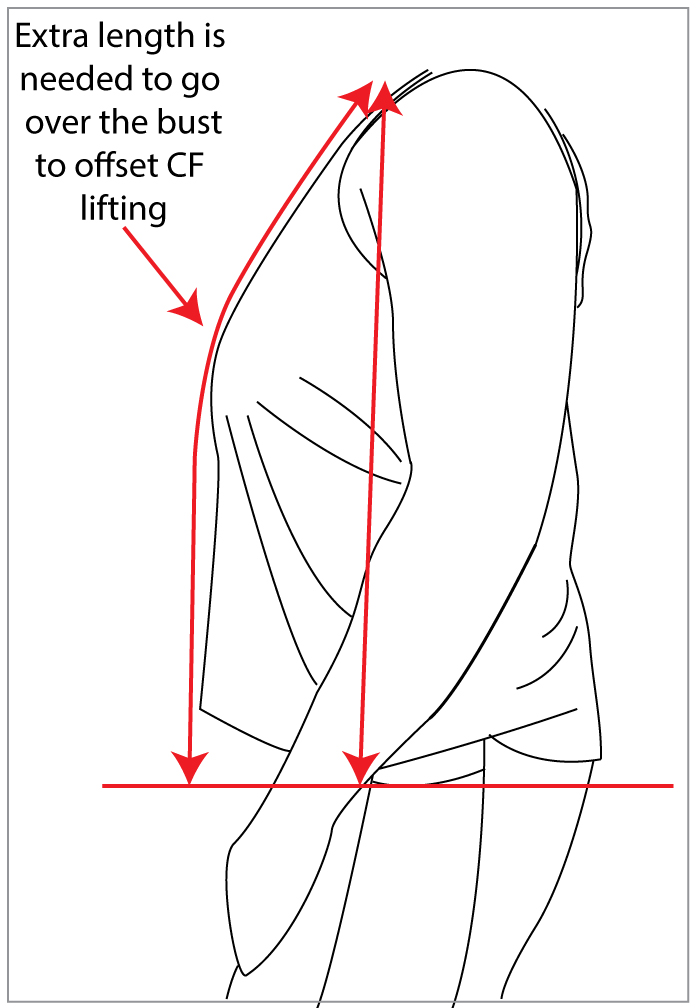
To offset the front hemline lifting – and the drape lines radiating to the bust point – the length of the front pattern piece needs to be increased.
The above image indicates two lengths of measure – one from shoulder – over bust point – down to hem. The second – from shoulder but straight down without going over bust point.
You can see how much longer the length is that is going over the bust point – than the straight vertical measure.
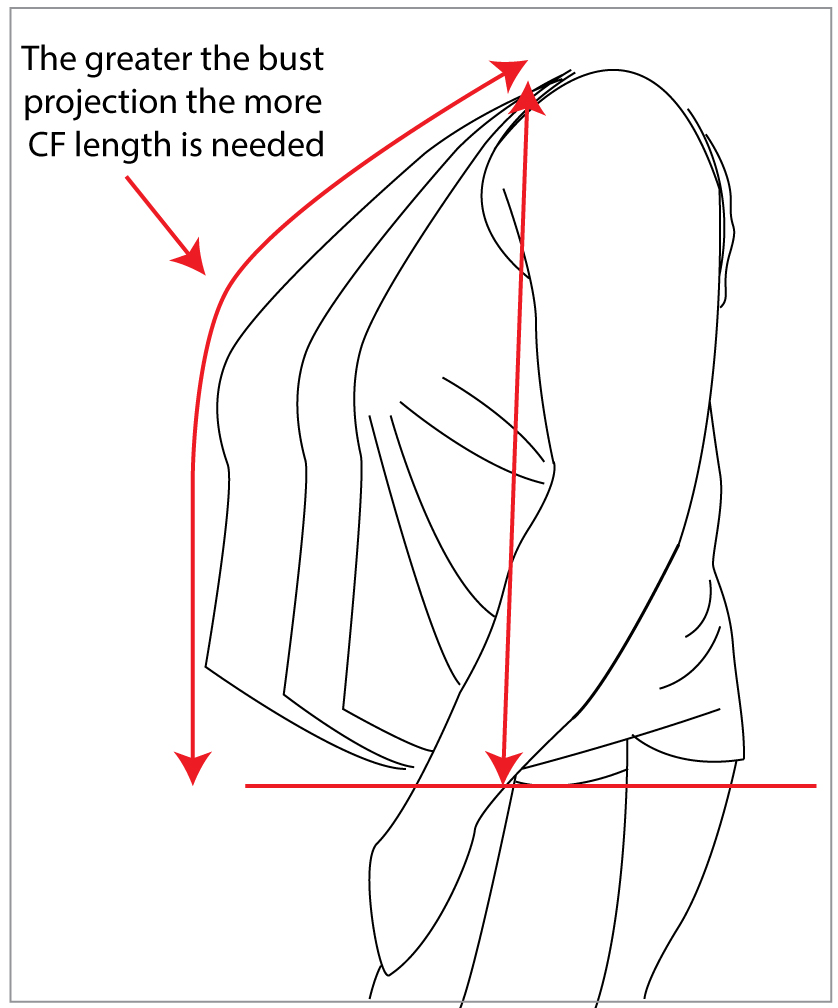
The above image shows the more the bust projects – the need for a greater length of front pattern piece.
Adding extra vertical length to the front pattern will then allow the sewn piece to contour nicely over the body – but to do this we have to add shaping to that pattern piece to offset the extra length.
And that will be remedied by our friends – DARTS!
OUR FRIENDS – DARTS.
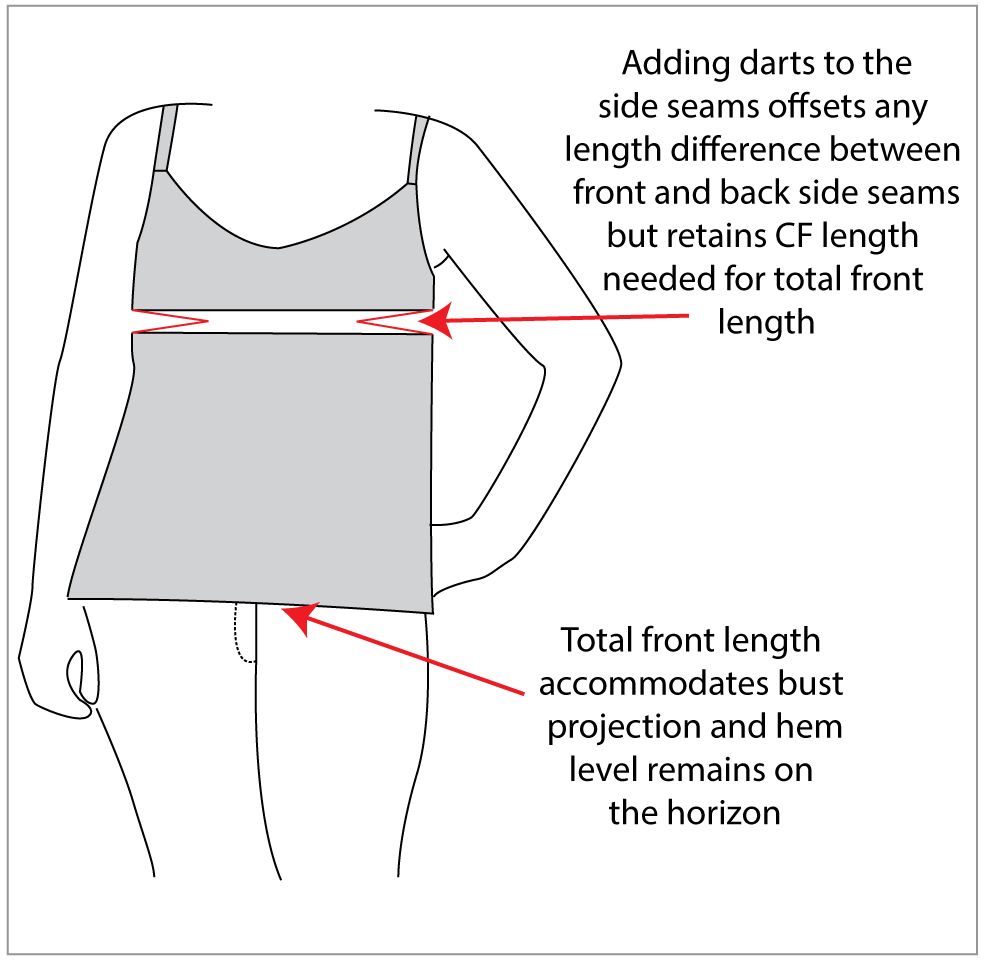
To add extra length to a pattern piece – to facilitate contour – the entire front needs to be lengthened – but as the center front (CF) of the pattern has to be cut on the fold the entire front piece needs to be split and extra length added in.
And so our lovely dart friends come into play xx.
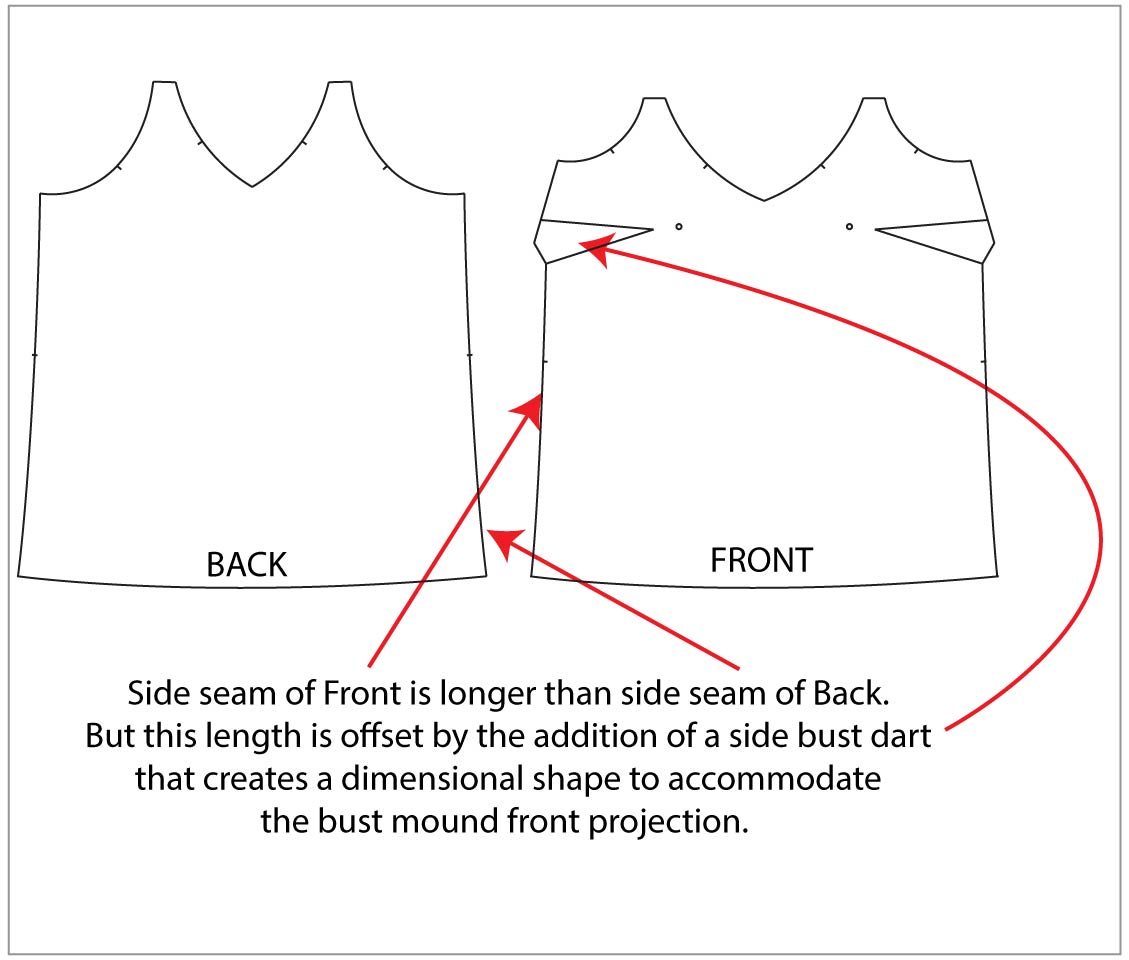
The extra length added to the vertical front of the pattern is taken up with a side bust dart.
The side bust dart is placed at an angle – generally 8-9cms (3 – 3 3/8″) down from your original armhole/scye line – angled to the junction of your front bust depth/bust point separation known as the bust apex (bust point).
Then this dart is usually shortened back around 3 to 3.5cms (1 1/4″ to 1 1/2″) from your bust apex/bust point (but this can be variable)
Adding bust darts to a pattern piece is relatively easy – if you have your correct measures – and of course know how much is needed.
From the original photo that I drew the above images from I calculated that the OP need to split and add approx 2.5cms (1″) to her front length.
I hope that you have learnt something by reading my story and please shout out by commenting below if you have any thoughts to share. And don’t forget to submit your fit questions to fitquestions@sewbusty.com!
The good thing about sewing and fitting our bodies – we always learn NEW THINGS.
Love to you all and please stay safe and well everyone xx
Cheerio my lovelies
Ann xx



Suzanne
June 18, 2024Hi,
What does OP stand for?
sewbustycommunity
June 18, 2024the original poster!
Amy
July 4, 2024this is a really helpful post that I’ll definitely be using. Thanks