Amelie Sew Along Week A | Choosing a Size & Materials
For August and September at Sew Busty, we’re doing a button challenge! Post a make that features buttons on instagram with #sewbustychallenge by September 30 for a chance to win a prize!
As part of that challenge, we’re doing a sew along for the Untitled Thoughts Amelie Dress – a cute little number that features buttons down the back of the skirt, as well as an open (but bra-friendly!) back. (Check out the picture of the dress on today’s post, as I accidentally earlier shared a picture of the non-bra friendly! For the full sew along, including bonus content, click here!
The Untitled Thoughts Amelie has been on my to-make list for a while, so I’m really looking forward to sewing this up!
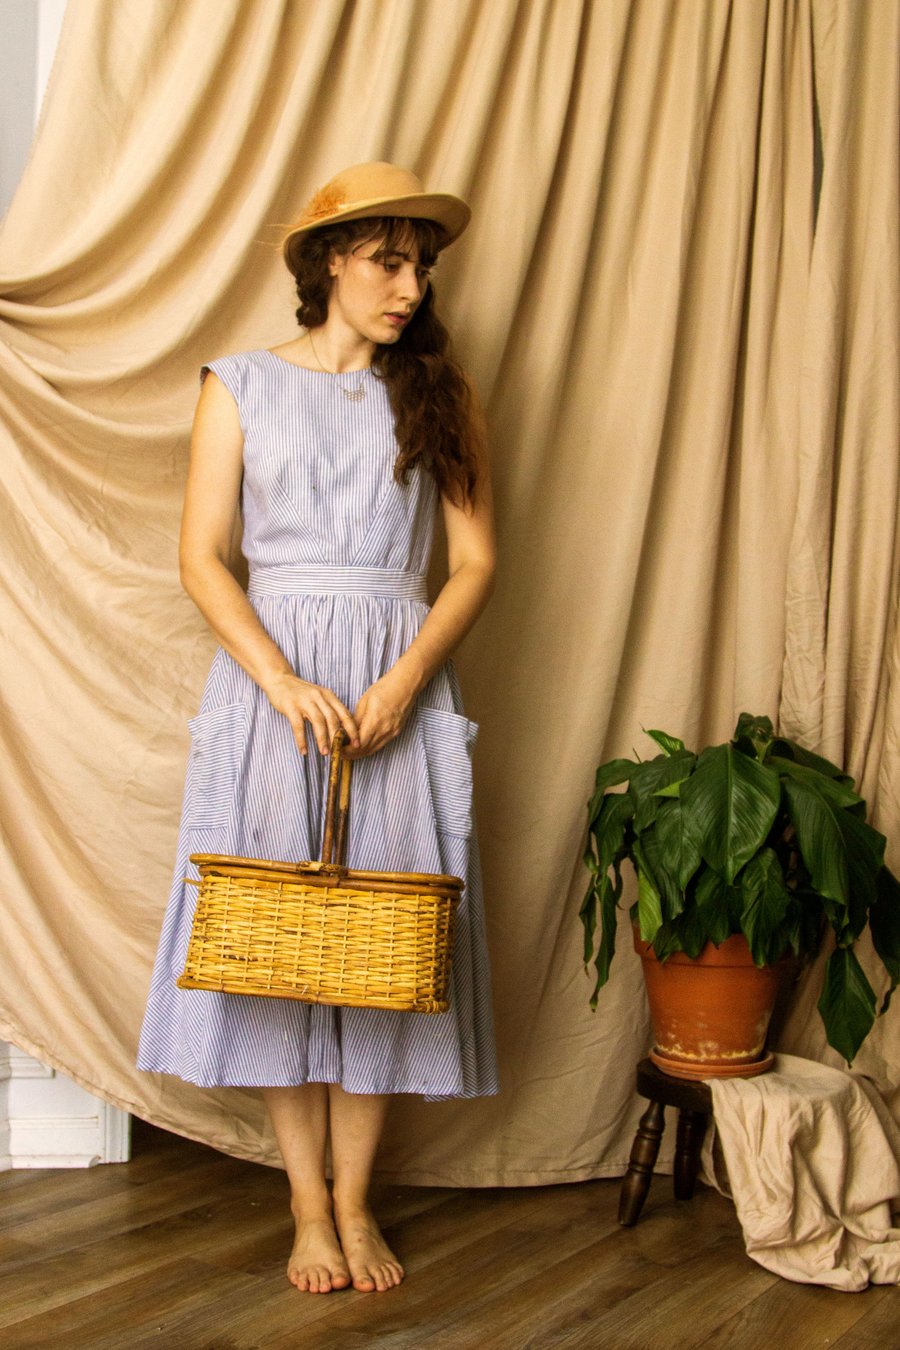
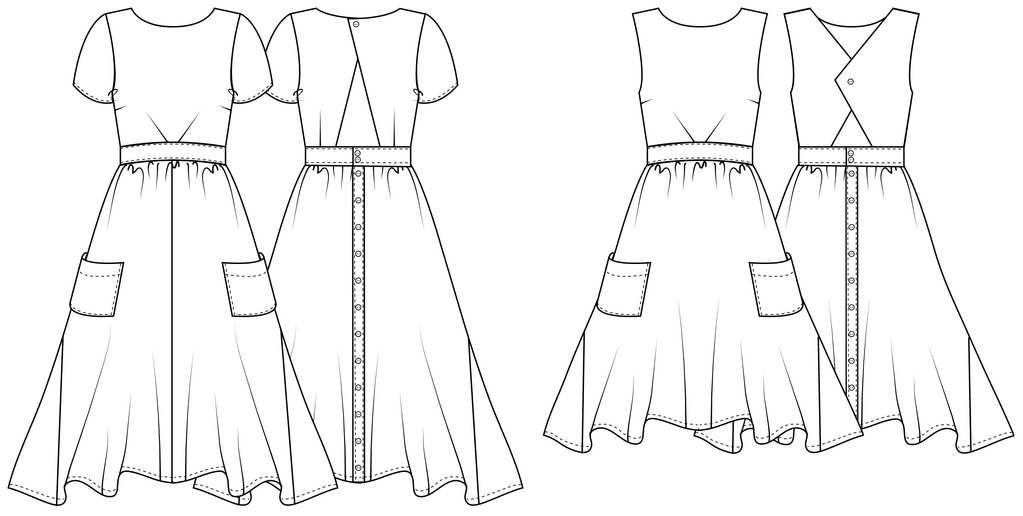
This dress has a couple options: You can choose sleeves or sleeveless, knee length or tea length, and fully open back or bra friendly-back. For this sew along, I’m going to be sewing the sleeveless, tea length, and bra-friendly back! But you could easily sew along with any of the options, the instructions might just be a bit different.
This is an intermediate sew, so we’re going to take things a bit slower this time. Sew along installments will be released weekly over the next 5 weeks, but you’ll have until the end of September to finish up before we start the next sew along in October! The schedule for this sew along will be:
- August 9: Choosing a Size and Materials
- August 16: Preparing Your Pattern: Doing a Full Bust Adjustment on the Amelie
- August 23: Sewing the Bodice and Waistband
- August 30: Sewing the Skirt and Attaching the Bodice
- September 6: Finishing Touches (including BUTTONS!)
Choosing a Size
This dress comes with a bunch of options. First, it’s available in US sizes 0-30, which corresponds to a waist measurement of 24-50″ (60.9-127 cm). Second, it comes with both garment B cup and garment DD cup options. (Remember these are not the same as bra cup sizes! For more info, check out our guide here.) Third, the pattern comes with two sleeve options – slender bicep and full bicep!
So many options! So how does one choose?!
Using your high bust measurement + 2″ (5 cm)
When choosing a size, we always start at the top and work our way down. So we need to choose based on our high bust measurement. (Not sure how to take your high bust measurement? Check out our guide and free measurements printable here!)
We don’t use our full bust because the size chart “bust” listed is for a B cup. And we, my friend, are not B cups.
A lot of full bust adjustment tutorials will tell you to directly substitute your high bust measurement for the full bust line on the size chart. This is also wrong. Like I just mentioned, the “bust” line on size charts is generally for a garment B cup – 2″ (5 cm) between full bust and high bust. So if we directly substitute our high bust for the “bust” line on the size chart, we’ll be choosing too small a size.
So, what’s a busty person to do? Add 2″ (5 cm) to your high bust!
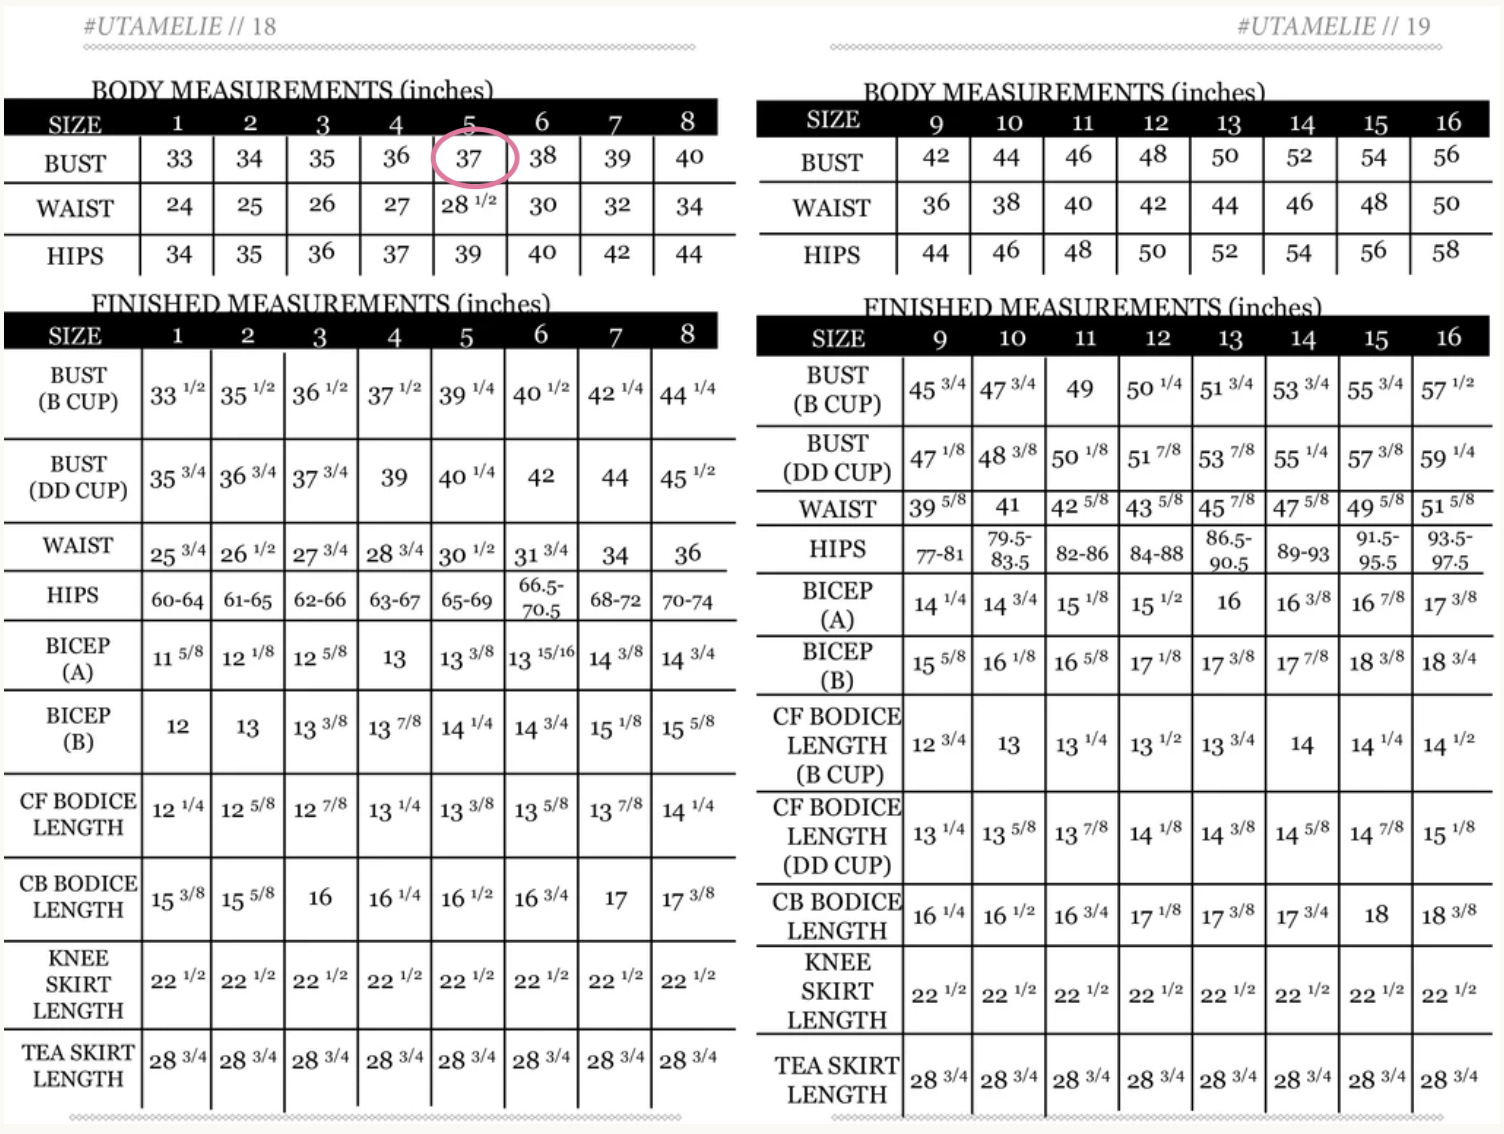
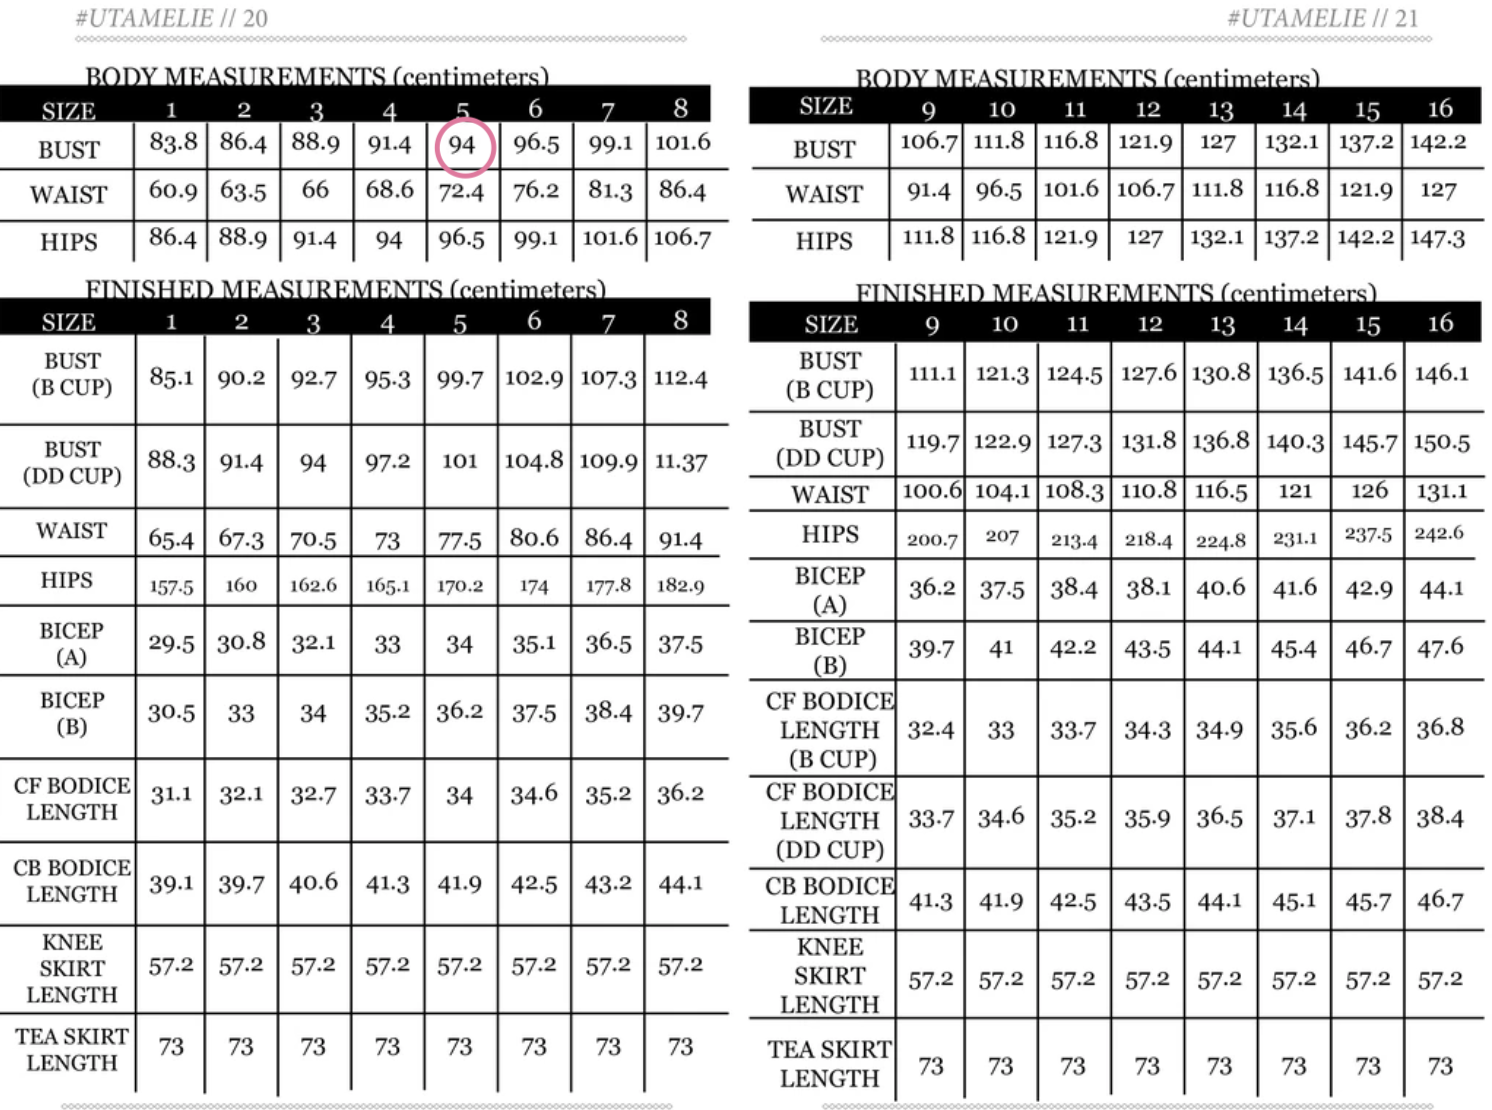
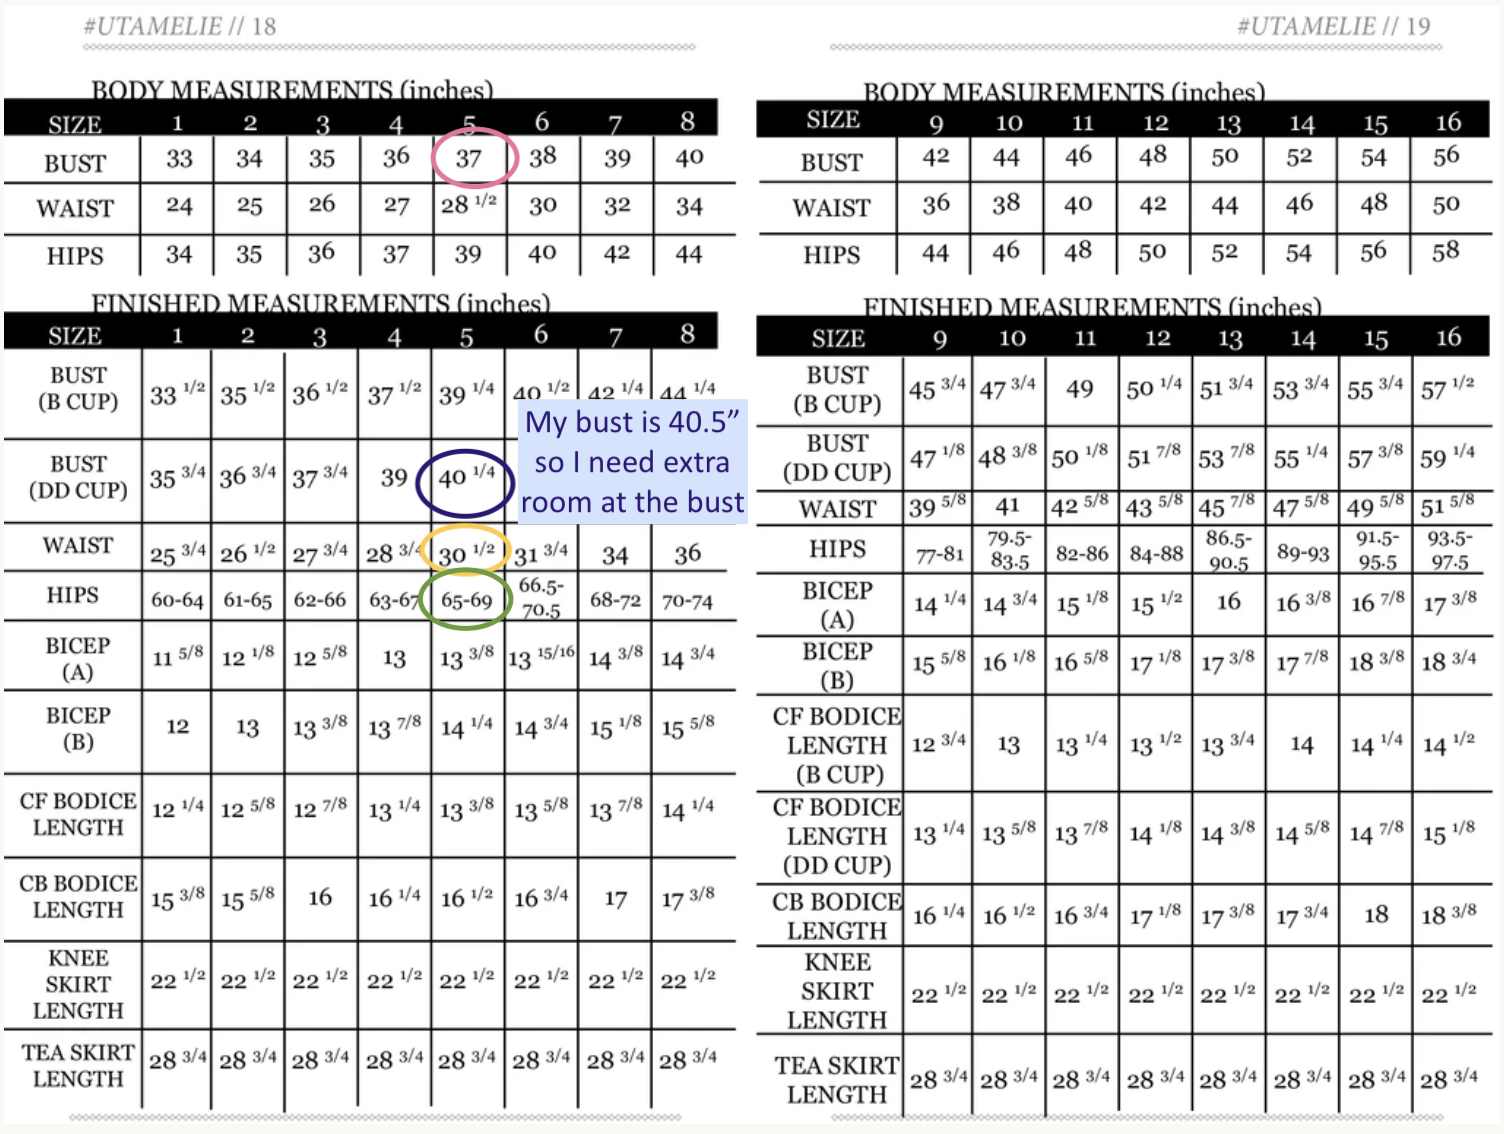
For example, my high bust is 35″ (89 cm). When I add 2″ (5 cm), I end up with 37″ (94 cm). I call this my pre-FBA measure, and this is what I’ll choose my pattern size based on.
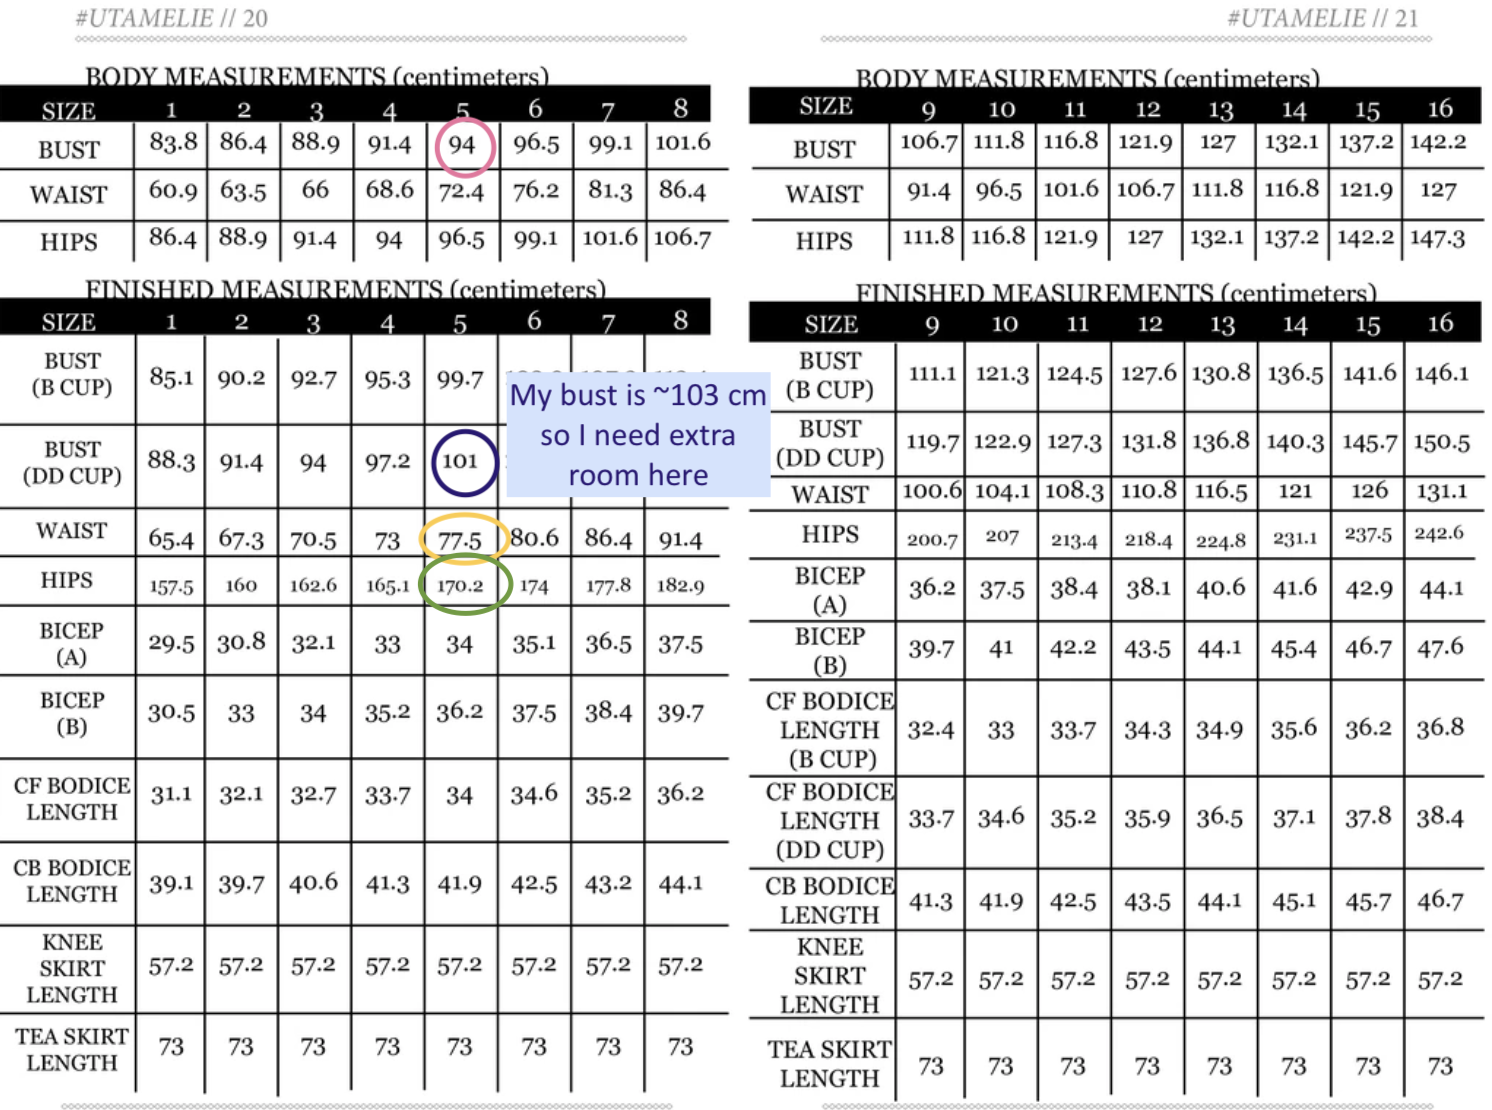
Now, let’s look at the size chart! (Slide for metric!)
You’ll see I’ve circled the bust line on size 5, which corresponds to my pre-FBA measure of 37″ (94 cm). This means I’ll start with a size 5.
do I need a full bust adjustment?
Now, if you’re not a B or DD cup (and maybe even if you are … more on this below), you’ll need a full bust adjustment. Next week, Brittani – the designer behind the Amelie – will be on the blog to show us how to do an FBA to this pattern. But, for now, let’s explore how to determine if you need an FBA.
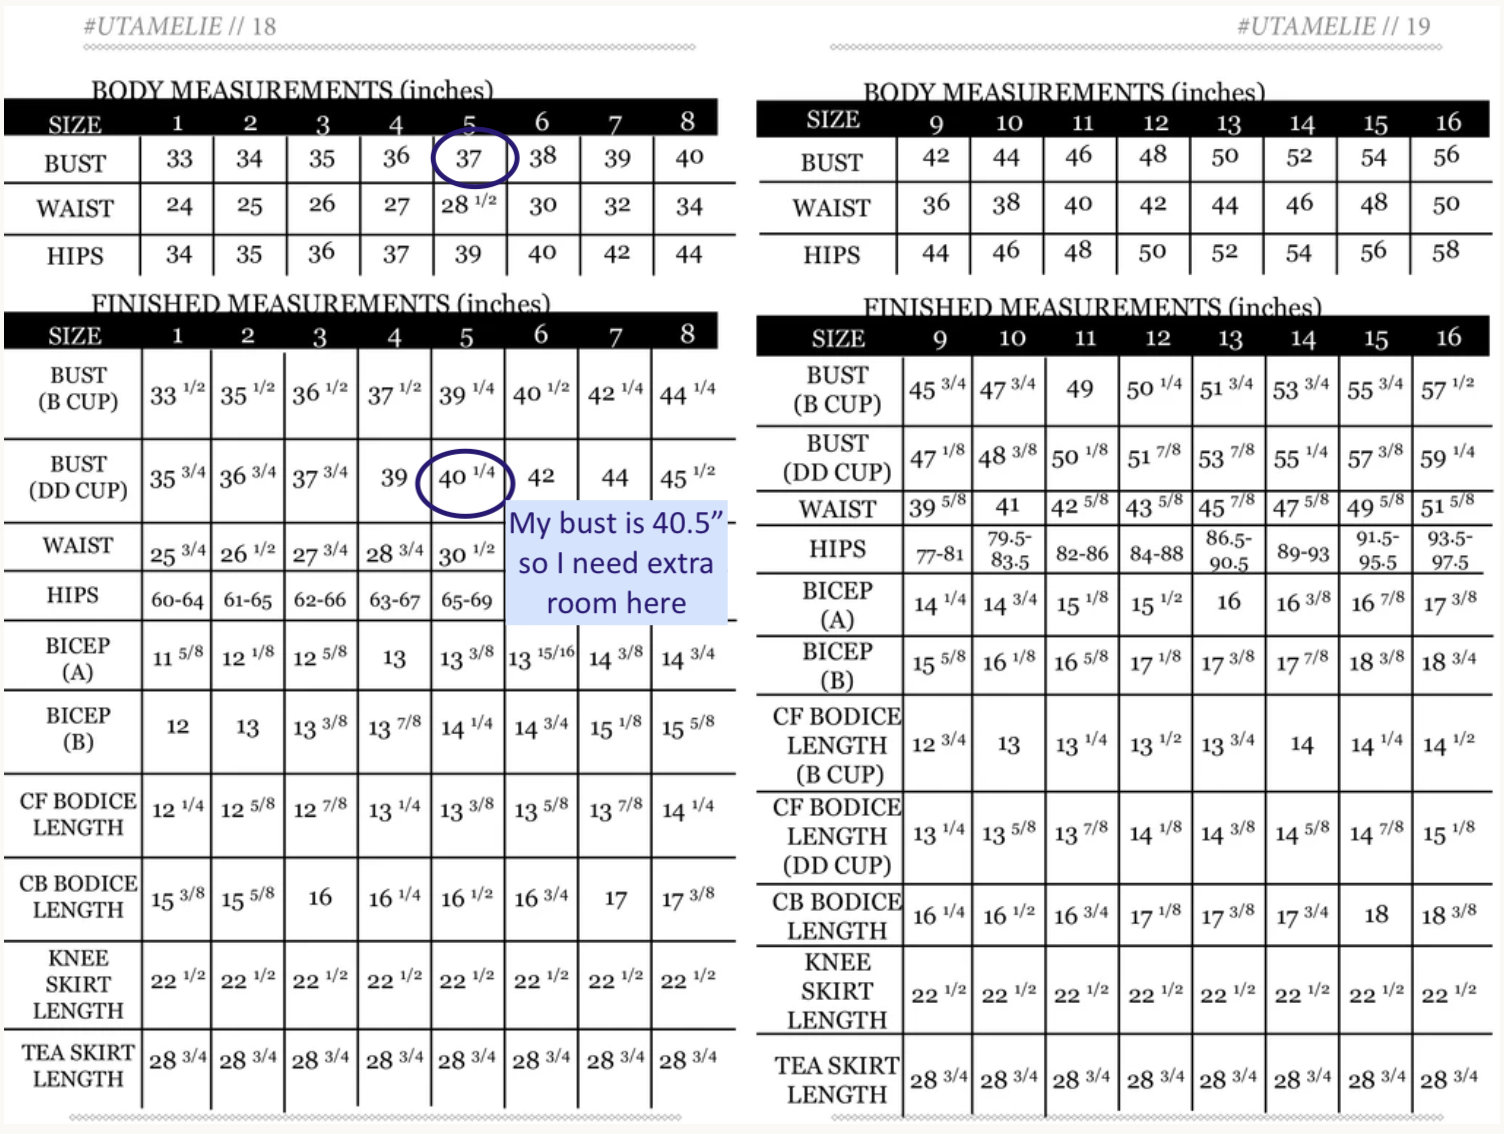
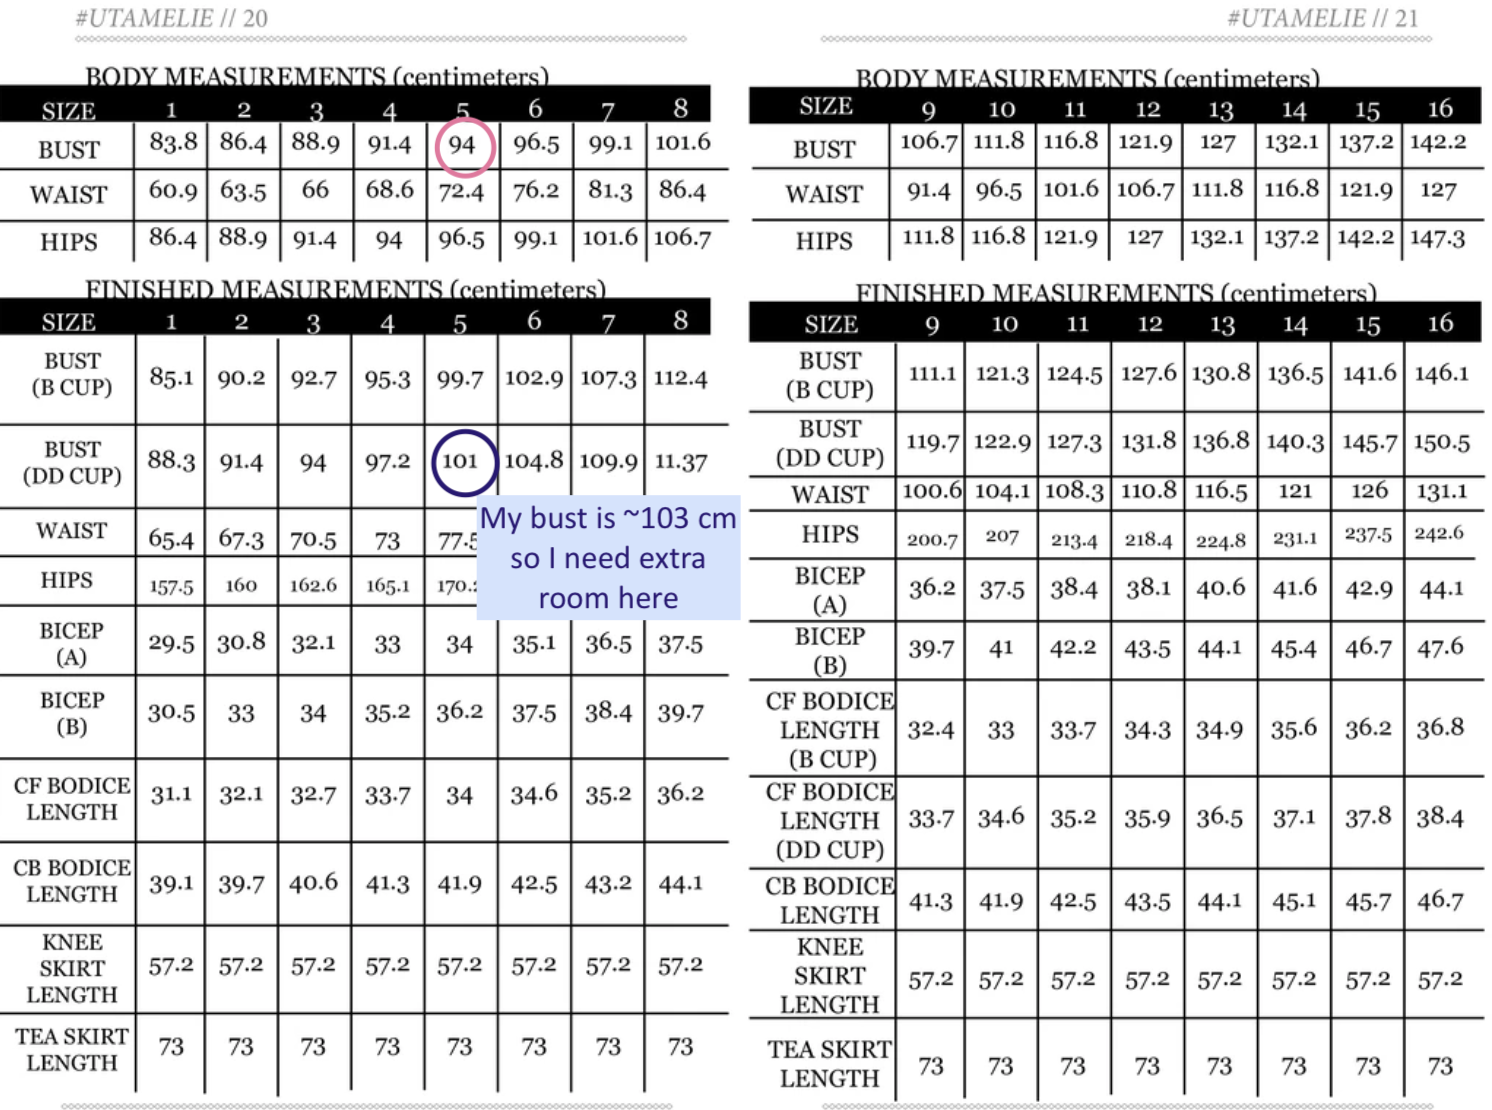
The reason I say you may need an FBA even if you’re a garment DD cup is because the DD cup on this pattern isn’t exactly 5″ (12.7 cm) at all sizes, which is what we’d expect from a DD cup. So how do we figure this out? Look at the finished garment measurements, of course! (Slide for metric!)
My full bust is 40.5″ (103 cm), so normally, I can wear a DD garment cup without change, as that extra 1/2″ (1.3 cm) gets accounted for in ease. But on the Amelie, that’s not the case. The 5DD only gives a finished bust of 40.25″ (101 cm), so that leaves me needing some extra room. This means, if I made the 5DD as drafted, it wouldn’t quite zip, as there’d only be 40.25″ of fabric around me! You also want a bit of ease.
I find this chart from Something Delightful helpful in determining how much ease you want. A lot of drafting methods will say the minimum ease you want at the bust is 3″ (7.6 cm), but I know I tend to like less ease at the bust, so I break that “rule.” I like somewhere around 1.5-2″ (3.8-5 cm) of ease at the bust, personally. So I need the finished measurement at the bust to be at least 42″ (106.7 cm) to include enough ease. (For reference, the Eden Jumpsuit I made recently has a finished full bust of 42.5″ (108 cm).)
I’ll probably add about 2″ (5 cm) to give me a finished measurement of 42.25″ (107.3 cm), offering 1.75″ (2 cm) of ease. Again, next week’s post will cover the full bust adjustment and preparing your pattern, so just keep this in mind for now!
What if you’re between the B and the DD cup? It sort of depends on how close you are to either measurement. I’d say you want at least 1.75″ (5 cm) of ease at the bust, and up to 4″ (10 cm) of ease. So if your full bust is between 1.75-4″ (5-10 cm) less than the DD cup, I’d cut a straight DD. This will probably cover most busty people who fall below the DD cup finished measurement!
Looking at the waist
Back to the size chart we go! (Slide for metric.)
Alrighty! For me, this is going to be easy. My waist is somewhere between 29-29.5″ (73.7-75 cm), depending on how much ice cream I’ve been eating 😂😂 I know I like about 1-1.5″ (2.5-3.8 cm) of ease at the waist, so the finished waist measurement at size 5 of 30.5″ (77.5 cm) is perfect.
Technically, my waist falls between sizes 5 and 6, as you can see at the body measurements chart on the top. The pattern is designed for slightly more ease at the waist. But I’m not going to sweat it, because I know I like less ease.
If your waist measurement falls into another size, don’t fear! You just have to blend sizes. For example, if my waist was 30″, I’d probably want to choose a size 6 at the waist. Then I’d just blend the 5DD (with FBA) at the shoulders and bust into the size 6 at the waist down.
I like this tutorial on Cashmerette for blending sizes. You’ll just need to print two sizes on top of each other: your bust size (which for me, is a size 5) and your waist size (which, in the hypothetical where my waist is 30″, would be a size 6).
Finally, the hips
The hips are pretty easy on this pattern, because the skirt is a gathered, full skirt with plenty of ease. So most people will be able to keep the same size for the waist and hips.
For hips on skirts like this, I like to totally ignore the body measurement chart and look only at the finished measurement chart. Why? Because the ease makes it so looking at the body measurements doesn’t much matter. For example, my hips are actually 38″ (96.5 cm), but the finished hip measurement on this is 65-69″ (165-175.3 cm) at size 5. In other words, even if my hips were, say, 44″ (106.7 cm), which technically would fall into a size 8, there’d still be plenty of room for my hips at a size 5.
What does this mean? Well, for most people, you’re not going to need to grade or blend sizes for the hips. Just keep the same size at the hips as you have at the waist.
Choosing Materials
This pattern suggests different fabrics can achieve different looks. You can go drapey or structured! For drapey, the pattern suggests chambray, silk noil, linen, cotton voile, or rayon challis. For structure, canvas, cotton, and denim are suggested.
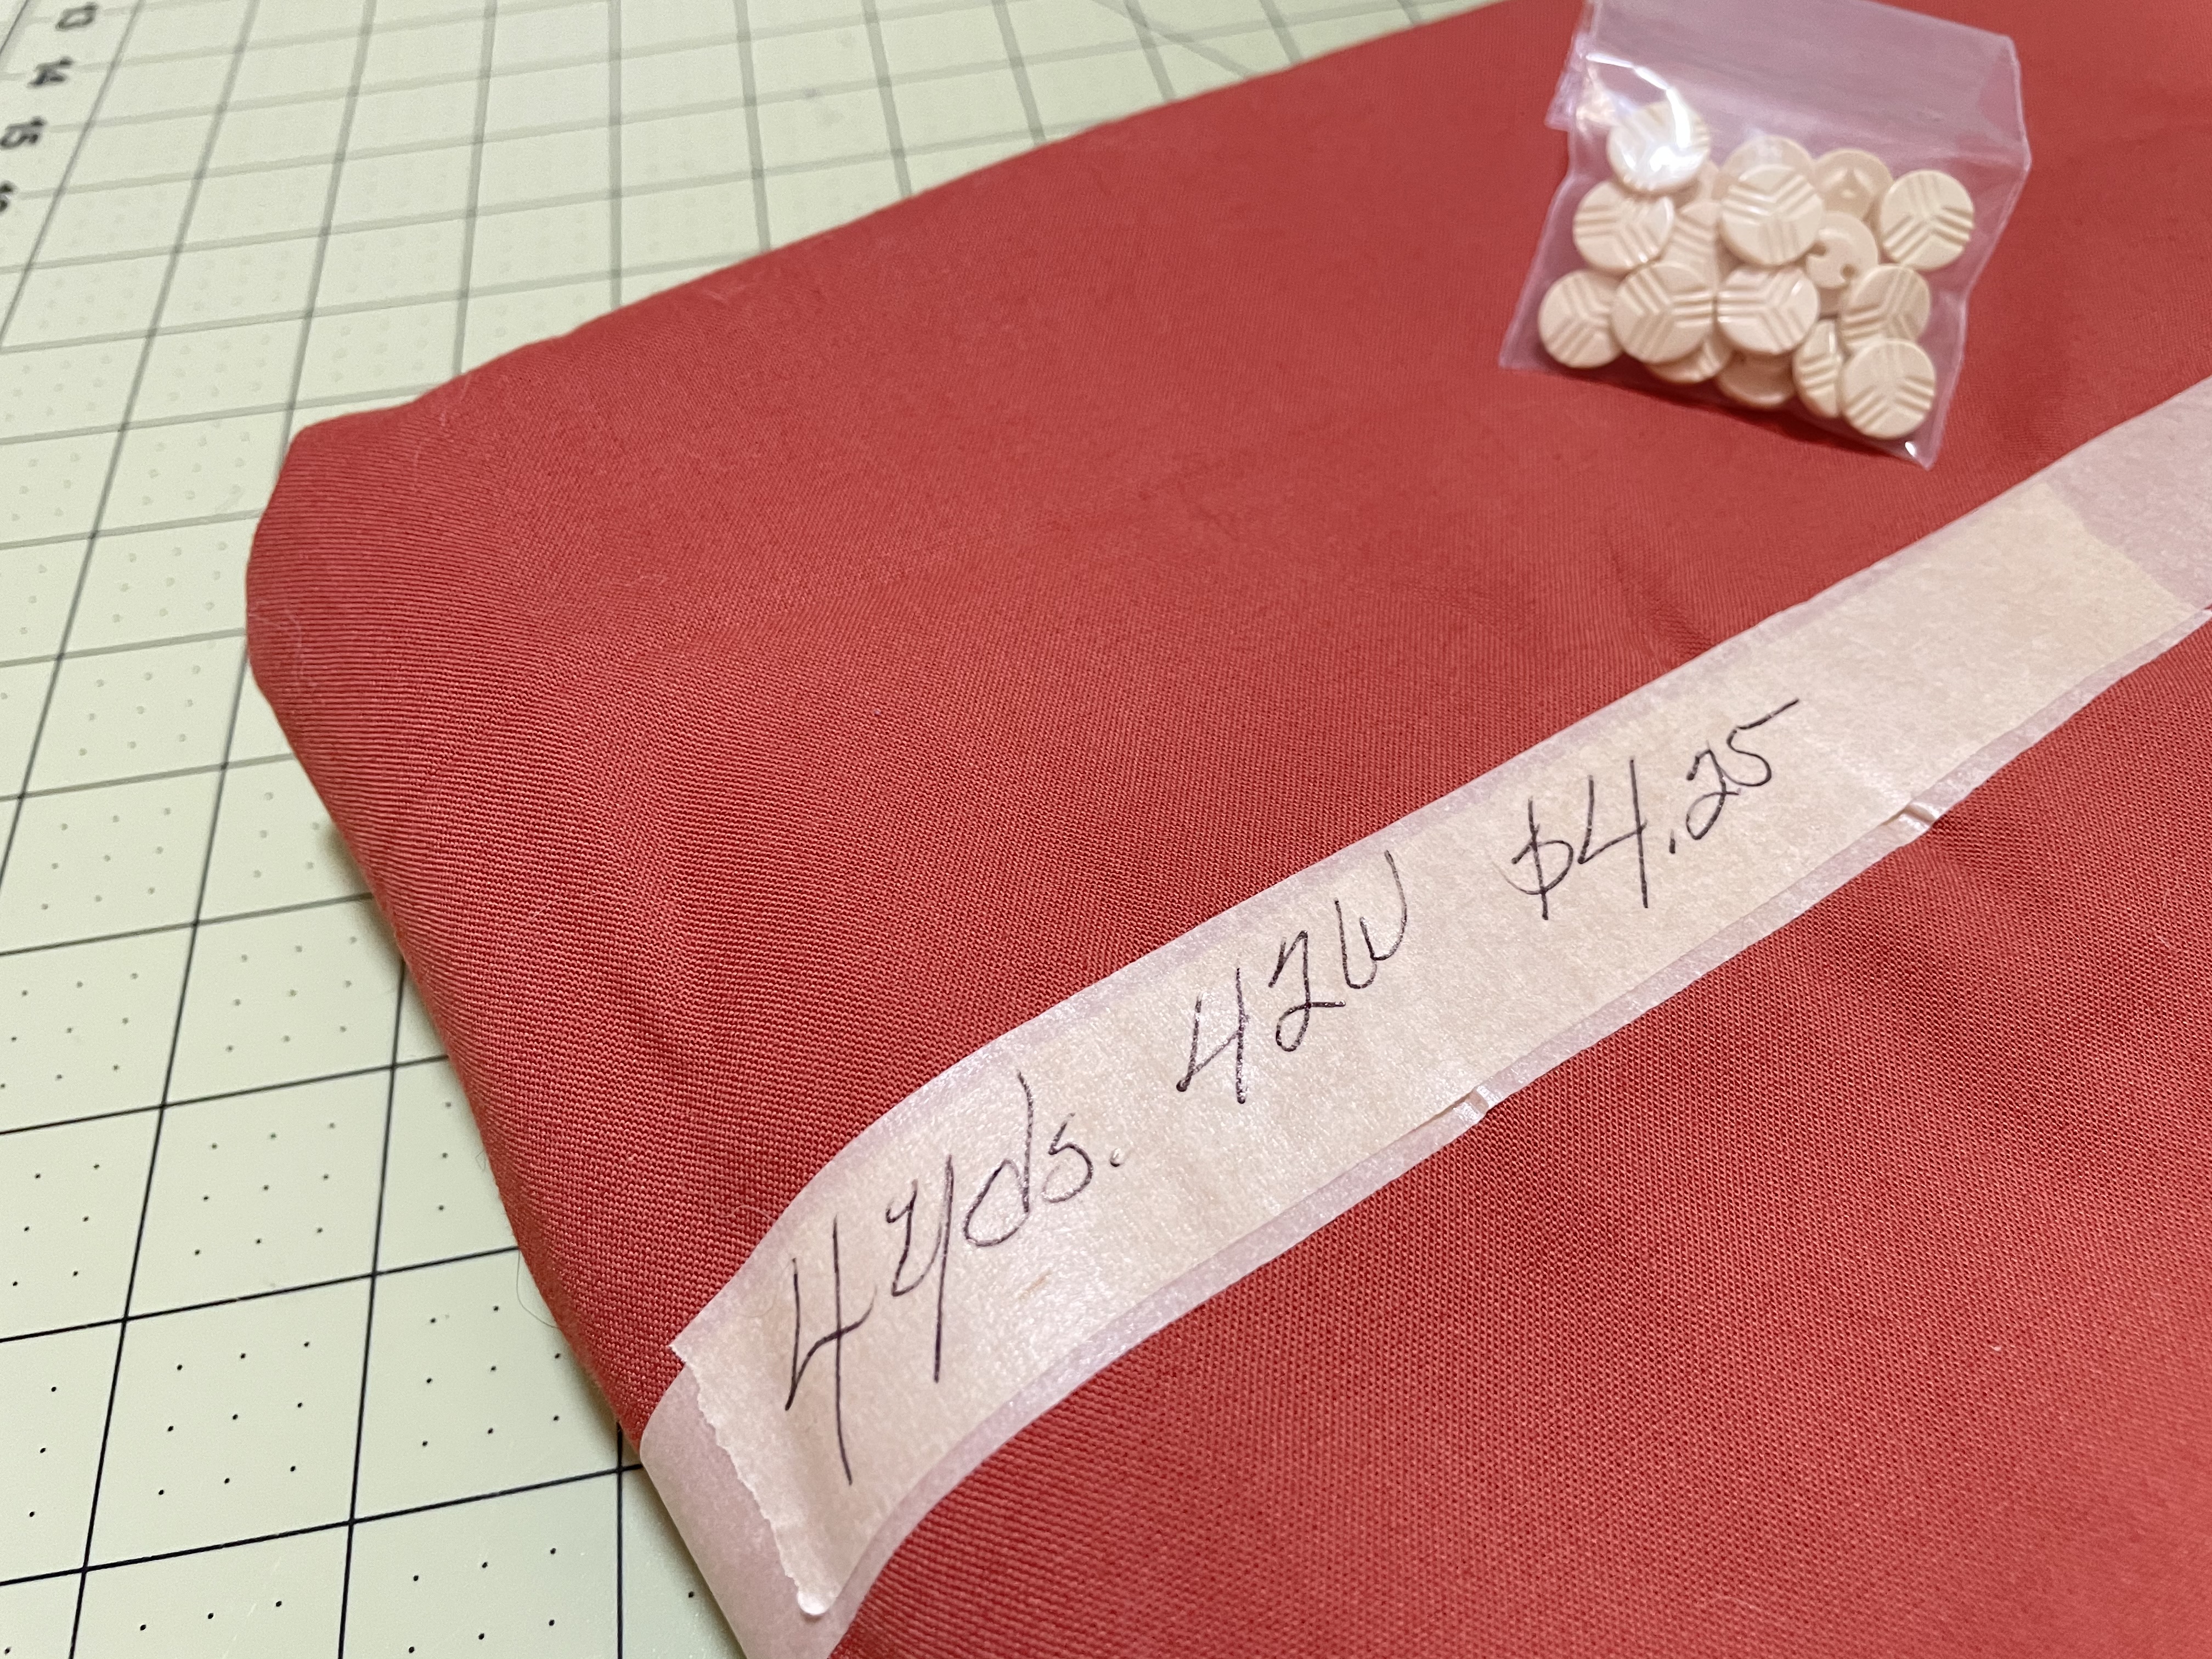
I want a slightly structured look, but not too much. So I’m going for this lovely burnt orange cotton I got at a thrift shop! (Yes, that $4.25 price tag for 4 yards is accurate!)
This chart gives you yardage requirements for this pattern. For me, I’m making the sleeveless long skirt, so I’ll need 3-1/3 yards (3 meters).
You’ll also need a few other materials:
- 1 yard/meter of lining (I’m going to live dangerously and hope to get away with 4 total yards of this cotton, buuuut I’ll use muslin for lining if I need more)
- 1/2 yard/meter of interfacing of choice
- 15 buttons, 1/2″ (13 mm) (or 13 buttons for the knee-length skirt)
- Matching thread
- A set of needles appropriate for your fabric of choice
As usual, you’ll need your normal sewing tools, listed in this post.
Your Homework
This week, you should:
- Purchase, print, and assemble your Amelie pattern. Print in layers the sizes mentioned in this post – one size for your bust, and, if it’s different, one size for your waist and hips.
- Gather your materials
Next week, on August 16, we’ll talk about doing a full bust adjustment for those of us who need a bit more room at the bust!

