Bra Month | Community Blog | Using Scuba for Bra Making with Jeannie
A ready-to-wear look easy enough for Beginner bra makers??
It’s easier than you think to have the look and feel of a custom or high-end retail bra, even for beginner bra makers. The answer is found in scuba print fabrics!
What is scuba bra making fabric?
Scuba fabric is a double-knit fabric made with finely spun polyester fibers to create a smooth hand with a low luster sheen and a full-bodied drape. While named after the material used in scuba suits, this is not thick neoprene.
Instead, the scubas we select for bra making have a slight spongy feel like ready-to-wear, a medium to medium-light hand so they will drape well with some stretch. Scuba is printed on one side with a very soft back. The Gigi’s Bra Supply exclusive scuba prints include both animal prints and floral prints. Because the scuba print fabric has a stretch of 10% to 25%, we would back the scuba with either sheer cup lining, duoplex or cut-and-sew foam to give it the stability you need for cups.
Additionally, scuba print fabric is absolutely gorgeous!
Using a backing fabric provides the freedom to ignore the DOGS (degree of greatest stretch) of the scuba fabric, allowing us to position our pattern pieces in any place and any direction to give the perfect printed pattern matching between the left and right cups.
The technique that makes this so approachable for a beginner is called “fussy cutting”.
With fussy cutting we add one additional step – just one step!
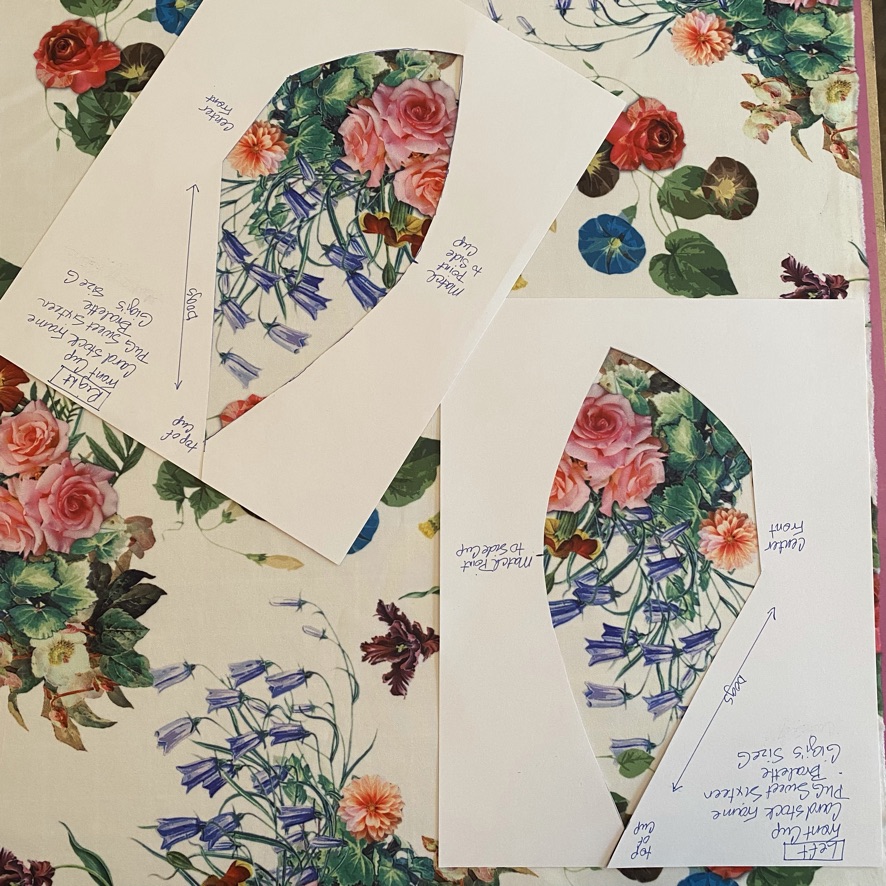
Fussy cutting is a term often used in quilting to feature a special part of the fabric, for example, you might want to feature a certain flower or color you especially like. Fussy cutting is a great way to customize the scuba to feature any of the design elements … for this Bluebells and Roses scuba, I would have the bluebells face inward toward the center front, which means the fabric would be mirroring (the Left Cup bluebells will face toward the Right Cup, and the Right Cup bluebells will face toward the Left Cup at the center front).

This Pin Up Girls Bralette pattern has a prominent center front so I would use the ¼ inch seam line to match up the center front…remember, you are stitching these together so you’re matching at the seam line, not at the edge of the fabric. Other patterns might have cleavage in the front … in that case, you might want to match up or mirror the design on a different part of the cup.
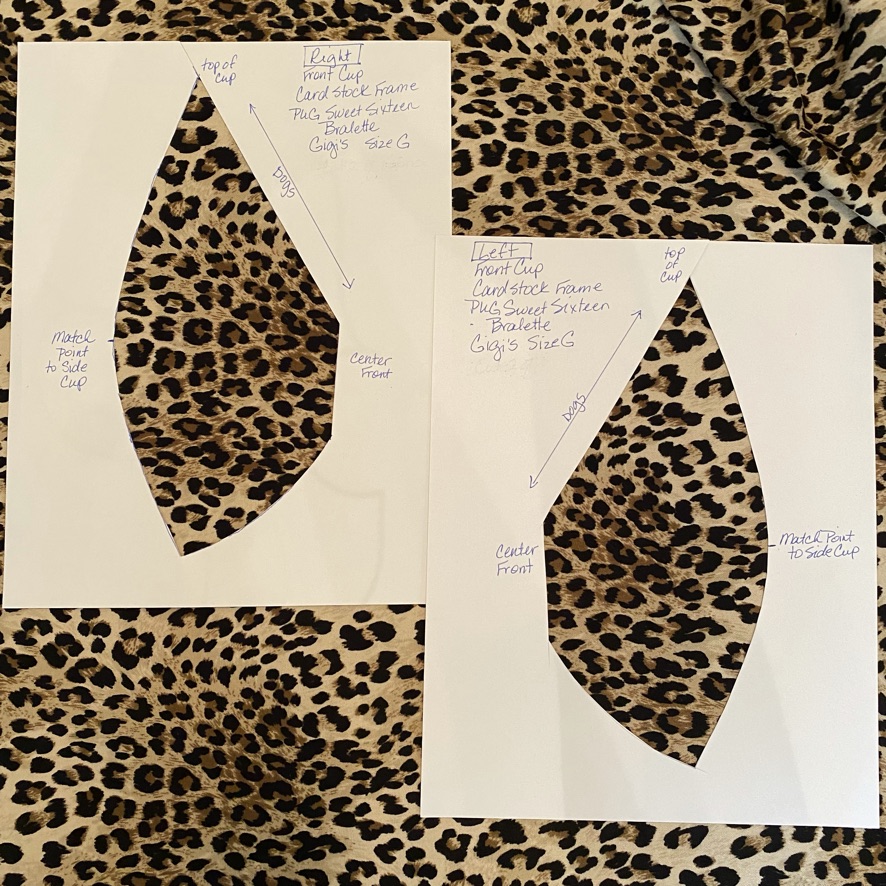
We will prepare our pattern pieces for the cups as normal, and then add ¼ inch seam lines at the spot where you want the scuba fabric to intersect … either at the center front, or at another match point. The cups are curved so you’ll have to choose a spot you want to feature, and not try to match up the entire cup. Next, place the pattern pieces on cardstock or heavy paper to trace a Left Cup and Right cup. Cut out the pattern piece and you’ve created a cardstock window to use on the scuba. Cut out a Left Cup and a Right Cup frame so you can see how each cup will intersect at either a match point or the center front.
Next, we lay out the scuba print fabric on the cutting table and use the cardstock window frames to frame the floral or print exactly how we would like it to appear. Remember, because we are lining the scuba print with a stable fabric like sheer cup lining, duoplex or cut-and-sew foam, we do not need to worry about direction at all.
Once we have the design we want lined up in the window frame, mark on the paper frame any details. Then use a fabric marking pen to transfer the pattern onto the fabric, and be sure to transfer match points onto the fabric. (You can put them on the back or front in the seam line, but you will need them to make sure your pieces line up correctly.) Once you’ve traced the pattern piece onto the fabric, use a small rotary cutter or good sharp scissors to “extract” the fabric piece that is exactly the size, shape and print pattern that we desire!
When our scuba pieces are cut out we will place them on top of the corresponding pieces of sheer cup lining, duoplex or cut-and-sew foam (remember, with the duoplex and cut-and-sew foam, we do follow the direction of greatest stretch, as shown on the pattern, as normal). We can use fusible webbing to secure the two pieces of fabric together, or we can use a wash-out glue stick to temporarily connect them. By using either method, we make it easier to sew because it is as if we are working with one combined fabric, instead of messing with keeping two fabrics in alignment.

We’ve already looked at the mirroring of the bluebells. Now take a look at the animal print fabric. This print has a darker section and a lighter section of the design. I’ve used the window to put the darker designs toward the center front.
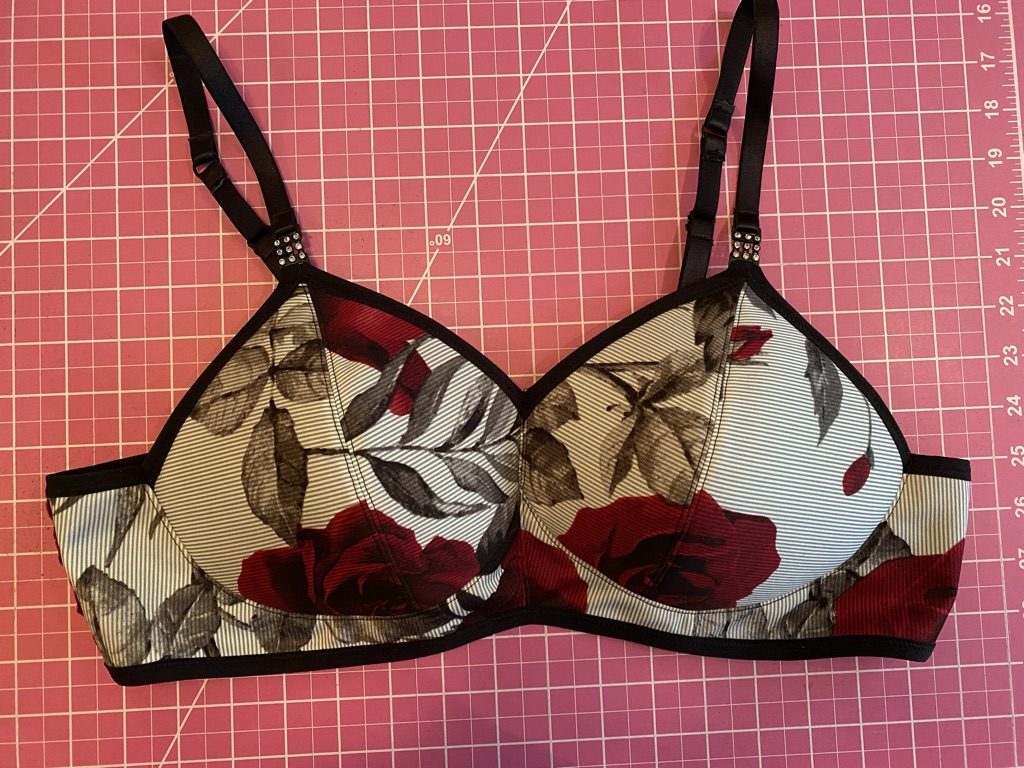
The grey and red scuba bralette features another way line up the scuba – notice how the leaf design continues from one side of the center front to the other.

Whether you are mirroring a design, or matching, the ¼ inch seam line marks will show you where the fabric pieces will intersect … those ¼ inch seam lines will be your best buddies as you sew the cups.
Now sew the fabric pieces and enjoy your gorgeous new bra!!
Here are the steps for bra making scuba success:
- Decide which parts of the beautiful scuba you want to feature
- Add ¼ inch seam lines to the pattern pieces in the areas where you want to match the design, or mirror the design.
- Make a Fussy Cut Frame by tracing the pattern pieces onto cardstock. Make a Left Cup frame and a Right Cup frame ensuring that the center fronts are faced the correct direction.
- Use the Fussy Cut Frame on the fabric to “frame” the bra cup pieces to highlight your preferred designs on the fabric. Trace the pattern onto the fabric. Keep the pattern pieces handy and to transfer all match points and ¼ inch seam lines.
- Place/adhere the scuba fabric piece onto a backing fabric (sheer cup lining, duoplex or cut-and-sew foam)
- Sew the fabric pieces as directed in the pattern.
- Wear your gorgeous new bra!!
Give yourself some grace the first few times you try matching or mirroring. It might take a few tries for your eyes to “see” how the pieces will come together. Even if the design doesn’t line up exactly as you planned, you’ll still have a gorgeous new bra!

Jeannie New is the owner of Gigi’s Bra Supply, an online bra supply store featuring professional quality fabrics, elastics, findings, and patterns for bra making…and USA distributor of Bra Makers Supply, Canada. We’ve helped thousands of customers finally get a supportive, beautiful, comfortable bra. We love our customers…and we love comfy curves! ™


