
Full Bust Adjustment Guide | Pivot + Slide Giant FBA
What’s a giant FBA?
This post is part of a series on “giant” full bust adjustments — adjustments for sewists who need to add more than 2-3″ to their garments. The series is a response to the fact that almost every FBA tutorial out there assumes you’re only adding a couple inches to your bodices, but for many of us, that’s just not true.
I, for example, need to add 7-9″ to most patterns.
Other posts in this series include:
- Giant FBA for a dartless knit bodice
- Giant FBA on a woven bodice
- Giant FBA on a cowl neckline
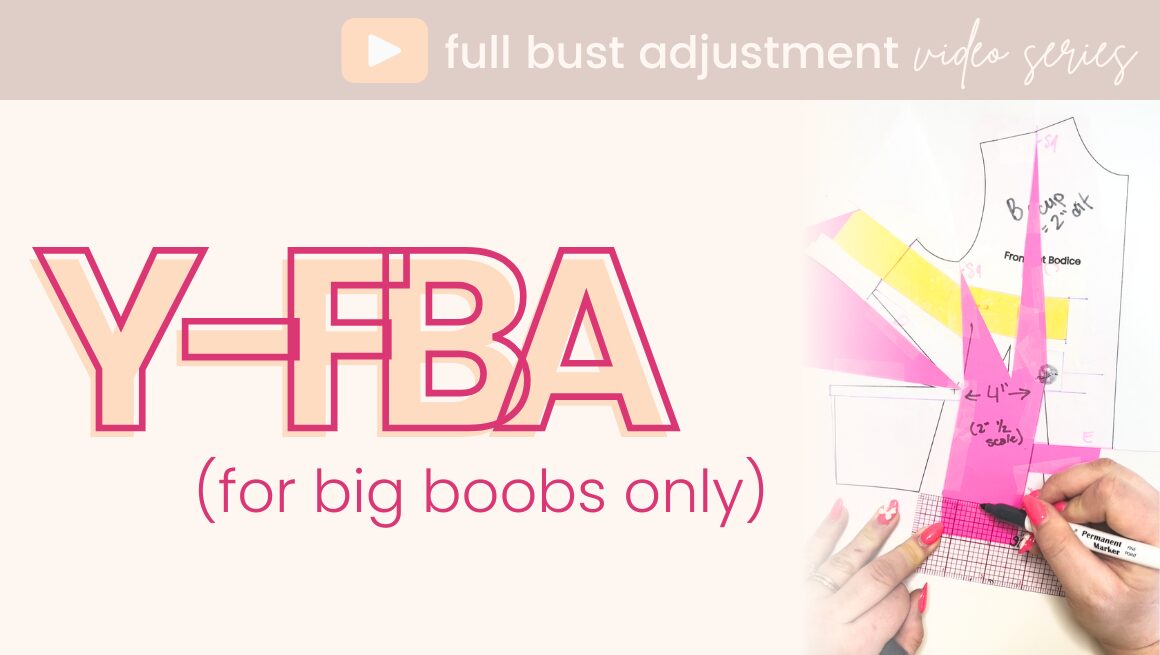
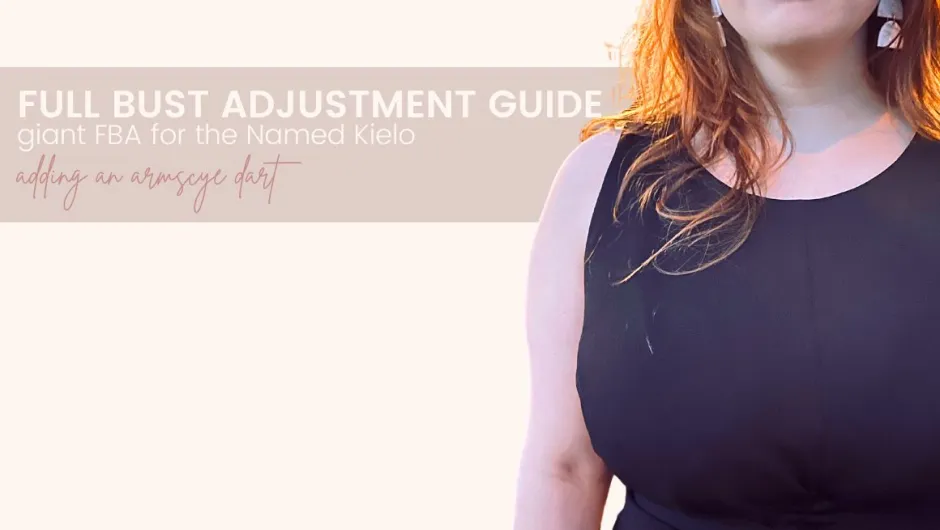
- Giant FBA on the Named Clothing Kielo (adding an armscye dart)
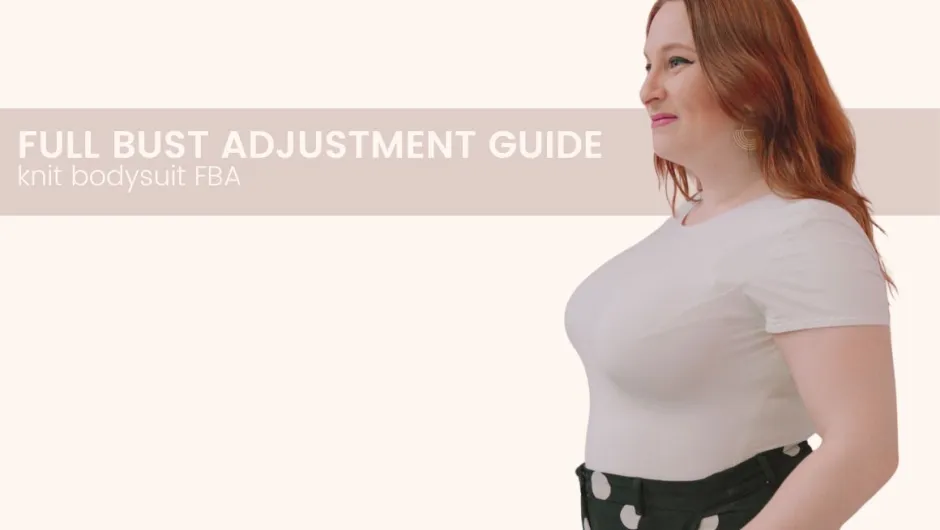
- Giant FBA on a knit bodysuit
Me and a fearless group of busty sewists also recently reviewed five different FBA methods, and 3 of the 7 testers (including myself) identified the pivot and slide method, from Nancy Zieman’s book, as our favorite.
But online instructions on using the Pivot + Slide method for large full bust adjustments are few and far in between, and — in my opinion — none provide great clarity. And, honestly, it’s not super well laid out in Nancy’s book either. Well, let’s change that. Here’s how to do a pivot and slide FBA if you’re very busty.
the steps
The first thing to know about the pivot and slide full bust adjustment method is that it’s comprised of four steps:
- Deepen the dart
- Pivot and slide (front AND back bodice)
- Armscye extensions (front AND back bodice)
- True the seams
If you’ve seen other pivot and slide FBA tutorials online, chances are one or more of these steps were skipped. That’s because steps 1, 3, and 4 are really only necessary for giant pivot and slide FBAs — folks who need smaller adjustments can usually get away with just doing step 2.
Throughout this guide, I’ll be using hot pink for the step I’m currently demonstrating.
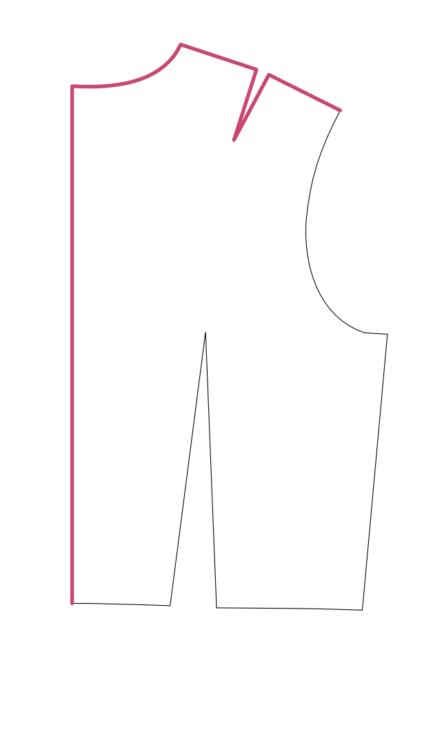
deepen the dart
I’m starting with a standard B cup bodice with darts at the waist and side. I’m going to be expanding this to fit a garment J cup (10″ difference between upper and full bust) — so adding 8″.
Before we begin, make sure you already have your apex marked on your pattern, and that the apex matches your body’s apex. I’ve removed seam allowances, but you can also opt to just pivot at the seam allowance point if you’d like to leave them on.
Bigger busts need deeper (wider) darts, so the first step is to make that mini dart wayyyyy bigger.
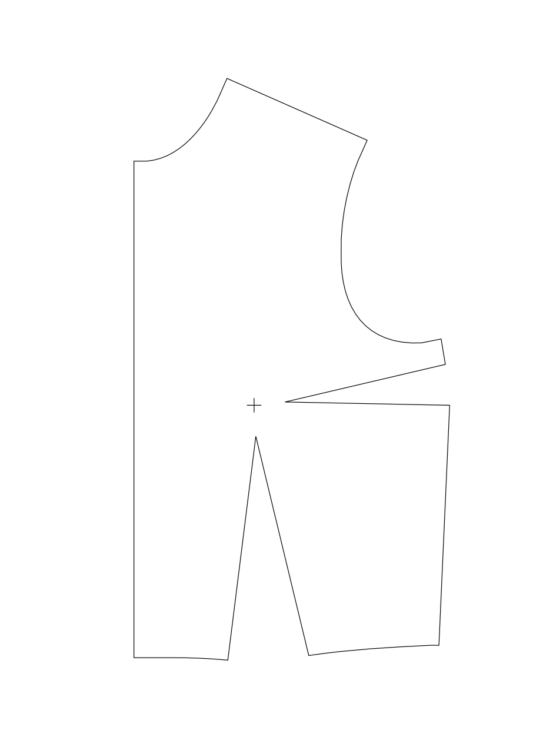
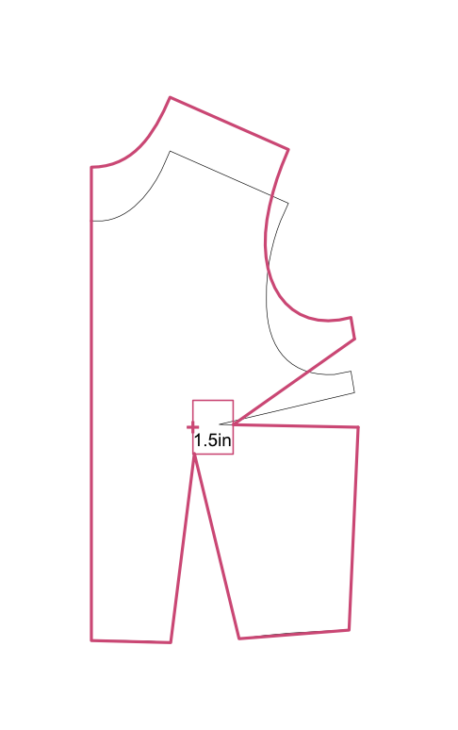
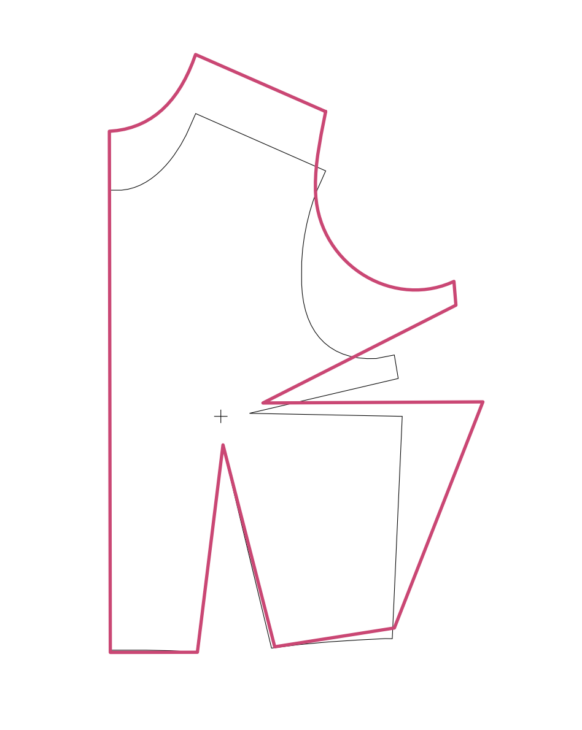
First, trace the center front, the hem, the waist dart, and the side seam below the side dart. Then, we mark a point above the high shoulder point 1/4 of the amount we need to add during the FBA. For example, since I’m doing a 8″ FBA, I’m putting this mark 2″ (5cm) above the HSP, because 8/4=2.
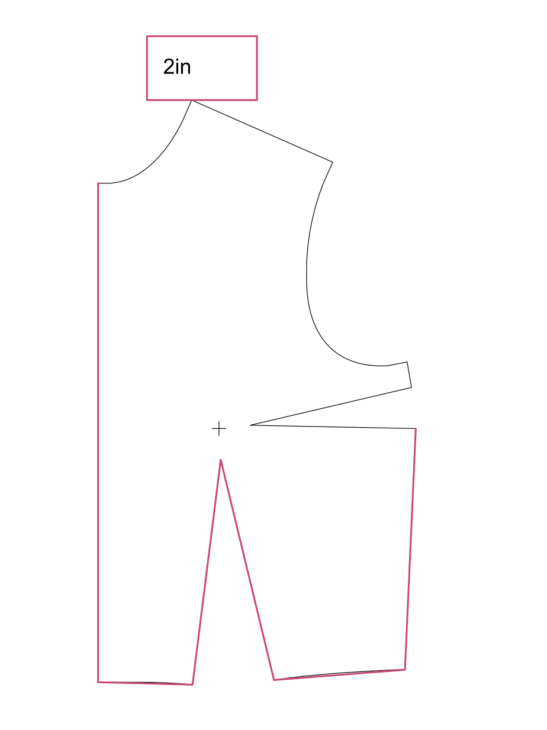
Then, we drag the whole thing up and trace the center front, the neckline, the shoulder, the armscye, and the side seam from armscye to the upper leg of the dart. We’ll also mark 1.5″ (3.8cm) or so from the apex. This will be our vanishing point. Personal preference guides where the vanishing point sits, but I’ll include guidelines below. (Note that I like a smaller distance from apex to vanishing point than these guidelines suggest, hence my 1.5″ when the guidelines suggest I need 2.5″.)
| I+ garment cup | 9″+ (22.85 cm+) full/high bust difference | 2.5″ (6.35 cm) |
| G-H garment cup | 7-8″ (17.8-20.3 cm) full/high bust difference | 2″ (5 cm) |
| DD/E-F garment cup | 5-6″ (12.7-15.2 cm) full/high bust difference | 1.5″ (3.8 cm) |
| D garment cup or smaller | 4″ or less (10.2 cm) full/high bust difference | 1″ (2.5 cm) |
Next, we’ll draw in the dart legs. You’ll notice the dart legs are a bit wonky. We’ll fix this in a later step.
Pivot + Slide — Front Bodice
Let’s start by figuring our pivot amount. The pivot and slide method adds both to the front and back bodice. (Yes, I know that’s weird, and I don’t quite know why it works, but it does!). Thus, we’ll divide our full FBA amount by 4 total seams — two in front, two in back. For my 8″ FBA, that means 2″ at each seam.
BUT WAIT! You cannot add more than 1″ per seam during the pivot and slide. So if you need to add more than that 4″ total, just subtract 4 from the total you need, and save that number for later (for me, this number is also 4, since 8-4=4). For now, we’ll be adding 4″ by pivot + slide — 1″ to each front and back seam. Let’s start with the front bodice.
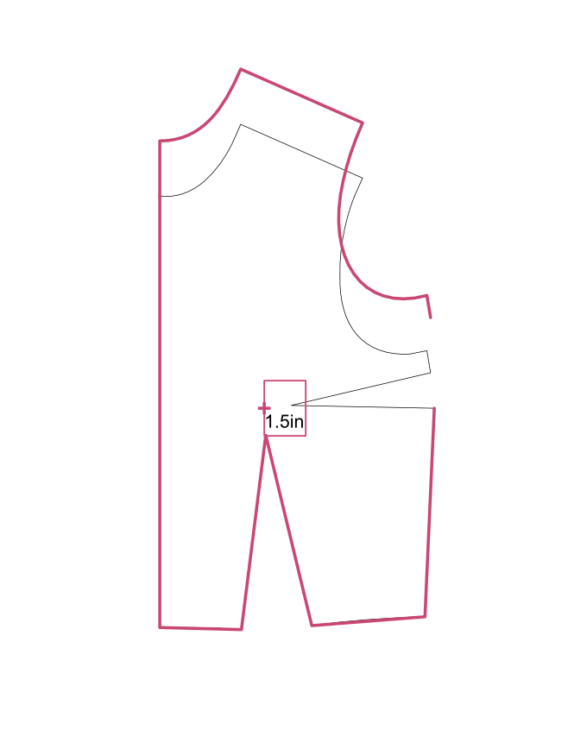
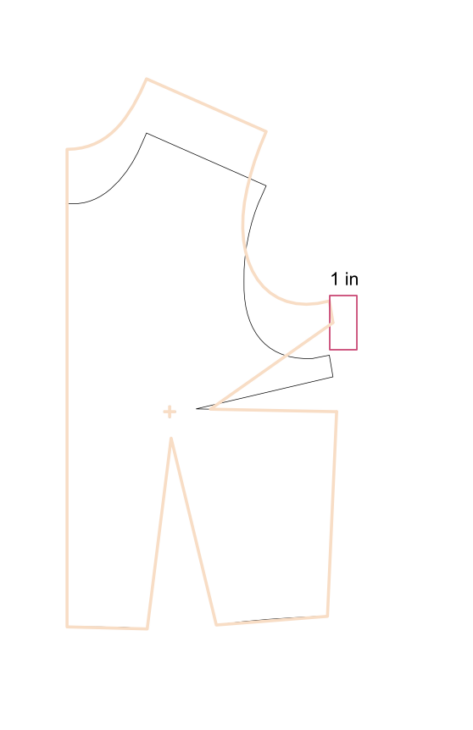
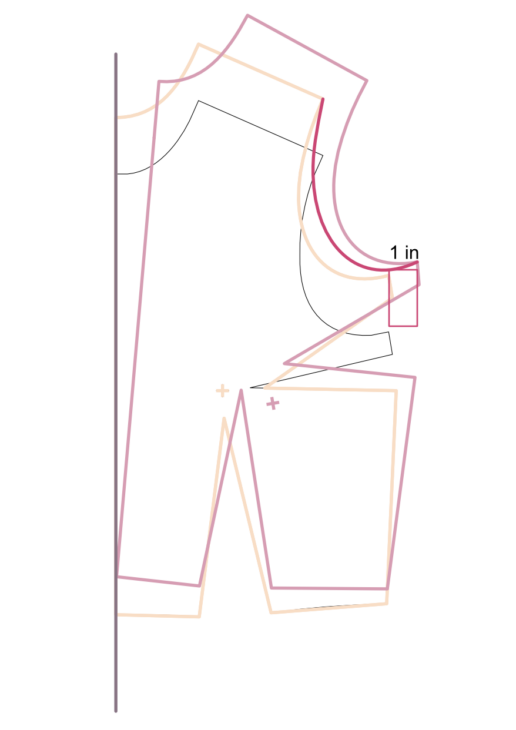
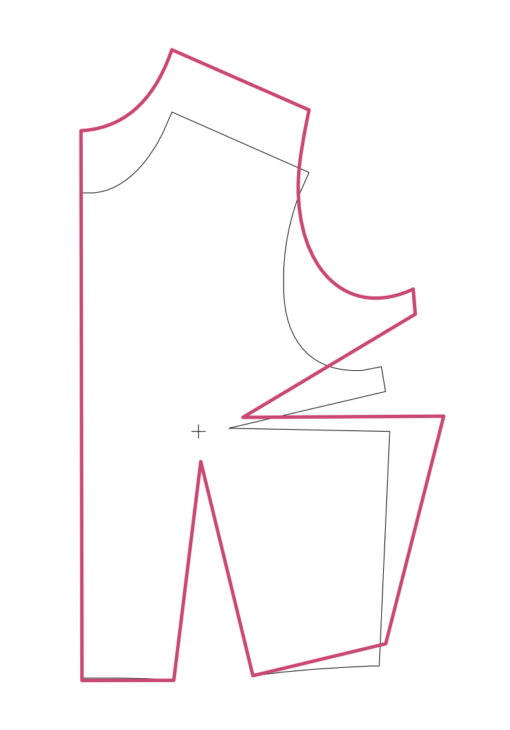
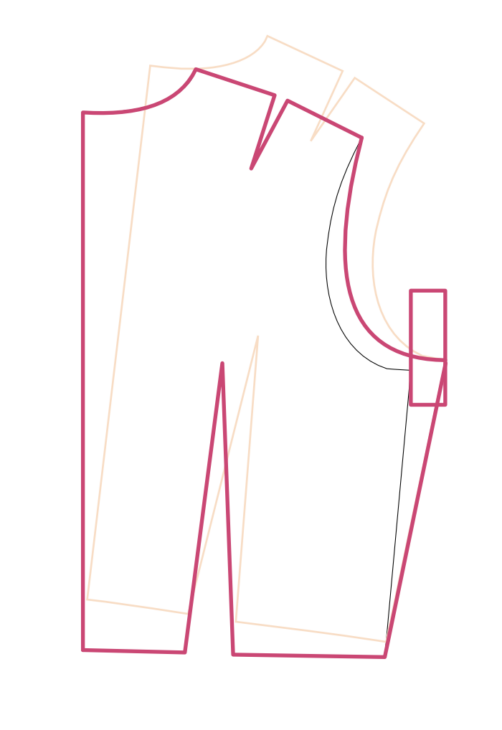
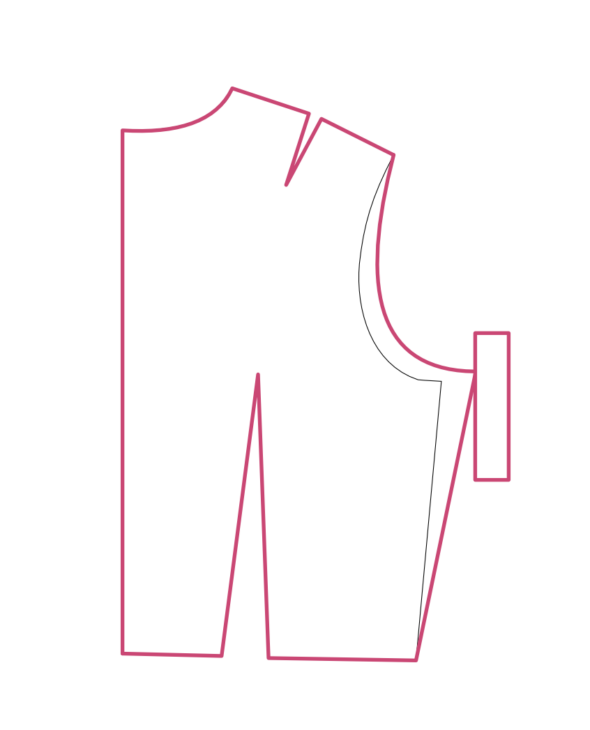
Mark 1″ (2.5 cm) from the underarm, then put a pin in the shoulder point at the top of the armscye and pivot until the underarm seam meets your 1″ mark. Trace just the armscye.
In the following diagram, the black outline is the original pattern (before deepening the dart), the peach is the pattern after the dart was deepened, the light pink demonstrates our pivot, and the hot pink shows where I traced the armscye.
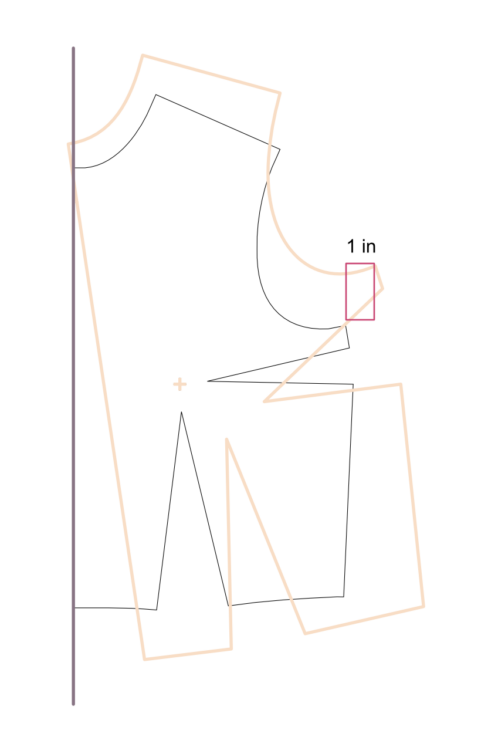
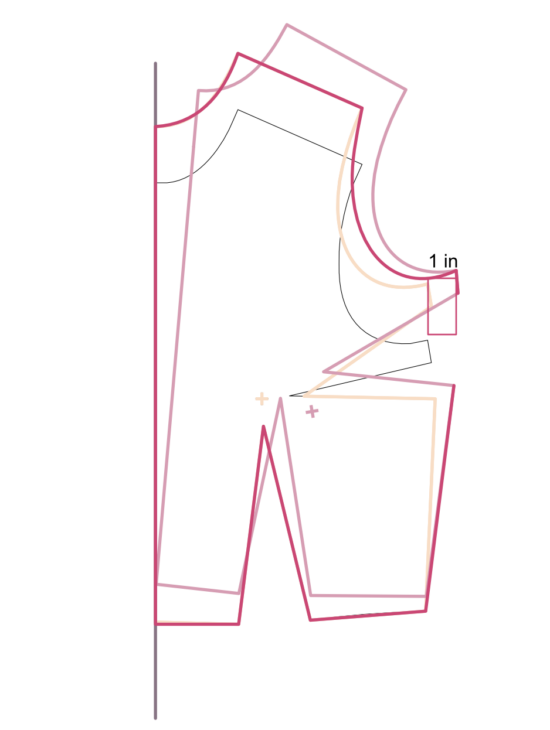
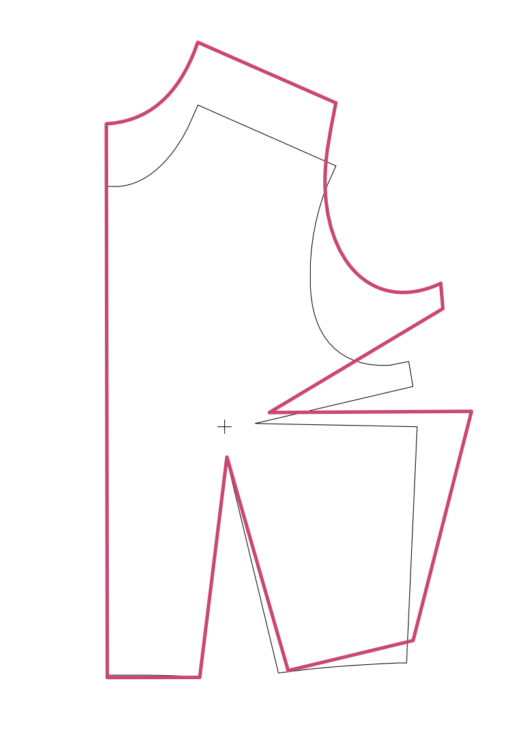
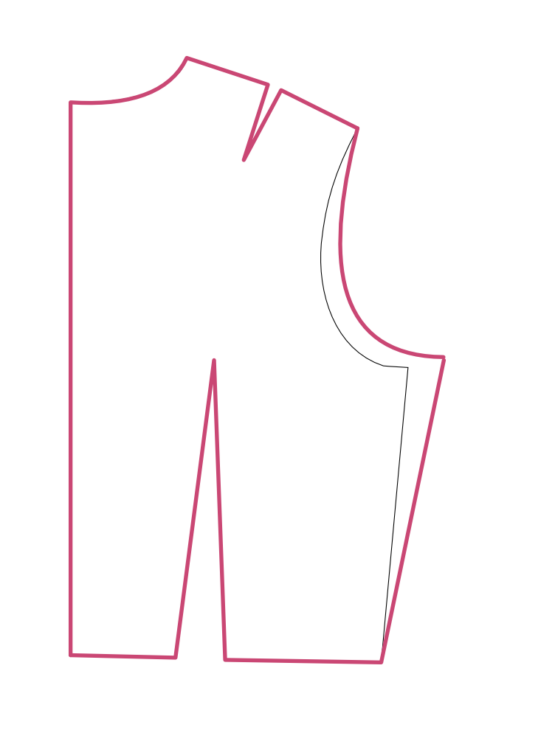
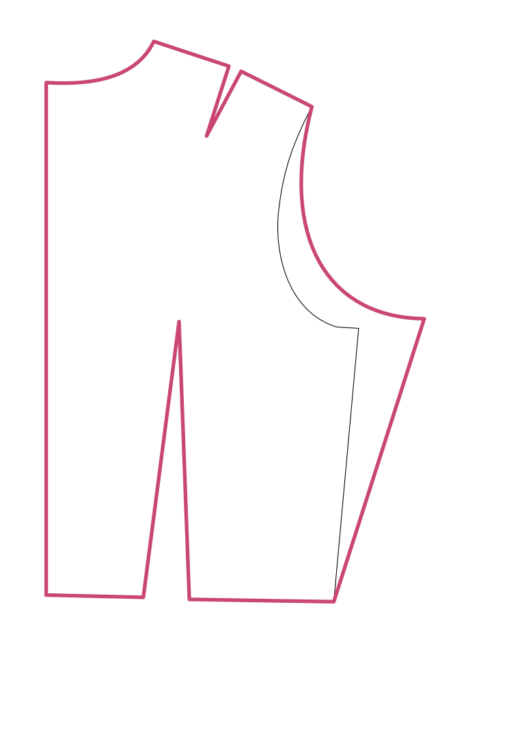
We will now put a pin at the point where the armscye and side seam meet and pivot the pattern back to where the waist meets the original waist. Trace the side seam, the hem, the waist dart, the center front, the neckline, and the shoulder. Redraw your dart legs (which will again be wonky; don’t worry!).
In the following diagram, the black outline is the original pattern, peach is the post-dart deepening pattern, light pink shows the pivot, and hot pink is where I’m tracing.
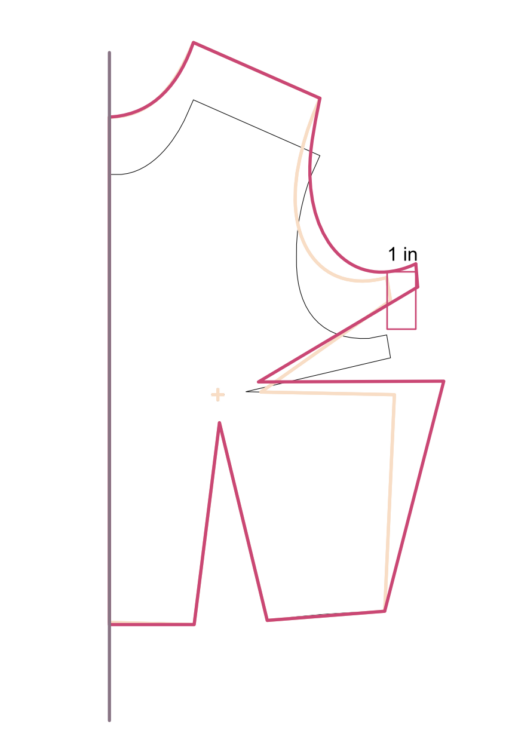
Now I like to do a bit of dart truing. You don’t have to do this now, as we’ll true our seams and darts in the final step, but I like to do some initial dart truing at this point just to make things easier and visually less wonky.
I measure the longer dart leg, and extend the shorter dart leg to match. Then, I ensure the side seam didn’t grow by moving up the hem at the side seam. Then, I widen the waist dart by however much the hem grew.
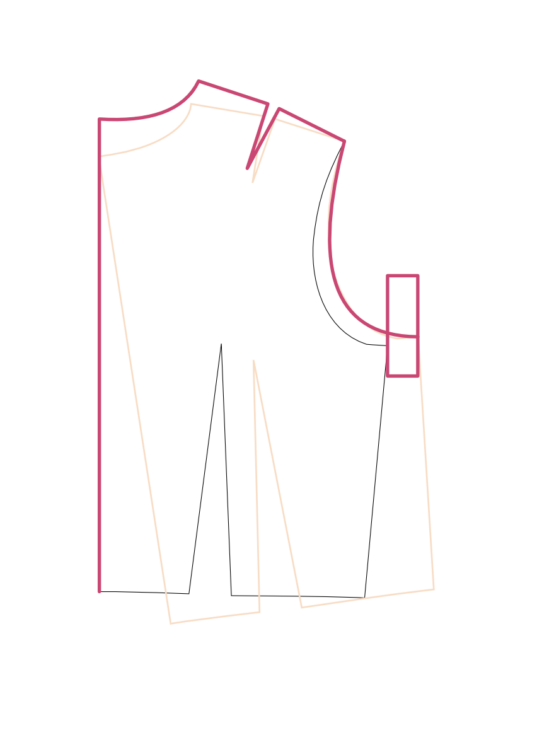
Armscye extensions — front bodice
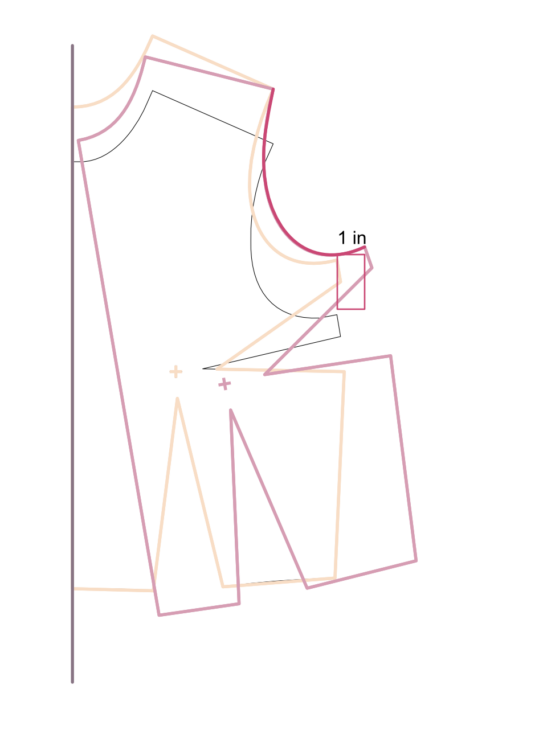
This is a step that rarely gets discussed in online tutorials because it’s only needed if you need a full bust adjustment of over 4″ (5cm). Remember that number we set aside in the previous step — the one we calculated by taking our total adjustment minus 4? Pull out that number now! For me, this is also 4.
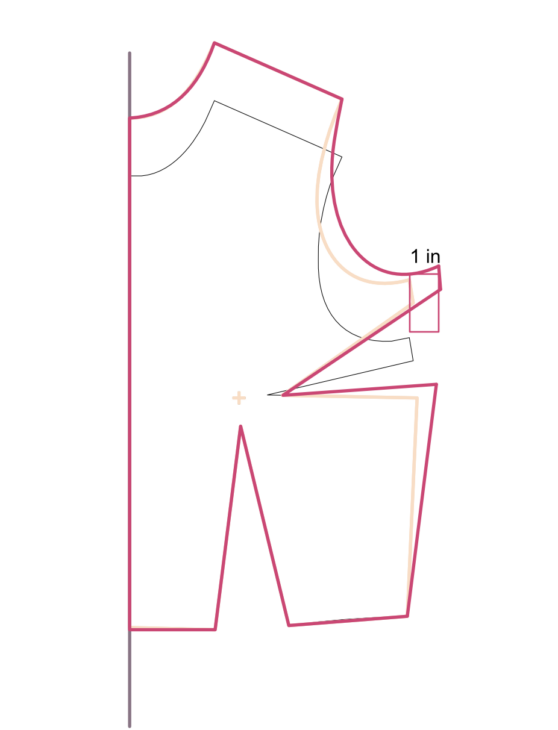
We’re going to extend the point at the underarm and the upper point of the dart by 1/4 of your remaining adjustment. For me, I need to add 1″ because 4/4=1.
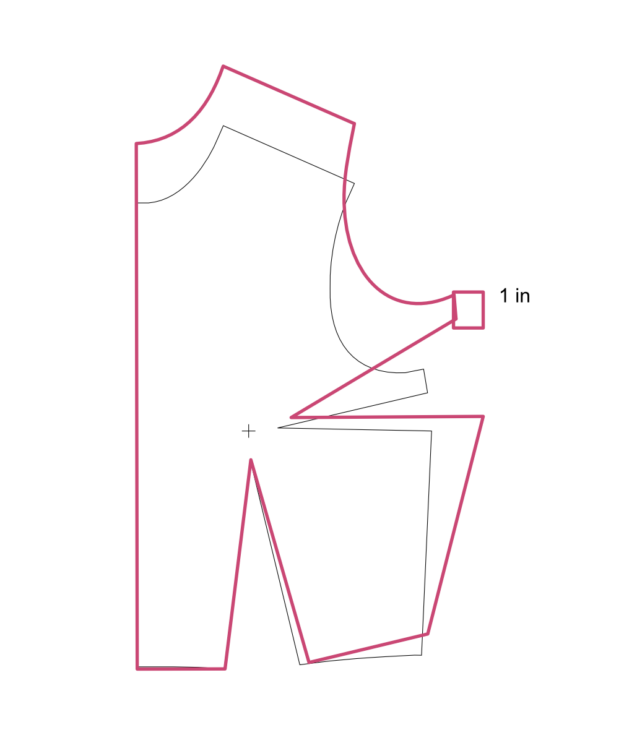
This will lengthen your side seam a bit, but don’t worry about that for now. We’ll re-adjust later.
pivot + slide — back bodice
We’re essentially going to repeat the same steps on the back bodice, and we’ll use the same measurements again.
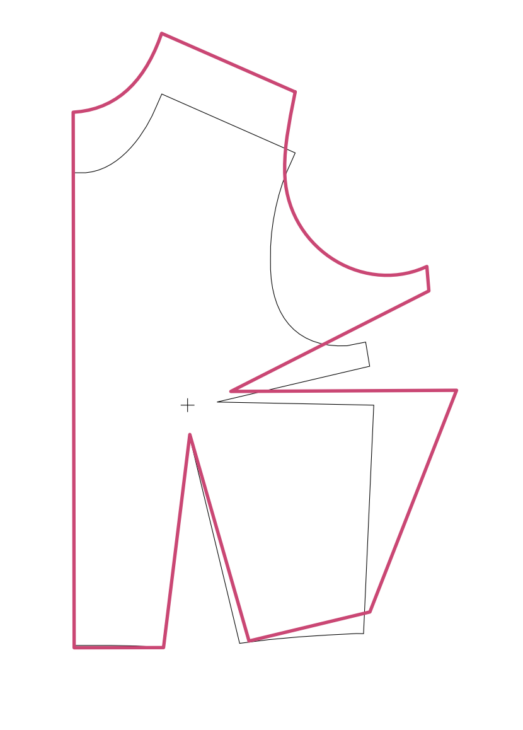
First, trace your center back, neckline, and shoulder (including shoulder dart). Then, mark out from your underarm the same amount you marked during the pivot and slide step on your front bodice (remember, max 1″ at this step). Placing a pin at the shoulder point, pivot until your underarm point meets your mark. Trace your armscye.
Place a pin at the underarm point, and pivot back so the waist meets the original waist. Trace your side seam, hem, and waist dart.
Armscye Extensions — back bodice
Once again, we’re essentially repeating the steps we did on the front bodice on the back. And once again, we’re using the same measurements.
Mark a line out from your underarm point the same amount you added at the extension step on your front bodice. For me, this was 1″. Move your underarm point out by this amount, which will slightly lengthen your side seam. This is fine and normal!
If you’re working with a pattern with sleeves, you’ll also have to extend the underarm points on your sleeve pattern by the same amount.
Truing the seams
We’re going to begin our final truing by truing the side dart. Measure both legs and ensure they’re the same. If they’re not, extend the shorter leg to equalize.
Then, measure your back bodice side seam. Mine was 9.056″. Then measure your front bodice side seam (not including the dart). Mine was 7.867″. You can see the problem!
I always err toward having things be too long, so I went ahead and added to my front bodice side seam.
This did make my hem a bit shorter, so I needed to lengthen that by eating into my dart. Then, I trued the waist dart.
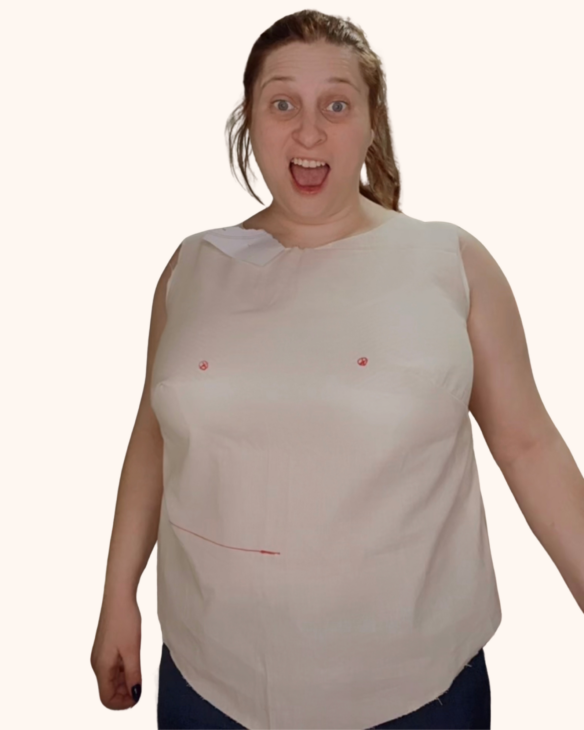
And that’s it! Here’s what my initial draft of the Designer Stitch Marit (B cup size) with a pivot and slide FBA! I was super pleased with the fit and just did a couple tweaks to the pattern after this muslin.


Una Doyle @SewVintageGlam
September 12, 2024Thank you Lindsie. Appreciate it 🙏
Funny how when you add to the back also it works?! Maybe it’s to do with balance…
Lindsie
September 12, 2024Isn’t it so weird? But it works!
JV
October 22, 2024Thank you so much for all that work experimenting and finding solutions. I have been having a host of issues with a pattern and landed on the pivot and slide which works, sort of. I couldn’t find anything on ” extension” I thought I would be good with the 4″ adjustment. Lo and behold the toile keeps riding backwards. Im on night # 4 and here is the solution!
Thank you so much I can experiment some more to get a better fit!
Lindsie
October 23, 2024Yay! I’m so glad this is helpful! I can’t wait to hear how this method works for you with the extensions <3
Ashlea
November 18, 2024This is such a useful tutorial! I’m always struggling with the bust being too tight on patterns. Can’t wait to try this FBA on my next make!
Lindsie
January 29, 2025Apologies for not getting back to you! I somehow had comment notifications turned off, so I haven’t been notified of comments since late October!
I’m so glad you found this helpful! Did you get a chance to try it yet?
Linda Hutchings
January 28, 2025Thanks so much for this. I was trying to do P&S last night and the sew/fit manual had me so confused between sleeve extensions and bodice extensions. Have you added a sleeve using this method?
Lindsie
January 29, 2025I have not yet added sleeves using this method, but I have added additional ease to patterns using the same logic — add to the side seam of the bodice and to the lower seam of the sleeve to fit. It works like a charm!
Linda Hutchings
February 4, 2025Thanks, Lindsie. Another question…why did you divide the total FBA by 4 for the amount to raise the bodice by?
Lindsie
February 4, 2025Do you mean for deepening the dart? Nancy actually suggests doing 1/2 the amount of the total FBA, but I found that to create much too deep a dart for the super busty among us — imagine that bust dart being almost twice as wide!! This is something you could experiment with, but for me and other folks who participated in this experiment, 1/4 provided the best results.
Linda Hutchings
February 4, 2025Thank you!