

The deal with Giant full bust adjustments
Being pregnant, my boobs have grown 6 inches in the last 6 months — I’ve gone from a garment sewing DD or F cup to a garment sewing K cup. (Remember that bra cups aren’t the same as your garment sewing cup size! Learn more about determining your garment sewing cup size here!)
Even with the ~80 designers on the Busty Pattern Database who draft for larger cup sizes or offer cup options, only one offers a cup option that fits me — Porcelynne’s I/J cup in her tank series is just right.
So full bust adjustments and I have become best friends lately. And not just small, 2-3″ FBAs, but BIG HONKIN FBAs. Even on a DD garment cup size pattern — the largest cup size offered by a substantial number of designers — I need a 6″ full bust adjustment (3″ per side). On a B cup pattern — the size that most designers draft for — I need a 9″ FBA (4.5″ per side).
The trouble? No fitting book or FBA tutorial I’ve seen really gets into what it looks like when you’re adding this much.
Which is annoying because it looks different. It can look a lot different.
So I’m going to start showing you what my FBAs look like when I’m adding 6-9″ to my patterns.
Fitting the Perfect Maternity Tee
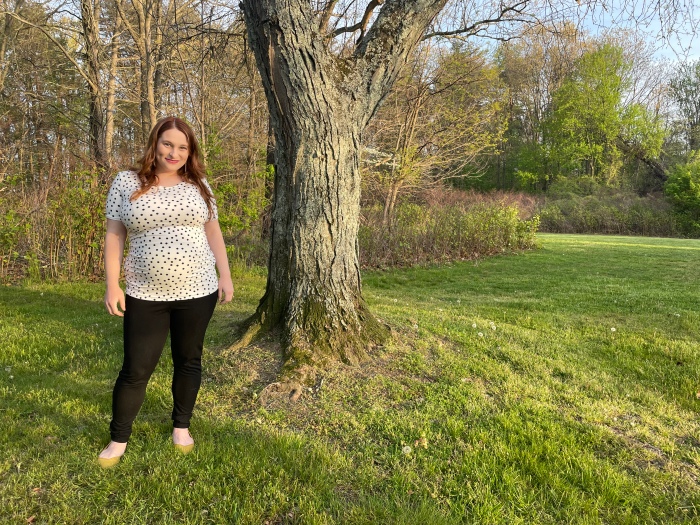
This particular FBA was inspired by my search for a perfect maternity tee — partially because I need a lot of new shirts right now, and partially because I’m planning a bodycon style dress for my baby shower, and I needed a base pattern.
I started with the Agnes Maternity Top from Tilly & the Buttons (which also has a non-maternity version), but this tutorial can easily be used for any number of dartless knit top patterns, such as the Cashmerette Concord, Itch to Stitch Glenelly, or the Laela Jeyne Indigo Bodysuit.
Do I have to add a dart?
Okay, I’m really sorry. But I have bad news. Yes, if the difference between your high and full bust is more than, say, 7″ (17.8 cm), you’re probably going to need to add a dart, even to a knit bodice — especially if you’re hoping for a fitted look.
If you’re okay with the bodice being a more loose fit at the waist, you might be able to get away with rotating the dart out and easing the side seam — a process we’re not going to get into today. But, if you want a fitted look, it will be simply impossible to ease your front and back side seams together after adding so much. (Trust me, I tried. A lot. It doesn’t work.)
That said, I really don’t think the dart is super noticeable, and I promise it’s less noticeable than the armpit wrinkles that result from ill-fitting knit tops. (Tell me if you think the dart is noticeable in this side view!)

Getting prepared for your FBA
Choosing a base size
We’ve talked about this before, but I want you to start with your high bust measurement, braless. (The reason we take this measurement braless is because you’re trying to capture as little breast tissue in it as possible, and bras push breast tissue up!)
If you’re working with a pattern that lists high bust measurements on its size chart, that’s great! The work is done for you! Choose your size based on the one that corresponds with your high bust measurement.
But, if your pattern is like the T&B Agnes, you’ll need to do a little math, which will require you to know what garment cup size the pattern is drafted for. In my case, I reached out to T&B and was told that their maternity patterns are drafted for a D garment cup — 4″ difference between high and full bust. So I knew I needed to add 4″ to my high bust measurement. (If you’re working with a usual pattern with a B cup draft, you’ll add 2″ to your high bust measurement.)
For me the math looked like this: 35″ + 4″ = 39″
This number should then correspond with the bust measurement on the pattern.

On the Maternity Agnes, this put me between a size 4 and 5. Because I wanted a more fitted look, I went with a size 4.
How do I know how much to add? Math time!
On a woven garment, this is easy. If the Maternity Agnes were woven, I’d simply take my full bust measurement minus the full bust measurement for which it is drafted, and that would tell me how much to add. Divide this by two, and you get how much you need to add per side.
For example:
My bust: 46″
– Drafted bust: 38″
= 8″
Divided by two (since there are two sides to a front bodice!) — 4″ per side
However, I don’t like to do things this way for knitted/stretch patterns. My reluctance comes from the fact that stretch percentages mean you’re really adding more. For example, if your fabric has a 50% stretch, adding 4″ total is really adding a maximum of 6″, while adding 8″ total is really adding a maximum of 12″ — that’s a 6″ difference in maximum stretch for what’s supposed to be a 4″ difference. This problem is exponential, so the larger your FBA the more skewed things can end up being by simply adding inches like you would with a woven.
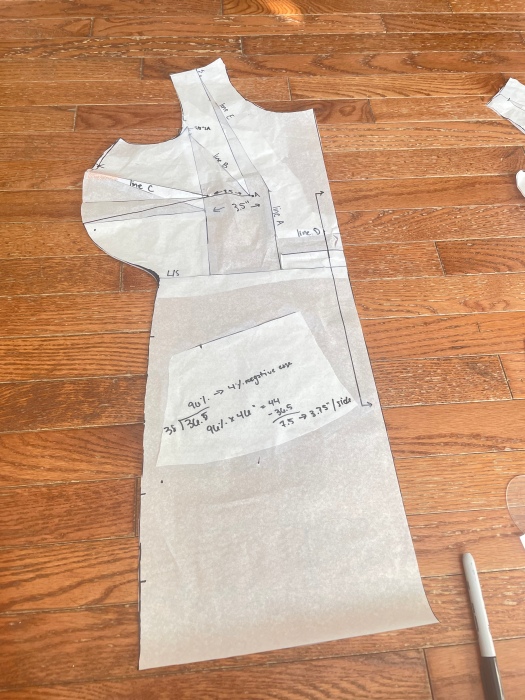
So I like to look at percentages. Enter the finished garment measurements.

For the size 4 I’m making, the finished bust measurement is 36.5″. It’s drafted for a 38″ bust. I want to figure out what this is as a percentage, so I’ll take 36.5 divided by 38 to get 96% — meaning this is drafted for 4% negative ease.
Now, I need to figure out what 96% of my full bust is: 46″ times 96% (0.96) = 44.16″. I’m going to go ahead and round that down to 44 to give me a nice even number (and I can confidently do that because I know my knit stretches plenty to cover a .16″ reduction). This is what I need my finished bust measurement to be: 44″.
Next, I’ll need to figure out how many inches that has me adding, so I’ll subtract the pattern’s finished bust measurement from my own needed finished bust measurement: 44″ minus 36.5″ = 7.5″. This shows me I need a total of a 7.5″ FBA, so 3.75″ per side.
If reading this is confusing and you’d like to see a video version, I walked through this process on instagram live here!
Doing the FBA
Finding your apex
Now that you’ve done your math, you can get working with your pattern! Here’s what my pattern looked like before I made any changes:

You’ll notice there’s no apex marked on this pattern. No worries! We’re going to find our own apex.
Put on a top that’s made from a fabric with a similar stretch percentage. Using washi tape, mark where your bust is fullest — this is sometimes the nipple, but not always. Look for the “peak” of your “mountain.”

Now, take off this top and fold it at center front. Lay the folded top under the front bodice pattern, matching the shoulder seam and center front (being mindful that seam allowances mean your pattern should slightly overhang the shirt).

You can see my washi tape through the pattern paper. This is where I’m going to mark my apex.
Preparing the pattern
Now that we’ve marked the apex, we’re going to cut the pattern at the waistline. On the Agnes, the waistline (or, in this case since it’s a maternity pattern, the empire waist) happens to be at the lengthen/shorten line, but this may not always be the case. Cut the pattern at the narrowest part and put the bottom of the pattern aside. We’ll come back to it later. (If you’re working with a bodice pattern that ends at the waist, great! No need to cut at this step.)
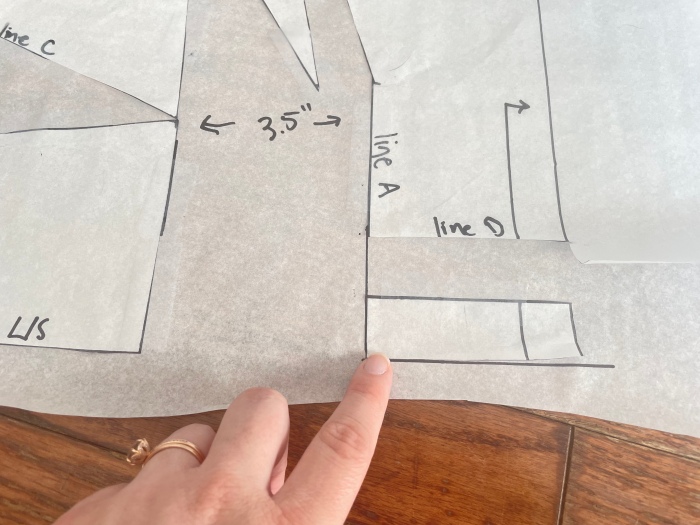
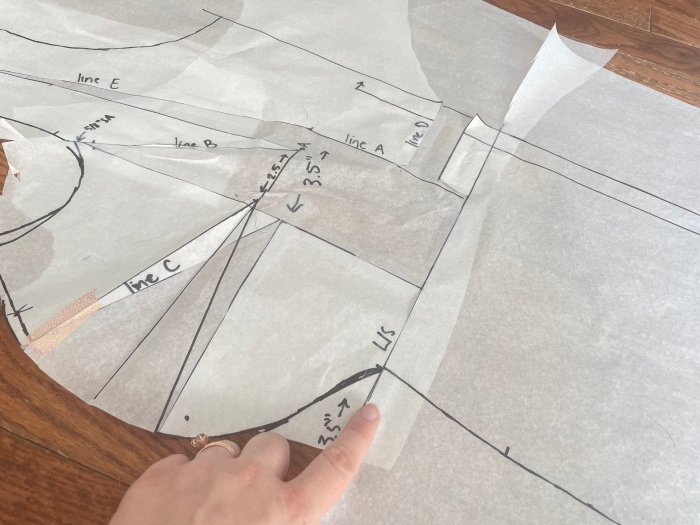
Now, we need to make some markings. First, draw a vertical line, parallel with your grain line, from the bottom of your pattern to the apex. We’ll call this Line A.

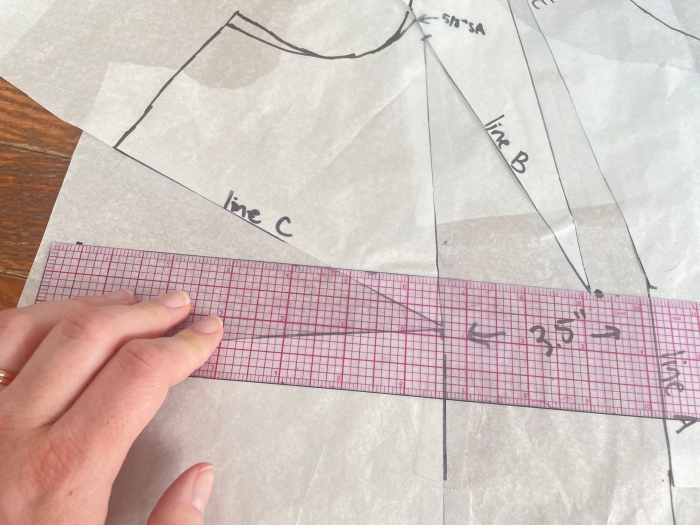
Now, draw a second line from your apex to about 1/3 of the way down the armscye. We’ll call this Line B.
Some tutorials will tell you to put this mark lower on the armscye. While this works for those who need to add fewer inches, for larger FBAs, putting this line low on the armscye causes too much armscye distortion, so higher is better.
Important: At Line B, mark your seam allowance. This will be very important at a later step.

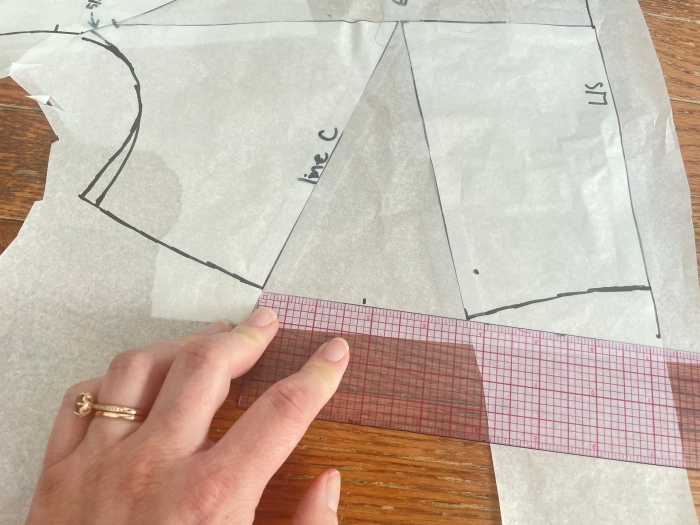
Third, you need to draw a line from your apex to the side seam. This is Line C.
You can really put this anywhere along your side seam that you’d like, but keep in mind that where you place it on the side seam will essentially end up being the top of your bust dart. I like to make mine slightly angle upward, but only slightly. If I wanted a fully horizontal dart, I’d need to make this perpendicular to my grain line.
Finally, mark a Line D perpendicular to Line A about an inch above your waistline.

Cutting the Lines
Now it’s time to start cutting! But, before we do, do yourself a favor and stick a piece of scotch tape on your apex and on the seam allowance mark at the armscye.

Okay, now, starting from the bottom of the bodice, cut upward through Line A to the apex, then from the apex through Line B — stopping at the seam allowance mark. From the opposite side, starting from the armscye, cut through Line B, again stopping at the seam allowance mark.
Your pattern should be hanging on by a thread of paper at the seam allowance mark, allowing you to pivot at this point.

Now, starting at the side seam, cut through Line C, cutting to but not through the apex — creating another pivot point where the paper is holding on by a thread.
Your pattern will look like this:

Adding inches
Now it’s time to add some inches! I like to tape down the center front side of my pattern (on this pattern, the right side of the picture) along Line A onto another piece of pattern paper. I then draw a line however many inches from Line A on the extra pattern paper:

This line gives me something to line up the side seam side of Line A with, which is the next step.
Pulling the side seam side (here, the left of the photo) down and out to match that side of Line A with the line you just drew.
Note: You’ll see I’m only adding 3.5″ here, though earlier I said I needed a 7.5″ FBA, so 3.75″ per side. Well, that was a mistake. But since the pattern uses fabric with at least 50% stretch, I decided to just rock a bit more negative ease and not worry about it.

Evaluating Armscye Distortion
So this is what my FBA would look like. If I was adding fewer inches, I’d tape it down and call this my new pattern, essentially. But I’m adding a lot of inches, so I need to evaluate something first: How much did my armscye get distorted?
Depending on the pattern, the armscye distortion might be minimal and totally okay! In this case, tape everything down and use this as your pattern!
But, as you can see here, I got a lot of armscye distortion. It’s basically a J pattern, and I know that’s going to be super uncomfortable. But there’s a solution!
Doing the Y FBA
We’re going to add one more line. Draw a line from the apex to the middle of the shoulder seam — usually there’s a notch here, and if so, use that! This will be Line E.
Just like with Line B, you need to mark the seam allowance on Line E.

Now, cut from the apex along Line E to but not through the seam allowance mark. Then cut from the top of the shoulder along Line E to but not through the seam allowance mark, creating a pivot point with a thread of paper at the seam allowance.


Again, spread down and out to match the side seam side of Line A with the marker you created earlier to show how many inches you’re adding.
At this point, you need to decide how much of the added inches you want coming from the armscye versus the shoulder/high bust area. In the above slides, you can see how you can manipulate where things lay to have more of the added inches be along Line B or along Line E.
This is all about knowing your body. Adding more to Line E — like in the second picture — prevents more armscye distortion, but adds more width at the high bust/chest. Adding more to Line B — like in the third picture — creates more armscye distortion, but doesn’t add as much at the high bust/chest. Or you can choose something like the first picture, with roughly equal amounts distributed between Line B and Line E.
I don’t like to have too much added at the upper bust for my body, so I lean toward adding more to Line B than Line E — adding just enough to line E to avoid significant armscye distortion. I went with something like the third picture.
Once you have everything where you want it, go ahead and tape everything down, just being sure not to tape along Line A below Line D.
Adjusting length
Now we need to bring the center front down to the level of the side bodice. Extend Line A on the center front side down to be even with your new waistline from the side seam side, and draw a horizontal guideline at the same level as your new waistline on the side seam side.

Now, cut along Line D, completely detaching that bottom piece. Tape this down along the guidelines you just created, like so:
This is what we have so far, and we’re pretty much there!

Finishing Touches
Smoothing the armscye
Now we need to smooth out the armscye. You can do this by eye (which is honestly what I usually do), or break out your French curve to do it *technically* correct.
At this point, I like to drop my armscye just *a tiny bit* — like 1/4 to 3/8″ — making sure the armscye remains the same total length by measuring where I’ve dropped it.


Drawing your new dart
You now need to draw your new dart. Start by measuring the opening of the triangle you’ve created, and marking the center point.
Now, draw a line from this center mark on the dart to the apex. You’ll see here I moved my apex a bit. This was an experiment, and I wouldn’t recommend it. Just use the apex you marked — since the dot has been divided, choose the one on the center front part of your pattern.
Now, mark a spot along this center dart line some inches from your apex. The number of inches depends on the size of your bust. Here’s what I’d recommend as a starting place:
| I+ garment cup | 9″+ (22.85 cm+) full/high bust difference | 2.5″ (6.35 cm) |
| G-H garment cup | 7-8″ (17.8-20.3 cm) full/high bust difference | 2″ (5 cm) |
| DD/E-F garment cup | 5-6″ (12.7-15.2 cm) full/high bust difference | 1.5″ (3.8 cm) |
| D garment cup or smaller | 4″ or less (10.2 cm) full/high bust difference | 1″ (2.5 cm) |
So I made my mark 2.5″ back from the apex. This will be my vanishing point, or where the dart will actually end. You usually don’t want the dart ending too close to your apex, because this will make your bust look verrrrry pointy. (If pointy is the look you’re going for, then make your vanishing point closer to your apex!)

Now, you’re just going to connect this vanishing point to your dart legs. This is your finished dart!

Note: Do you need to split your dart? I answer this question visually. My dart was about 6″ long and 3-5/8″ wide, and, looking at it, I thought it would sew up fine. If your dart looks really wide, you may want to split it into two darts. This post goes over the how-to on splitting darts.
Truing the Side seam
We now must true our side seam. To do this, fold your dart as if it was being sewn. I prefer to have my dart go upward rather than pressing it down, as most instructions indicate. I find this makes a smoother line for larger busts. (Thanks to Cashmerette for the tip several years ago!)
You can either fold your dart up or down. It’s up to you.

I like to tape this shut using washi tape, so it stays closed while I deal with my side seam, but using a tape that won’t rip the paper when I remove it.
Use your French curve or eyeball a slightly curved line, connecting the armscye to the lower side seam.
You’ll see that I had a big jump from the upper to lower side seam. Since you can always remove but can’t add, I chose to go with the outer side seam — so the placement of the lower side seam. It’s worth noting, however, that I ended up skimming about 3/8″ off this spot when I sewed my muslin, so I probably could have/should have gone with the smaller of the lines — where the side seam is on the upper part.

Truing your waist
As you may recall, you’ve added inches (in my case, 3.5″) to your bust level down — including your waist. Well, if the waist was the correct size on the original pattern and you want the bodice to be fitted at the waist, this isn’t going to work. We need to reduce the waist.
On a woven, this would be easier. I’d recommend taking a bit from the side seam and adding a waist dart or two.
But here, I didn’t want to add a waist dart. This is a tee shirt after all! So it’s going to have to all come from the side seam.
To do this, mark along the waistline 3.5″ (or however many inches you added in your FBA) inward from the side seam. Draw an S curve, starting at your bust height and ending at your waist marker, like this:

You can do this with a French curve or by eye. I started with my French curve and ended by eye, which is why my line is so ugly 😂
I also had a bit of an extra challenge because I was making this with an empire waist rather than a natural waist, so that gave me less space to gradually skim off the side seam than you’d have using a natural waist. If you’re using a natural waist, this line shouldn’t look quite so angular.
Now, to finish truing the dart, cut along this line:


Open your dart back up, and you’ll see your finished side seam!

Reconnecting with lower pattern
Now our last step is to reconnect our upper pattern with our lower pattern!
Essentially, you just need to match your lower pattern to your upper at the side seam and center front.
At this point, I also do a bit more truing of the side seam and cut it out:

You’re finished!
Yay! All done! Here’s my finished pattern piece:
Now cut and sew the pattern as usual. If you have an extreme angled side seam like me, it might be worth reinforcing the side seam at that point with some seam tape or elastic, just to add some strength since the force of the fabric is a bit wonky there.
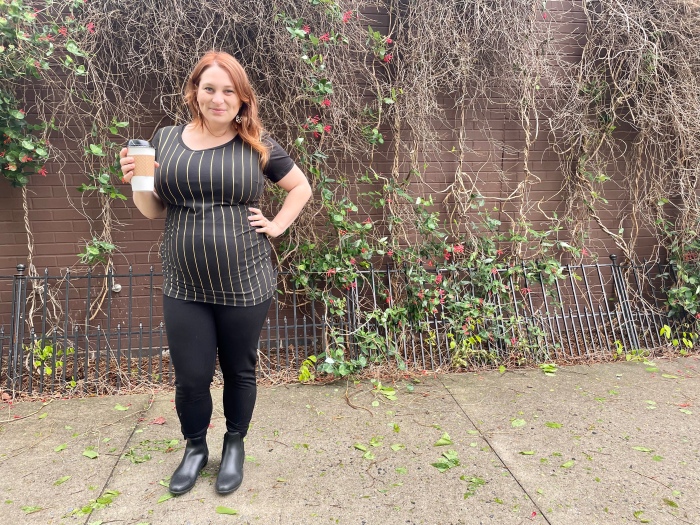
I feel pretty awesome about this pattern! I can’t wait to sew up my baby shower dress 🙂

If you follow Sew Busty on instagram, you’ll know that I ended up needing to tweak the sleeve for my fuller biceps, but the bust was on point!


This is an awesome FBA. I’m right at the point that normal FBA instructions for knits don’t work.
I’m 6″ FB – HB full circumference, but 7″ split measurement, front only. I’ve known you need to calculate the % to work the adjustment required out but couldn’t be b*ggered sitting down and doing the calculation, so I will be printing yours out to use as reference.
As an addendum, because fitting the bust for a knit relies on fabric stretch, I suspect it is not the absolute size difference between HB and FB that creates the inflection point of being tricky, but the percentage increase in front width. The smaller the HB the bigger the %. On your 38″ base your your 11″ difference on half HB is about 40% bigger. On my 33″ HB base, my 7″ split measurement difference is about 47% bigger than my FB, with less fabric to borrow stretch from to cheat with a bit more -ve ease.
LikeLike
Oh yes! That’s an interesting thought! To clarify, my high bust is 35”—38” is the full bust the size I chose is drafted for 🙂
I think the reason the absolute difference between HB and FB can be tricky, though, is in doing the FBA itself. Adding 6-7”+ is going to be odd looking no matter what base size one is starting with. But you’re right that folks with bigger base sizes have more stretch to “cheat” with and might be able to get away with a smaller FBA.
LikeLiked by 1 person
I knew I didn’t have your actual measurement, but I was working it out in bed without pen to take notes as I flipped between blog and calculator on phone, so rough was going to have to do. Be interesting what your % is on split measurements, which I didn’t have anyway, and which I think become critical for large boob calculations.
LikeLike
I just measured my split measurement, and I was surprised that it’s 11″ also! Full measurements are 35″ HB, 46″ FB. split is 18″ HB, 29″ FB.
LikeLiked by 1 person
It seems to me that 7.5″ / 2 = 3.75″ not the 3.25″ stated in your calculations. I am missing something?
LikeLike
You’re totally right! That was a typo. I’ve fixed it. Thanks!
LikeLike
“Next, I’ll need to figure out how many inches that has me adding, so I’ll subtract the pattern’s finished bust measurement from my own needed finished bust measurement: 44″ minus 36.5″ = 7.5″. This shows me I need a total of a 7.5″ FBA, so 3.25″ per side.”
LikeLike
I’m just wondering how the back would fit with such a large prominent adjustment. Would I need to do a bust bubble on the back ? So the side seam can line up.
Thank u
LikeLike
Great question! Since we’re assuming all the extra width is on the front (the projected chest/bust), there’s no need to add a bust bubble on the back, since there’s no breasts on the back! For this FBA, we use a combo of the dart and easing the front onto the back by taking advantage of the stretchiness of the fabric to match the front and back pieces. If you added a bubble to the back, you’d end up with a skewed side seam.
LikeLike
Thank you, thank you, thank you. For sharing your knowledge. I have had the J armscye issue, but had not thought about doing the shoulder split. Also seeing how far in you come on the side seam is useful too. Because I rarely see patterns with giant FBAs I often think mine are wrong, seeing yours helps normalise my pattern adjustments.
LikeLike
I’m so glad this is helpful! I totally get what you mean about feeling like you’re doing it wrong because it’s hard to find examples of giant FBAs online! If I’m being honest, I’m not really a fit expert, and I STILL often feel like I’m doing it wrong because I don’t see other people doing these giant FBAs! But then I put on the garment and the fit feels good 🙂
LikeLike