
Community Blog | How to: Seated Measurements for All Types of Bottoms (i.e., for wheelchair users) with Lolie
Hello, Lolie here (@lolieya on IG)! I am here today to show you my process to get measurements for panties that fit well for the permanent seated position, meaning for wheelchair users — but anyone that sits is welcome! You could use this tutorial for any kind of bottoms, but we’ll be focusing on underwear. I’ve been a full-time wheelchair user for 4 years now and getting panties/pants/bottoms that fit have been close to impossible. Let me guide you as to why and show you some solutions I’ve found.
Bottoms are complicated to fit for wheelchair users because we traditionally fit bottoms standing up. Every single book, tutorials, YouTube videos and blog posts on fitting seems to approach it that way. But since wheelchair users are not standing upright … it’s not useful for our fitting purposes. If each time someone would present a fitting problem with a picture, it were shown seated too, that would help to identify which existing technique would be best to improve the fit of the pattern. The same problem shown standing or seated will just not look the same, so it’s hard to draw parallels between them without being shown what it looks like.
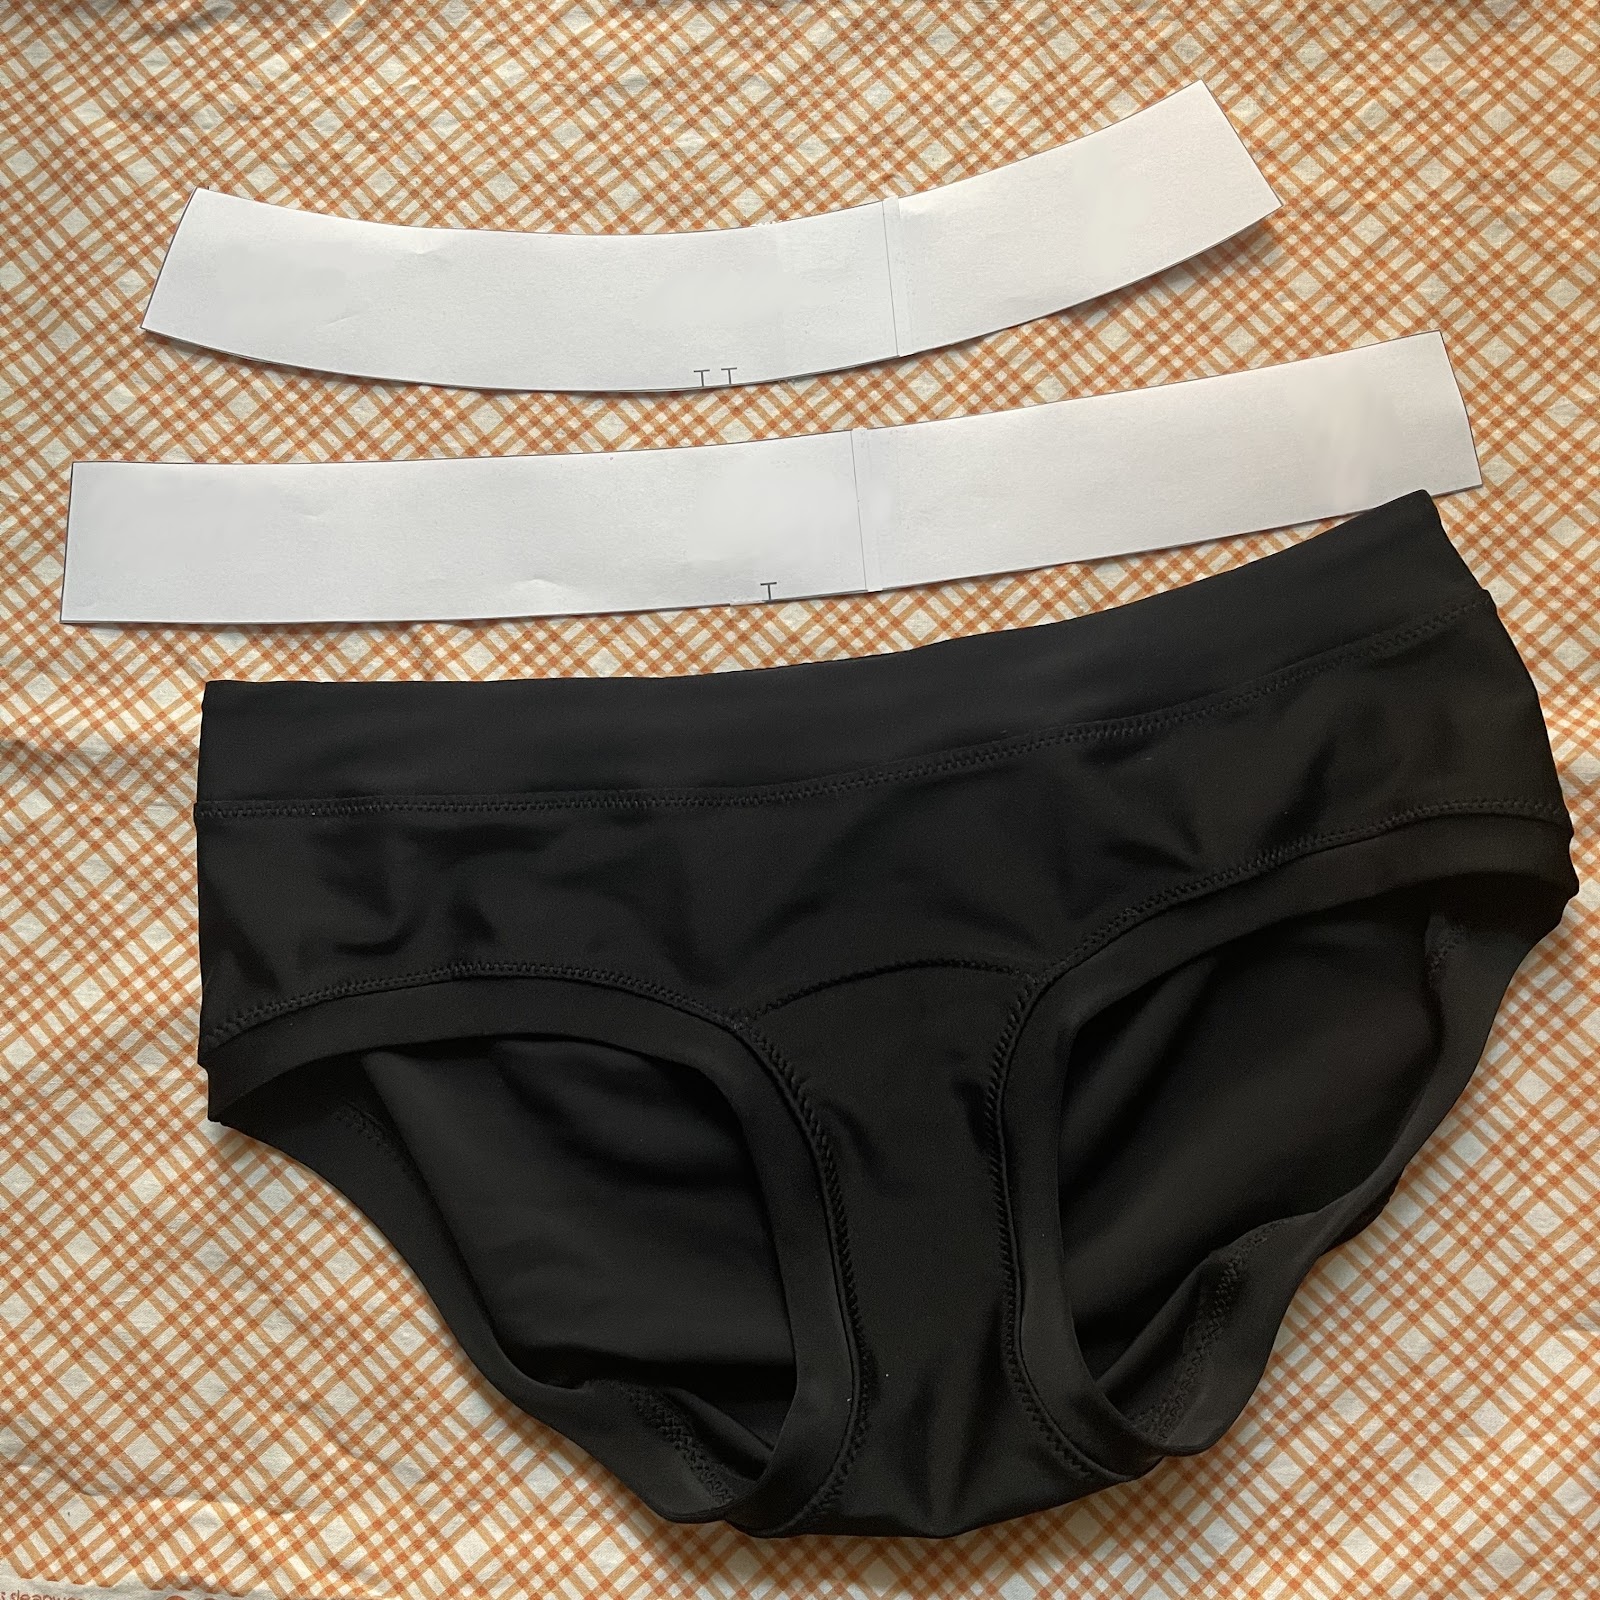
Also, fitting bottoms for the seated position isn’t easy. We’re creating a different shape altogether, so we need, for example, to add shaping at the knee, elongate the rise in the back, shorten it in the front, elongate the inseam (pants will ride up), add shaping to the side seam at the hip level … The trickiest part, in my opinion, being to remove the shaped excess where the legs meet the torso at a 90 degree angle.
But for now, we’ll focus on the top part with panties. We’ll of course need appropriate crotch depth, crotch rise measurements, waist and hips and waist to hips, taken seated. Taking seated measurements is also good for anyone to ensure that, when choosing a size in a close fitting garment, you’ll end up with enough room to sit comfortably.
In 2016, just before I had to start using my wheelchair all day long, I had just drafted a panties block for myself, and they fitted very well. I loved them and made a ton. They were medium-high rise, bikini style (low cut on the legs), really regular panties just like I personally like them. This pattern was literally drafted for me.
However, when I tried them again recently, they didn’t fit at all anymore. I had lots of excess fabric in the front (they went higher than my rib cage) and they were short in the back. Also, even if my measurements were very similar, my body shape had changed a bit because of the year I spent in a hospital bed. My abdominal muscles were making themselves scarce, which tends to make the belly protrude. So, I had to go back to the drawing board on a quest for a comfortable pair of panties pattern once again!
Let me show you both patterns on top of each other so you have an idea of the difference. It’s impressive. It was drafted for the same person, with the same weight, the only difference is being seated vs standing.
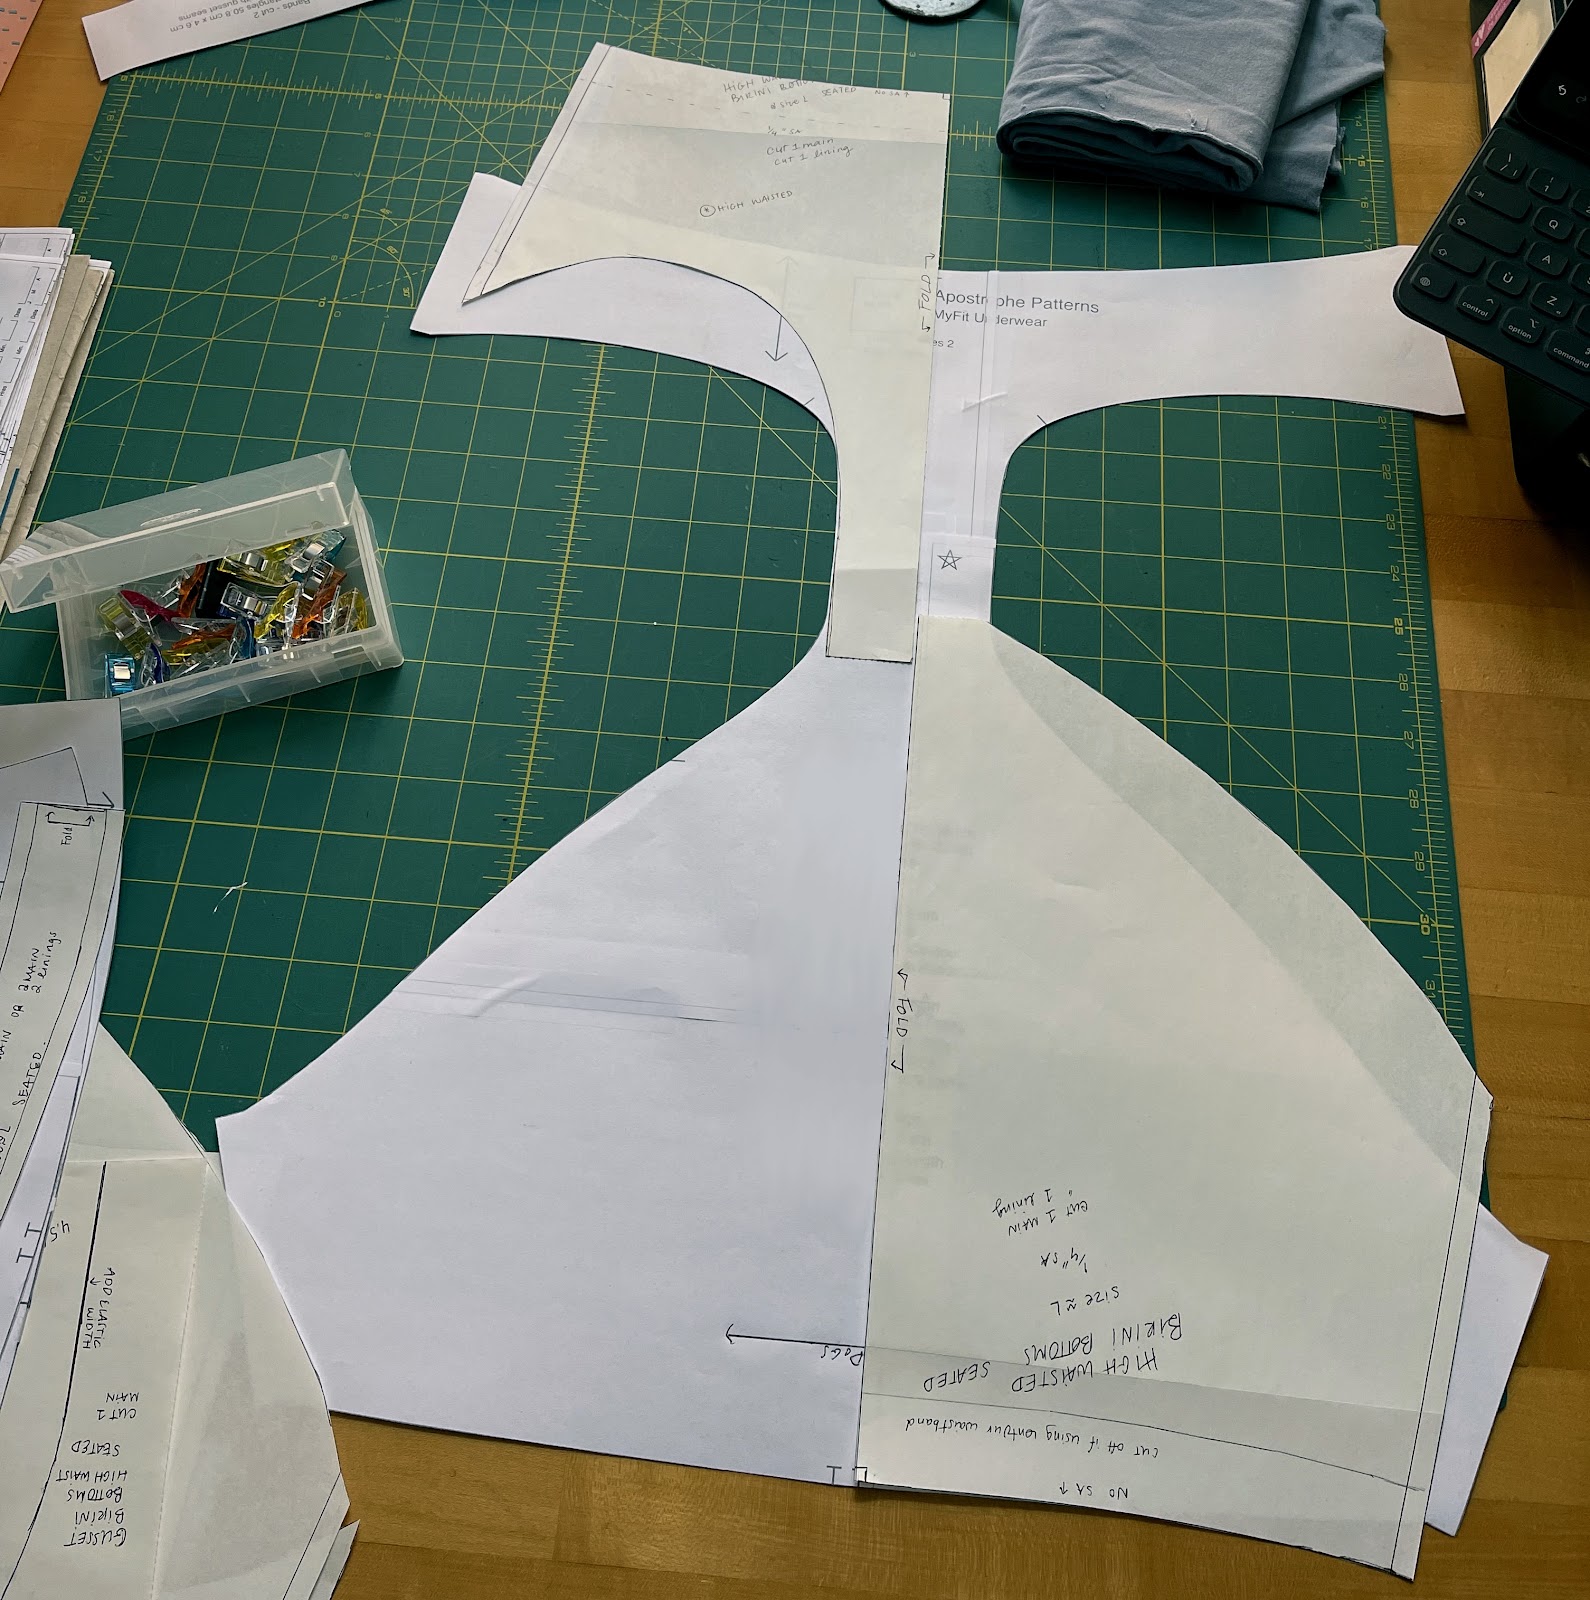
At first, I thought I’d just get my lingerie pattern drafting book and make another pattern with my new measurements. But it didn’t work because I didn’t know how to properly measure myself while seated. I was at an impasse, as I searched the internet on how to take those measurements, and couldn’t find much (hence why I’m writing this).
Eventually, I came across Apostrophe Patterns and their MyFit Underwear pattern generator. It generates a pattern based on a number of personal measurements you input in the system. Once you purchase a pattern, you can generate as many variations as you desire, so I thought it was a safe bet. The pattern has many options, and thorough instructions. There is also a maternity option which would make it simple to tilt the waist forward, but most of the time these options offered will cover the belly and make a bigger waistband, which is not what we want, so I preferred to go with only measurements.
To take the measurements, you will need two strings/piece of lingerie elastic long enough to go around you, scotch tape (any kind), a wooden stool, a mirror, two rulers or one ruler and something very thin and straight.
First, for the crotch depth:
- Sit on a flat and hard surface, preferably a stool, to see all around easily, or adapt to your needs.
- Put a string (light blue) around your waist, in exactly the same place where you want your waistband to hit, and tape in place (orange). It’s very important to be as precise as possible about this.
- Your waist placement doesn’t have to be parallel to the floor, if that’s your preference.
- Take a big ruler and place it between your thighs, one end perfectly flat on the stool.
- Take the other ruler (or any straight object) and place it at the same height as of your waist string and perpendicular to the first ruler. Mark where they cross. This is your front crotch depth measurement.
- Do the exact same but in the back, asking for help if needed so the rulers stay at a 90 degree angle to each other.
Tip: you can use a clip to mark where the rulers intersect so it’s easier to read.
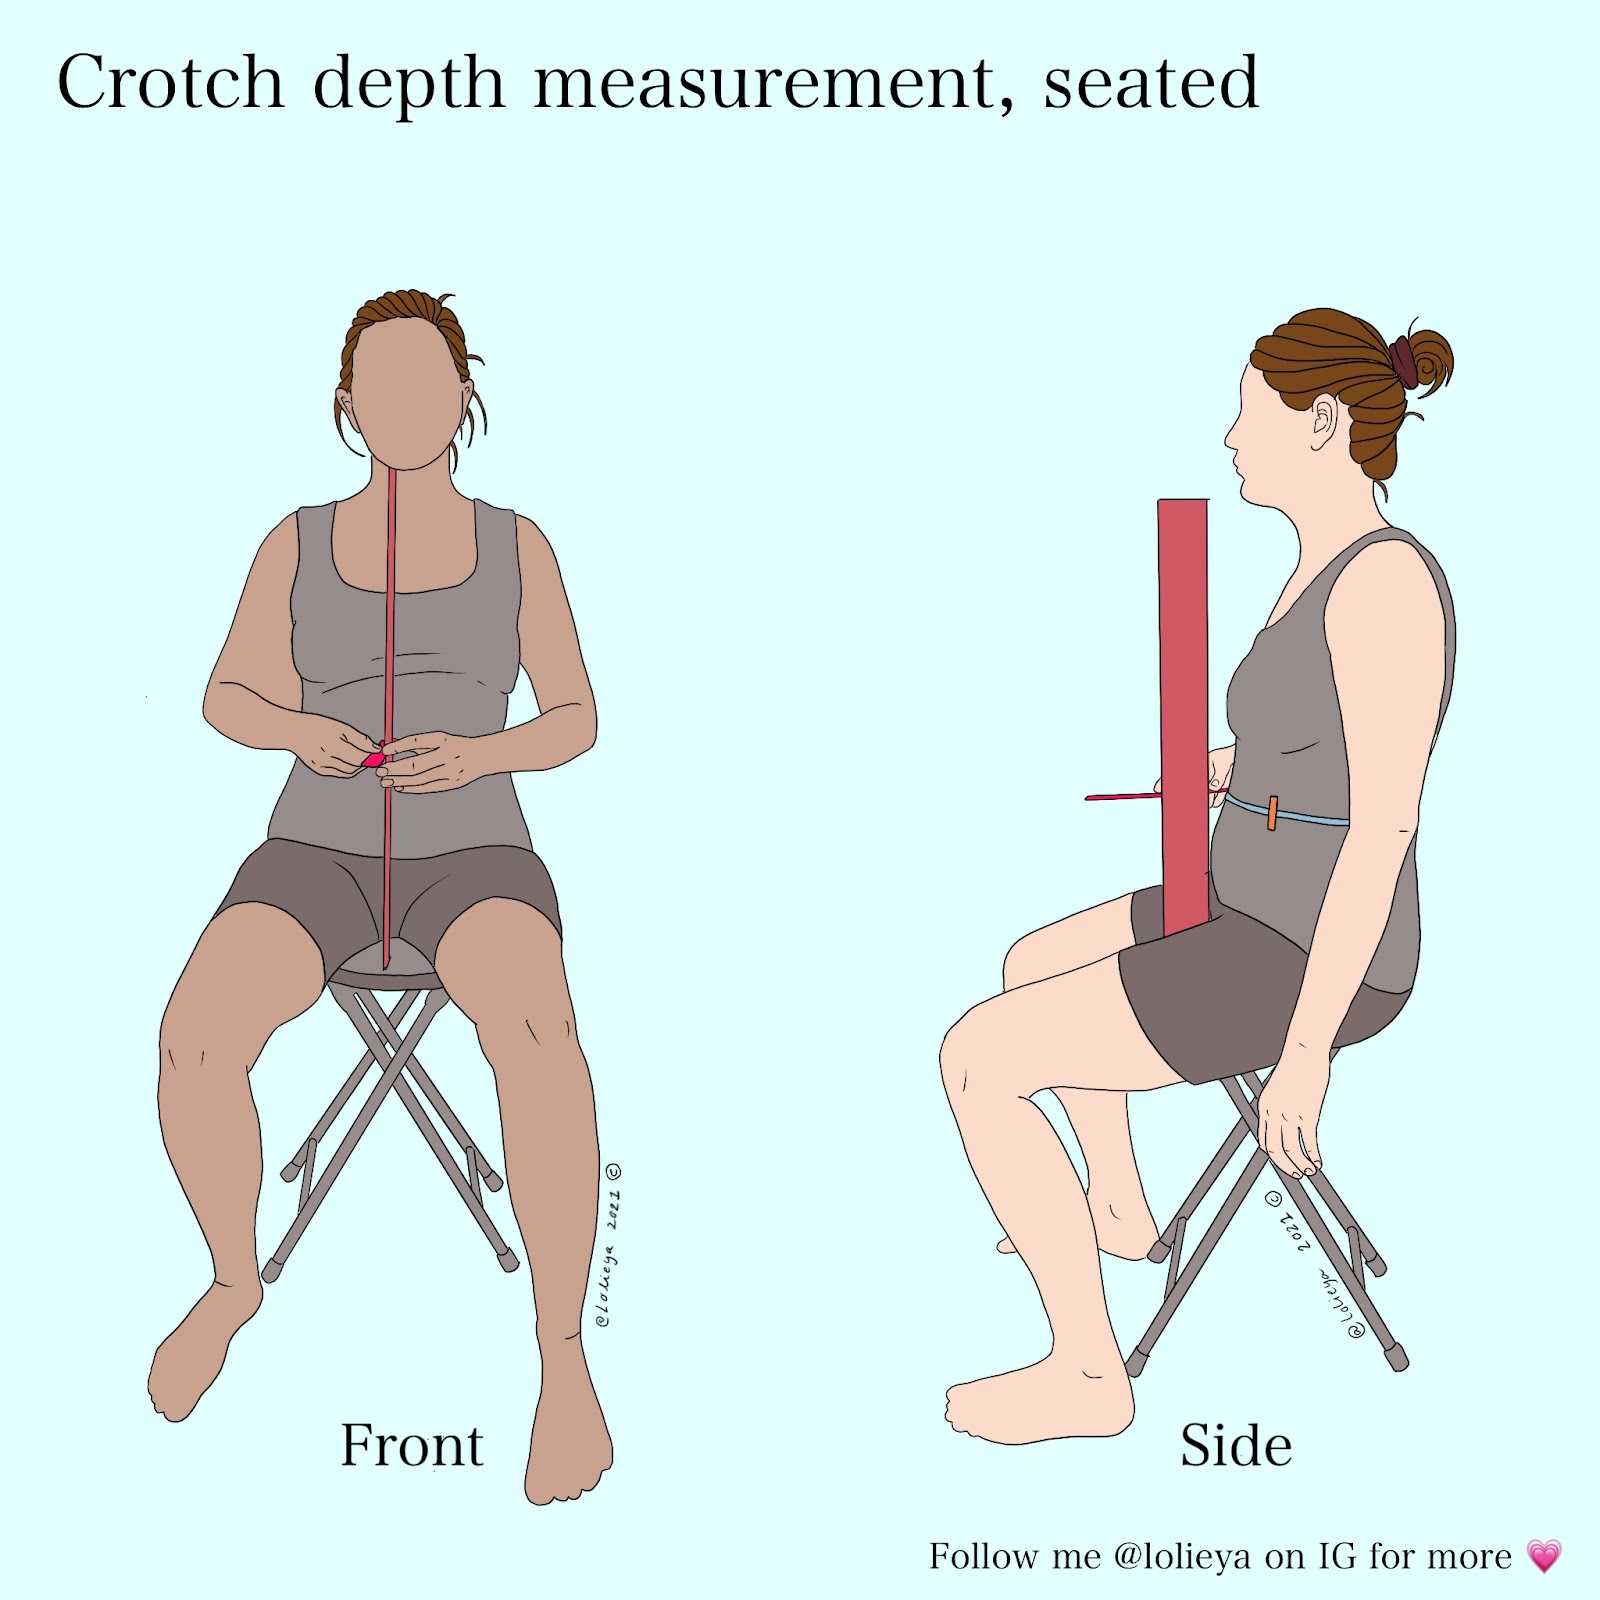
The administrators on Apostrophe Patterns page suggested adding 1,5cm (0.5″) to the back rise and subtracting 3,5cm (1.5″) from the front depth, so I suggest the same to you. This method gave me great results.
Example:
Let’s say I have identified a front crotch depth of 21,5cm (8.5″) and a back depth of 21cm (8.25″):
Front: 21,5 – 3,5 = 18 cm (8.5 – 1.5 = 7″)
Back: 21 + 1,5 = 22,5 (8.25 + 0.5 = 8.75″)
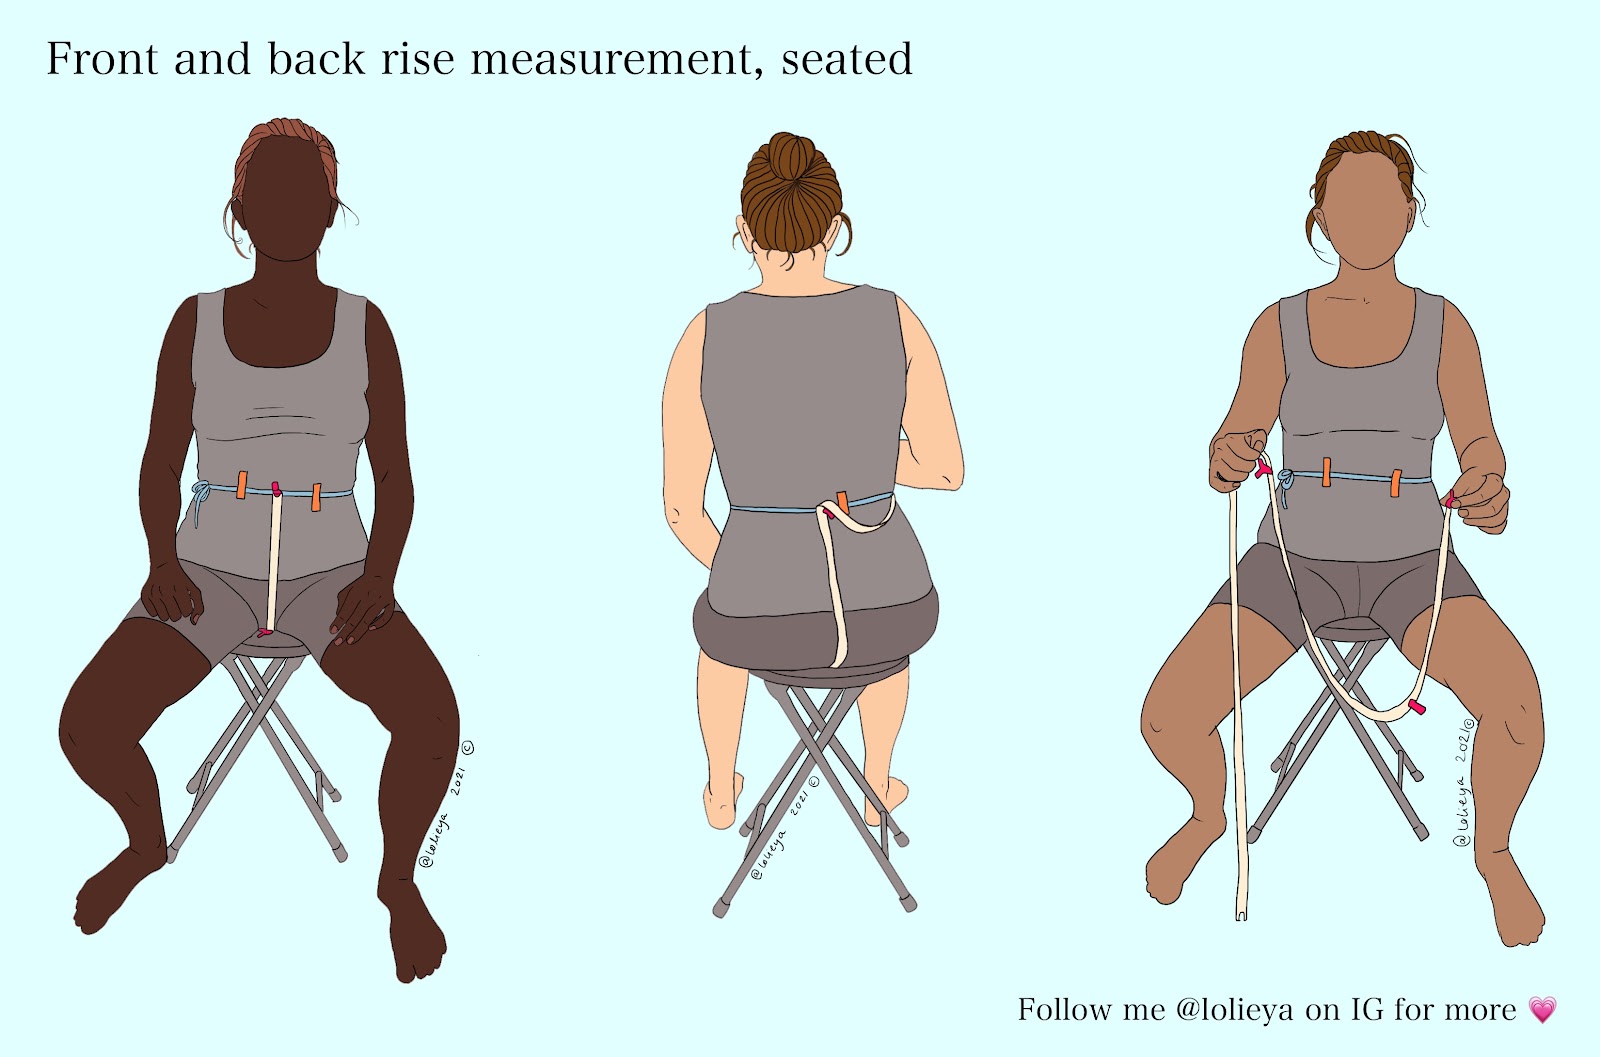
For the rise, stay in the same position. You will need to use a flexible tape measure.
- Put the flexible tape (light beige) between your legs, as shown in the picture.
- For this measure, it’s useful to have at least three clips (hot pink) and string or elastic (light blue) on your chosen waist placement, well taped in place (orange).
- Clip one end of the tape measure onto the string.
- Put another clip on the tape measure where you want your inseam to be (the seam from hem to hem inside of the legs).
- Finally, clip the tape with a third clip on the waist string in the back, making sure you don’t tug on anything in the process. It’s supposed to be snug but not tight. Adjust if necessary by looking in the mirror.
- Once done, take the tape measure off while keeping the clips in place and note the measurements. Don’t mix up the front and back!
Now, our last step is to take our hip, waist and waist-to-hip measurements seated.
For the waist, just take the measure on top of the blue string, while seated. It doesn’t matter if your waistline is tilted for this. I have no pictures as it’s pretty self explanatory.
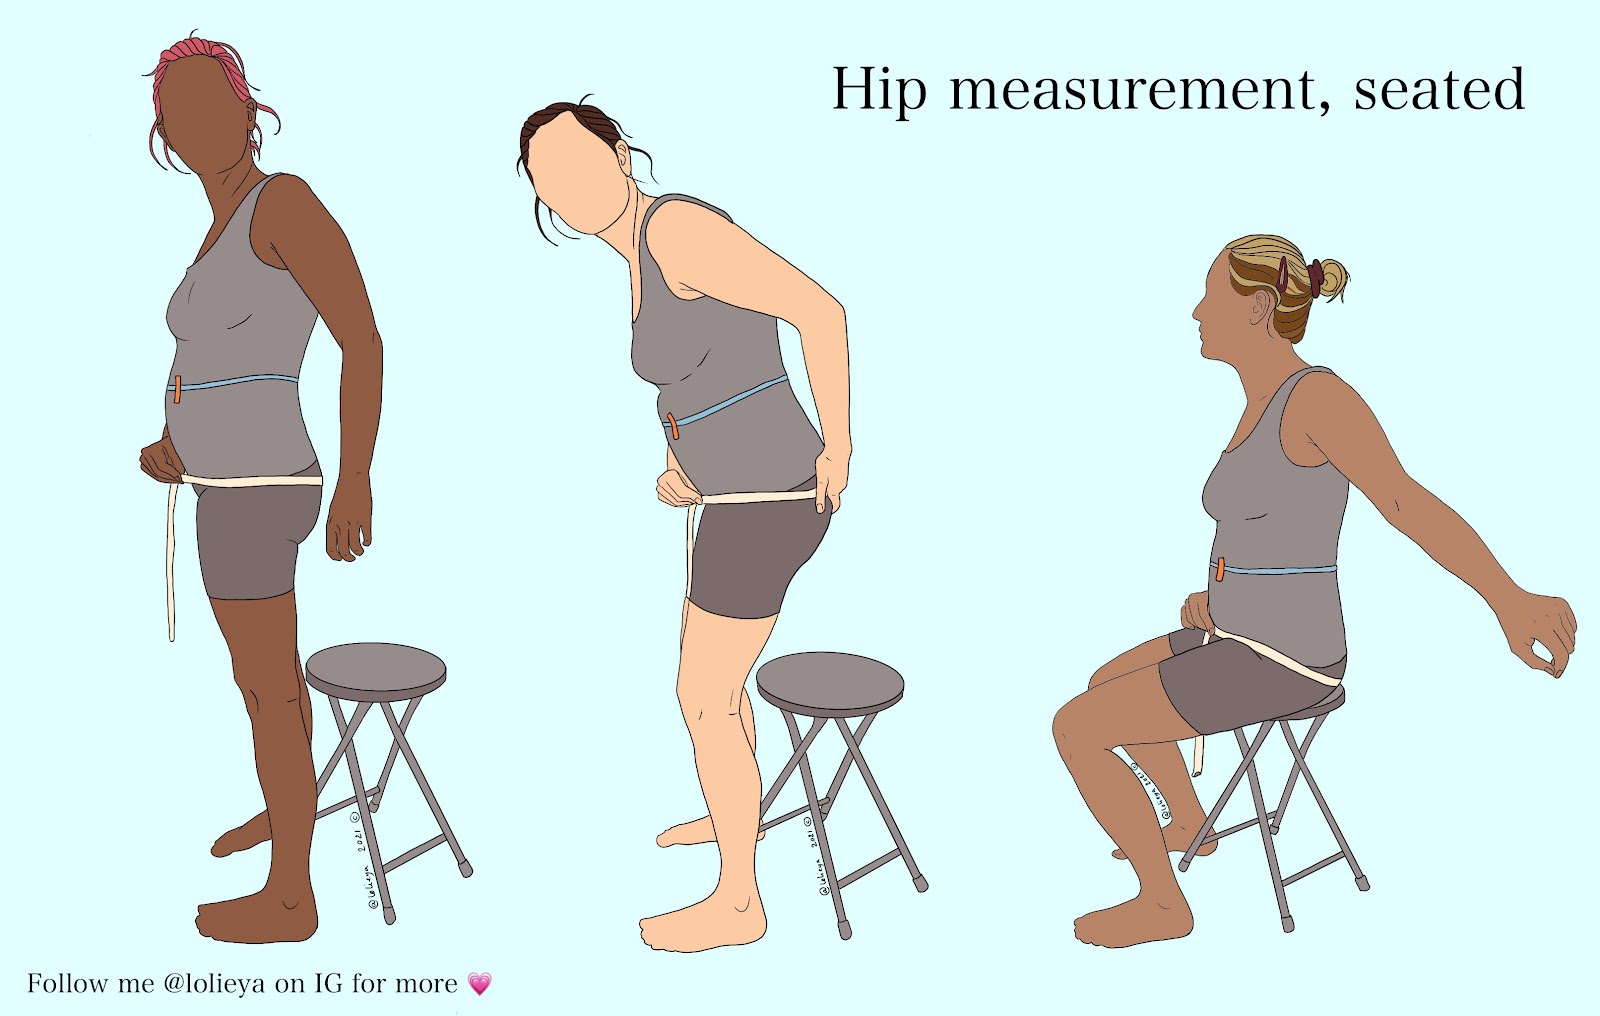
For the hips, it is not complicated.
- If possible, stand up and wrap the tape measure (light beige) around your hips, parallel to floor, making sure it’s in the widest part of your bum/hips. Tape it or hold it in place.
- Just note that it will probably not be parallel anymore once you sit down and that’s ok.
- Sit down and let the tape expand around you to take the measurement.
Tip: If you’re not able to stand, alternatively you can roll over in your bed, have someone tape the flexible tape measure on the widest part of your bum, transfer like usual, make sure the tape is still well placed and measure around yourself.
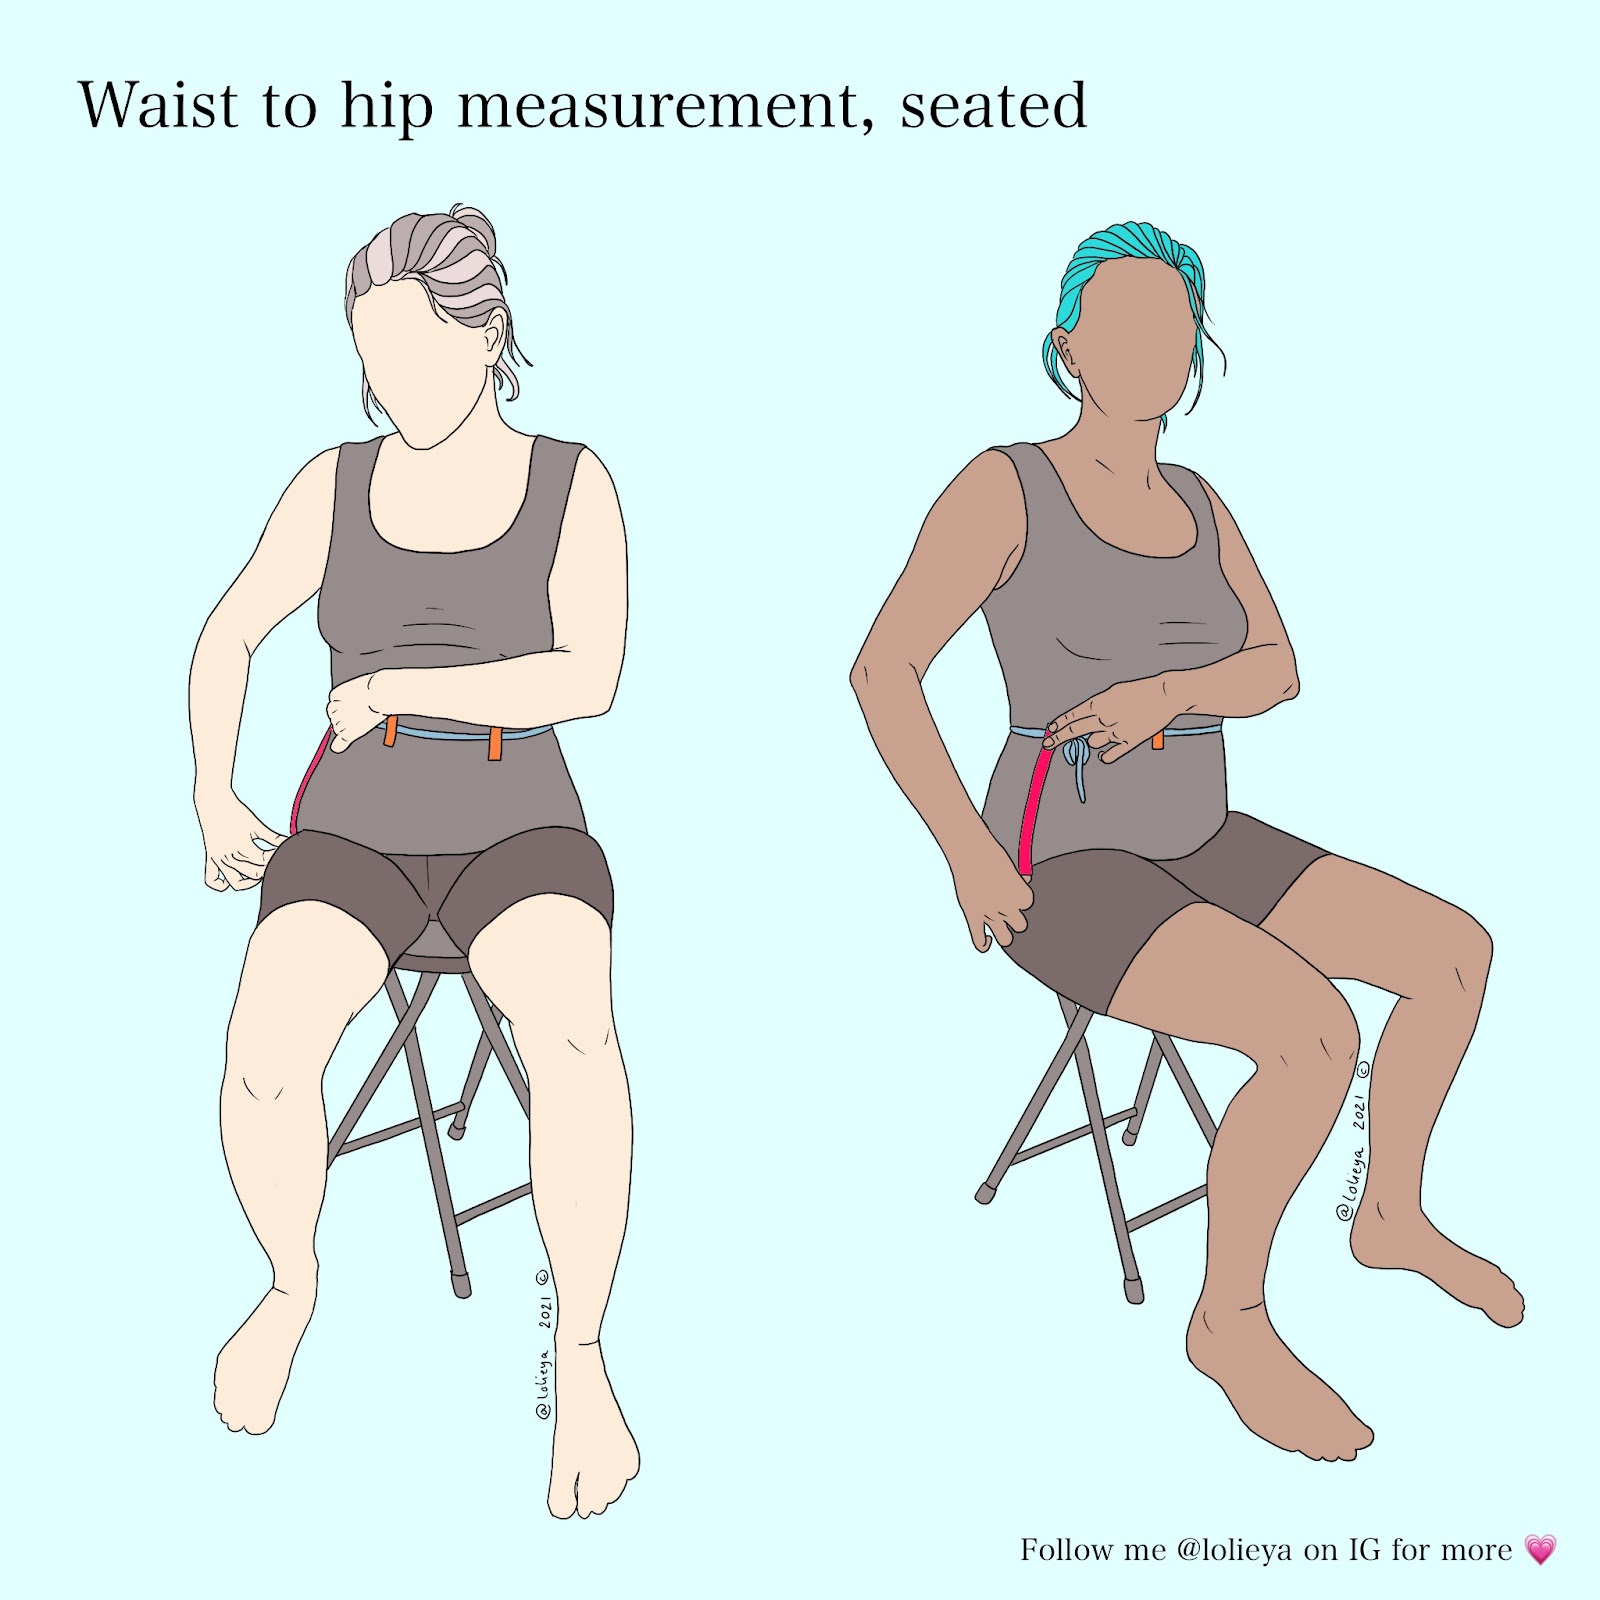
Waist-to-hip measurement
- Measure from your waist string to where your hip line (the tape measure) ended up on the side.
Those are the measurements that I would start with and add in a pattern generator or use for pattern drafting instructions. Then, make a toile of your new pattern and adjust if necessary. Our bodies come in many different shapes, so there might still be some things to fit even if it was made to your own measurements.
If you want to use an existing pattern, choose a your size according to the numbers you found, but know that it wasn’t drafted for someone sitting so there will be lots of other things to adjust. But with these and knowledge in pattern alterations, you can certainly do it. Trousers would be much more difficult than panties to adapt though.
About the MyFit Underwear pattern generator, if centimetres are not your jam, there’s the option to use both centimetres or inches in the pattern generator, so no need to worry! I usually use inches, except when I do pattern drafting. I find centimetres easier to calculate and more precise.
And there you have it! Now, you only have to draft your underwear block using your preferred method or use a pattern generator system and toile your comfortable masterpiece!
Apostrophe Pattern offered me a 15% discount on their patterns for anyone reading this blog post and wanting to try their formula out! This is not an affiliate link, just a discount I asked for you guys because I want you all to be able to feel fabulous in your clothes, no matter your physical needs!
Discount code: SEATED15
Come follow me on instagram @lolieya for more info on fitting for the seated position and all my creative endeavours! Thanks Sew Busty for having me

Lolie (he/her) sews because she likes wearing comfortable, cute clothes and cute clothes that fit are a rarity for wheelchair users like her. Wearing garments that she feels good in is a way to care for herself, feel empowered and relax through stressful medical stuff and, just, life. You can find Lolie on Instagram @lolieya.


0 Comments